Car windshields are a lot tougher than plain old plate glass windows, but after thousands of miles of driving they can get chipped, cracked, or completely broken. Small chips can sometimes be repaired but serious cracks cannot be fixed safely. And though it may be possible (if a bit distracting) to drive a car with a cracked windshield, in many states it’s not even legal — if your windshield is cracked badly enough (check your state’s laws) you’ll need to have it replaced.
If you find yourself in this position, you may be wondering: can I replace it myself? The answer turns out to be a carefully qualified “maybe,” provided you are prepared for some hard work and possibly some frustration.
Make no mistake: replacing a windshield is not a simple matter, and for many people professional installation is worth the cost. You’ll need several specialized tools (some of which can be rented) and various supplies, so if you don’t have these on hand already you won’t save much money.
Also, before embarking on a complex repair yourself it’s worth checking with your insurance company. Some states require insurance to replace a broken windshield for free (with zero deductible) regardless of what sort of policy you have, and in other states, low or no-deductible windshield replacement is common even when it’s not required.
But if you’re considering doing the replacement on your own, here’s how to go about it. We suggest reading this entire set of instructions, and probably watching a couple of video guides, before deciding whether you’re ready to tackle this repair yourself.
Part 1 of 1: Install a new windshield
Materials Needed
- “Cold knife”
- Electric knife
- Glass cleaner
- Molding
- Primer
- Protective gloves
- Razor blade scraper
- Scuffing pad
- Suction cup window holders
- Urethane
- Urethane application gun
- Urethane scraper
Windshield
Note: Compare the prices of new and use windshields for the best deal, making sure the condition of the used windshield is very good.
Note: For many cars, a specialized tool for removing the trim around the windshield is needed; ask your parts store or dealer.
Part 2 of 9: Remove the windshield
Almost every car has some sort of trim surrounding the outside edge of the windshield. Usually this needs to be removed very carefully if you’re to avoid damaging it. Don’t just tug on it; check with your dealer or qualified mechanic to see whether there’s a special tool for your particular car; often there is, and the relatively small cost will pay off in a much neater repair.
Step 1: Remove molding. If the molding is simply stuck on, you’ll probably be able to pull it away without a specialized tool.
Unless you’re very careful and a little lucky, you’ll need to buy a new molding to replace it.
Step 2: Remove the rearview mirror and stickers. Remove the rearview mirror, if glued to the glass, and scrape off any registration or inspection stickers carefully.
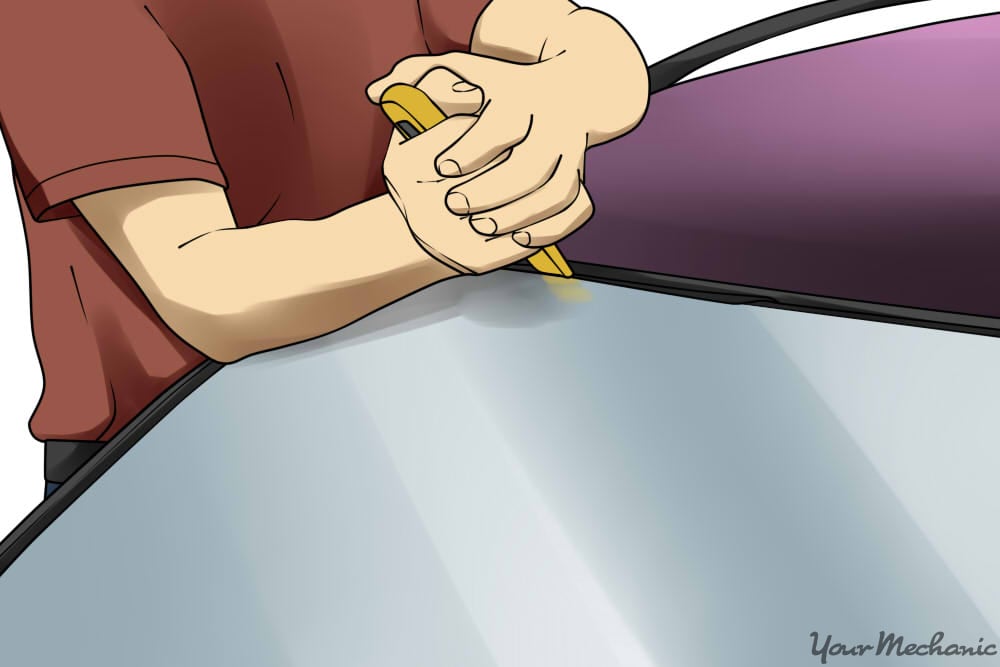
Step 3: Cut around the windshield. Using your cold knife, work your way around the entire windshield from the outside of the car, cutting through the urethane bead.
Don’t worry about cutting closely, but do be sure not to nick the paint. Work slowly and patiently.
Step 4: Press out from the inside. When you think you’re done, press upward from the inside.
You’ll probably find that some spots remain stuck. Keep at it.
Note: If you can’t get at the entire bead with your cold knife (possibly because the windshield is too close to the metal on one edge), you’ll have to attack the urethane from the inside of the car.
- Warning: This is much easier with an electric knife but can be quite tricky to do without damaging the rest of the car.
Step 5: Lift windshield out. Once the entire windshield is free, use your suction cup handles to lift it out.
Step 6: Scuff the inside edge. If you’ll be installing a new windshield, use a scuff pad to scuff the inside edge where it will stick to the urethane.
If you’ve obtained a used windshield, scrape off the old urethane (ideally leaving a very thin layer, as the new urethane will stick better to it). Scuff any bare spots as you would with a new windshield.
- Tip: Use a specialized glass cleaner to ensure that the windshield is completely clean.
Step 7: Remove most of the urethane bead. Use your urethane scraper to remove most of the urethane bead that remains on the car.
Try to leave a thin layer (a millimeter or so), because new urethane will adhere best to old urethane.
Step 8: Check carefully for any scratches in the paint. If you see any bare metal, you must apply primer paint to prevent rust down the road.
You can use touch-up paint on any visible scratches after the new windshield is in place. Apply a primer designed to work with the urethane you’ve chose.
- Tip: Apply it to the glass, if the manufacturer recommends that.
Step 9: Cut the urethane tube. Cut the tip of the tube of urethane, making a triangular hole.
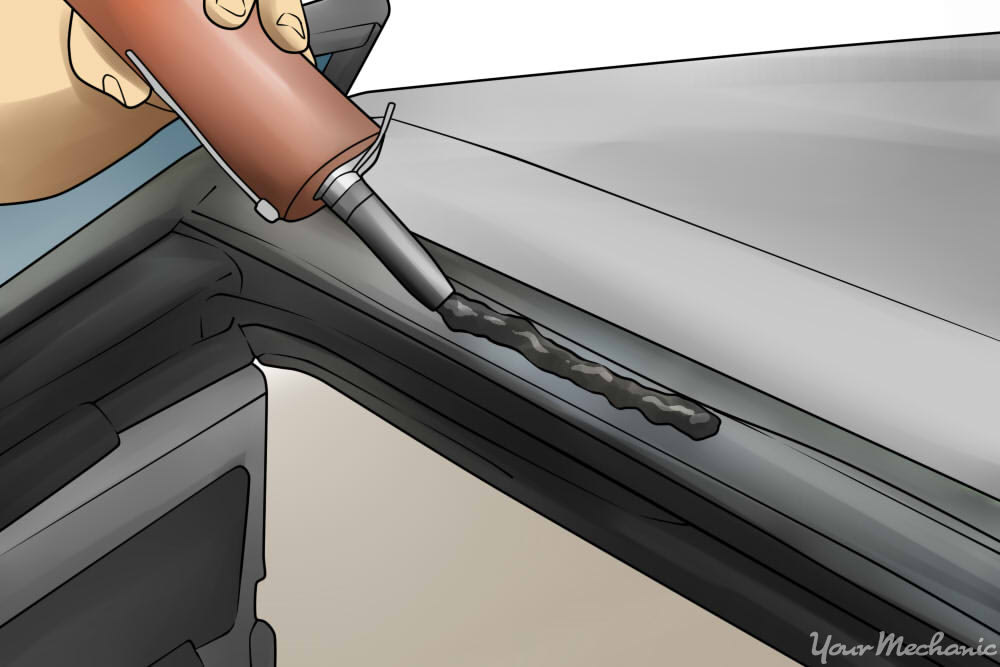
Step 10: Apply a bead of urethane. Using your urethane gun, apply a fairly thick, continuous line (called a bead) of urethane all the way around the edge where the windshield will rest.
Overlap the ends of the bead a little when you’ve made it all the way around. It’s critical that the bead be continuous, so check for gaps before moving to the next step.
But don’t move too slowly: depending on the urethane, you may have about fifteen minutes to work with it.
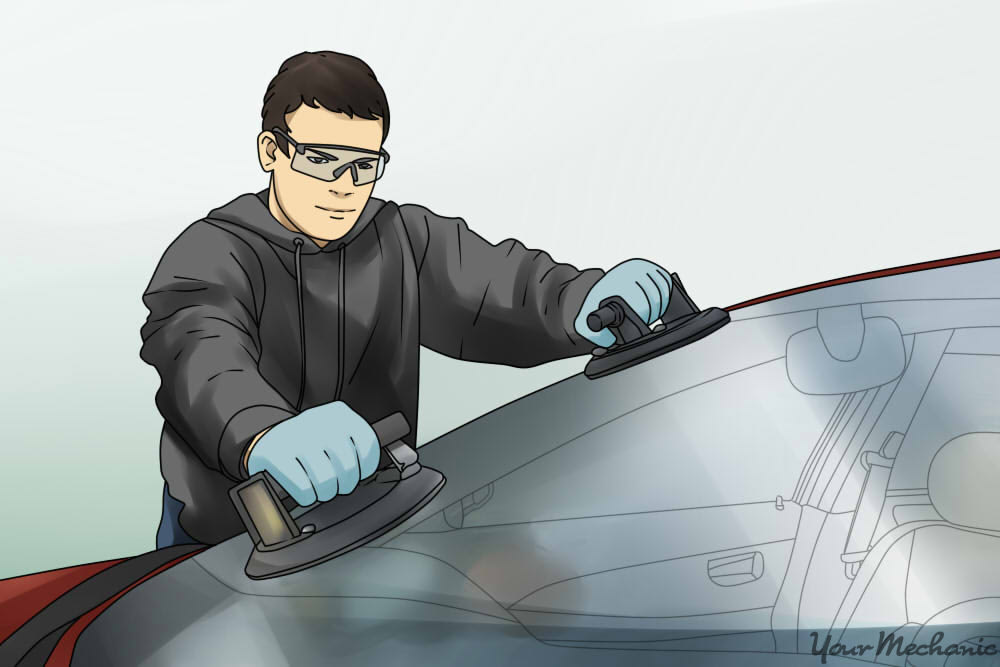
Step 11: Place the new windshield into position. Using the suction cup handles, carefully place the new windshield into position.
Don’t plan on sliding it around once you’ve set it down; instead, you need to lower it into the right position the first time.
Try very hard to leave a small gap between the glass and the edges of the windshield recess, all the way around the windshield. That’s so that if you ever have to do this again, you’ll be able to fit your cold knife between the glass and the metal.
- Tip: You may need to use small spacers (thin strips of wood or cardboard) to keep the windshield from sliding downward.
Step 12: Apply pressure to the windshield. When you’re satisfied that the windshield is in the right place, tamp it down with medium pressure, all the way around the edge.
Step 13: Replace trim. Replace any trim or molding you removed — the specifics will vary from car to car.
Step 14: Touch up paint. Touch up any scratches in the paint that you may have caused.
Step 15: Allow the urethane to cure. Check the specifications of the urethane you used for curing time.
Urethane gets stronger over time, depending on the particular type and on the curing temperature. A typical urethane allows allows about fifteen minutes between application of the bead and installation of the windshield.
Note: Some urethanes allow for safe driving within an hour of installation; others may require longer. It’s best to wait until the urethane is completely cured before washing it; this may be 24 hours, or considerably longer, depending on temperature and the urethane you use.
Warning: Until the urethane is completely cured, it’s advisable not to close the doors hard unless you’ve first cracked a window, because otherwise the sudden rise in air pressure can pop the newly-installed windshield out.
If you’ve made it this far, you’re either excited about getting started, or are rethinking your plan to perform this repair yourself. If you’re going to do it, head to the auto parts store and ask them what are the best materials to use for your particular car. If you want some help understanding the process, Ask a Mechanic for some quick, helpful advice to give you a better sense of how it works.
