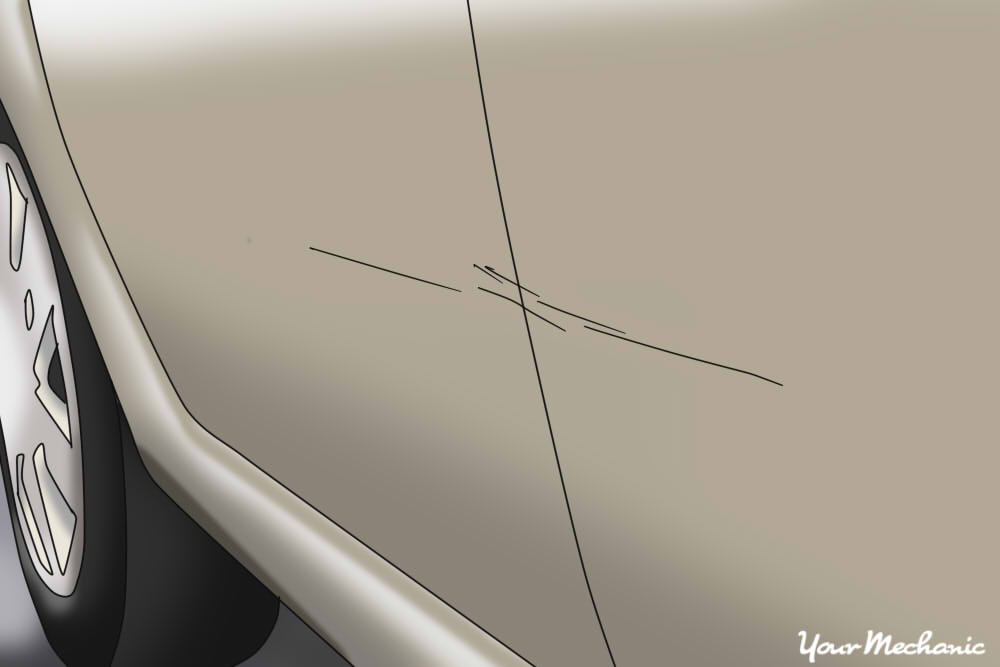
Your car’s paint job is more than just for looks. Its purpose is actually to protect your car’s metal panels from corrosion and rust that can quickly destroy it. If you drive your car under normal circumstances, it’s inevitable that you’re going to experience a paint scratch or chip at one time or another. It can be caused by a number of factors including:
- A stone kicked up by a passing vehicle
- A door ding in a parking lot
- A rust spot breaking through your paint
Paint blemishes, if they are left unrepaired, can not only make your car appear worn and old but can rust, corrode, or spread. That means more costly repairs that must be done by specialized body shops.
The best time to treat a paint scratch is as soon as you discover it. Have matching touchup paint on hand in the event you need to use it. Touchup paint can be found at auto parts stores and your car dealership’s parts department. Be sure to select the correct paint based on your car’s paint code, found on the driver’s door pillar information label.
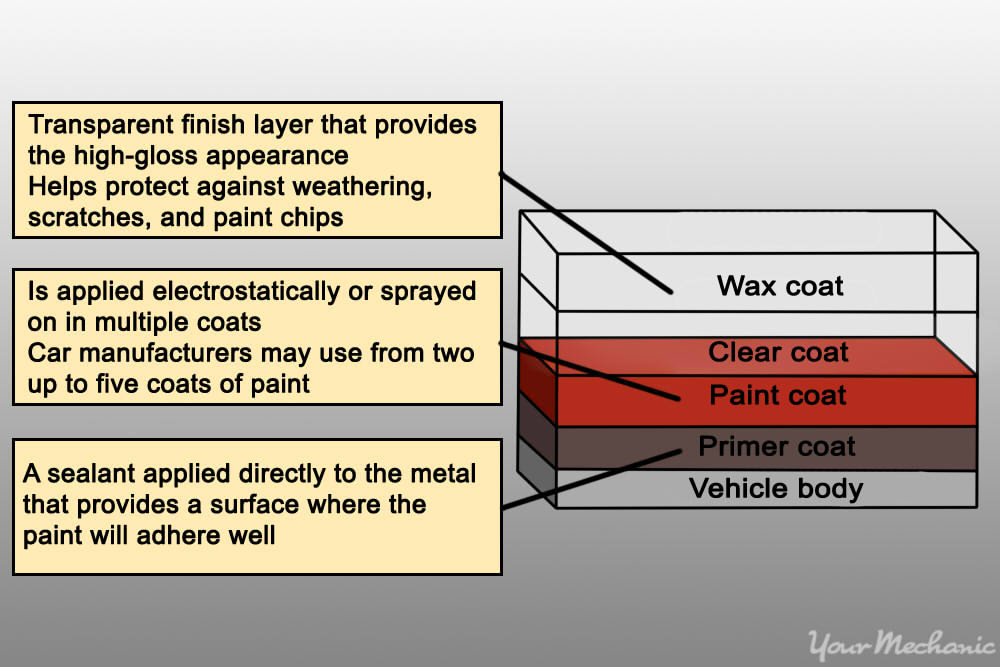
The paint on your car has multiple layers as seen in the illustration below:
Unfortunately, it is a harsh environment that cars drive in. There are stones, dirt, gravel, and other debris that litter the roadway. Objects can get kicked up into the air by vehicles driving in front of your car, or even by your own vehicle. When those objects - however small they may be - hit the paint on your car, paint damage can easily result.
Part 1 of 4: Determining the type of damage
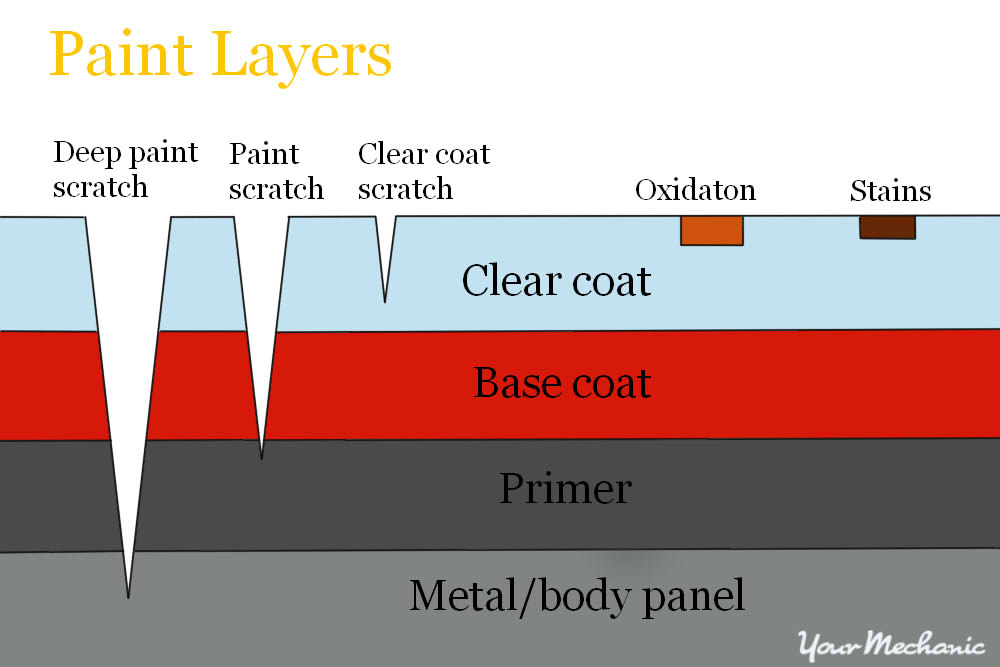
Your vehicle’s exterior is made up of four different layers: the clear coat, paint, primer, and metal body. Scratches that penetrate each of these four layers will appear differently depending on the color of your vehicle.
Step 1: Check for depth. Being able to determine the depth of a scratch is extremely important because the the depth will affect both the difficulty and cost of the repair.
The above diagram is helpful for visualizing the layers of your vehicle’s exterior and how a scratch affects each layer.
Paint chips are usually no larger than the size of an eraser on a pencil. Without being treated and repaired, however, they can begin to oxidize. This allows moisture to permeate underneath the paint around the paint chip. Rust will form on steel surfaces and a much more extensive repair will be required to restore the area to its original condition.
- Tip: If you are having trouble determining how deep the scratch is, a good rule of thumb is to assume it’s one level deeper than you think. For example, if you’re not sure if a scratch has gone through your clear coat and paint, base your repairs as if it has gone through both layers. This way you can guarantee that the correct repair was made.
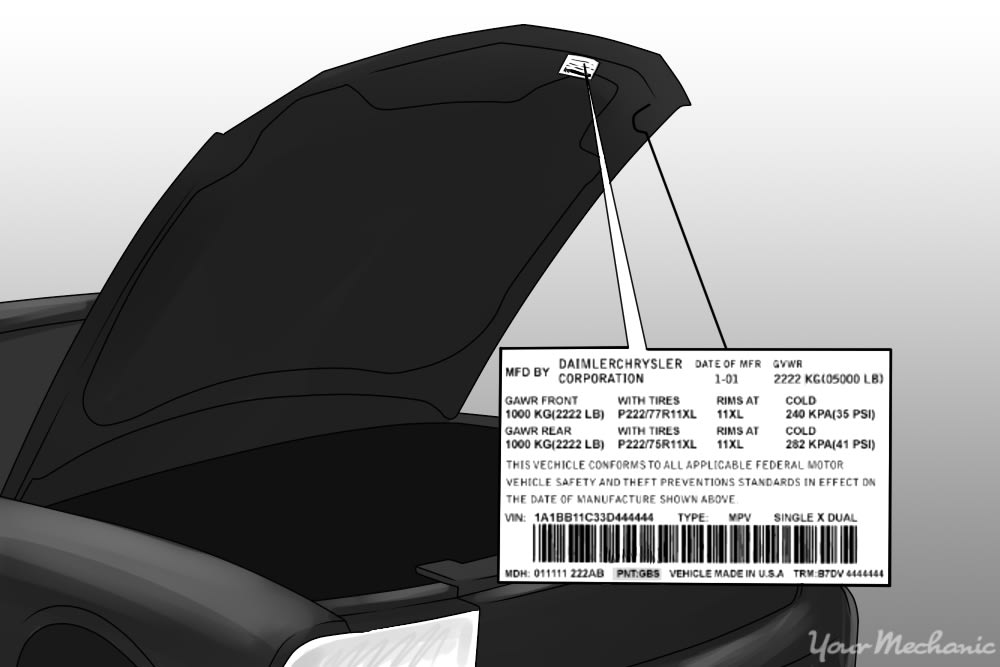
- Tip: Obtain your touch-up paint from a reputable automotive parts retailer or body shop. Match it up with your car’s paint code that you will find on a placard under the hood or on the driver’s side door pillar.
Part 2 of 4: Preparing the paint for repair
Materials Needed
- Bucket of soap and water
- Clean cloth or towel
- Sandpaper (2000-grit)
- Toothpaste
Step 1: Wash the car: You should always begin any repair to your vehicle’s body by washing the affected area.
A clean workspace will ensure that dirt and dust don’t cause any further abrasions to your vehicle's exterior.
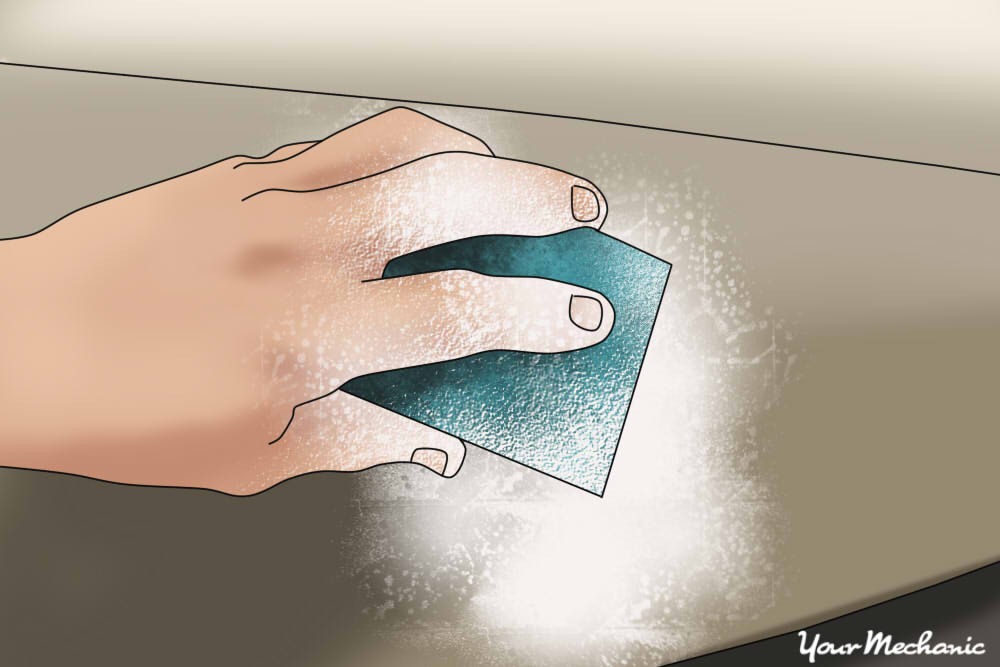
Step 2: Sand the affected area. After washing the affected area, you will want to sand the area surrounding the scratch.
Sanding makes the affected area smooth, allowing for a consistent look when new paint is applied.
If the scratch covers a large area you’ll want to use sandpaper. If the scratch is small, you may be able to use toothpaste
- Note: You may not need to sand scratches that have affected the clear coat only. Because it is only the top-most layer of your vehicle’s exterior, it is the easiest to repair. If you are sure the scratch has only affected the clear coat, skip to Part 3.
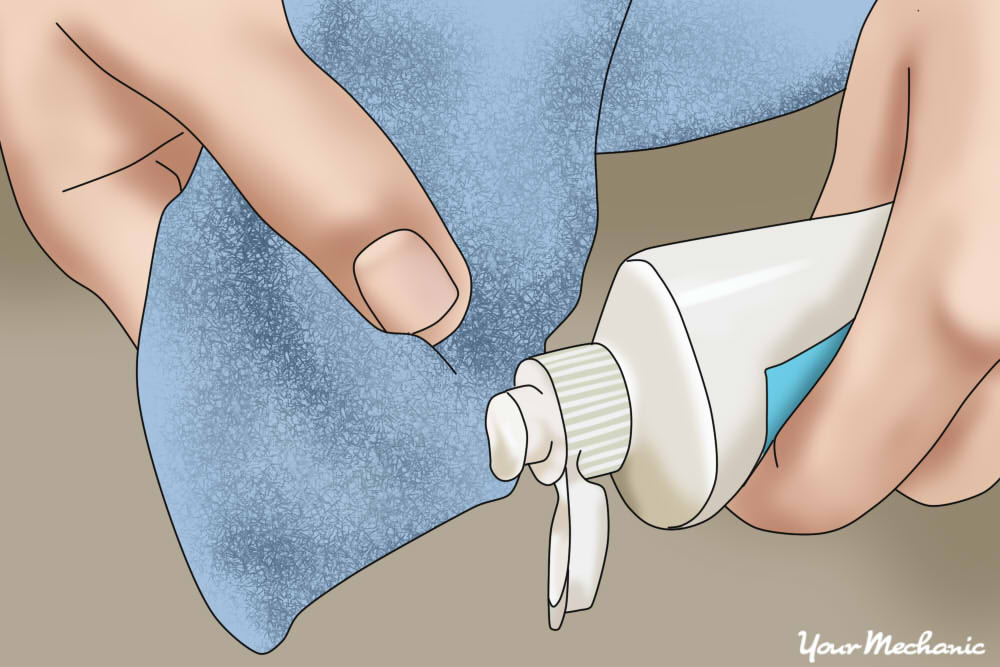
Step 3: Apply some toothpaste. For small scratches or chips, you may be able to sand the affected area using your common household toothpaste. While this may sound strange, toothpaste has the same abrasive properties as a fine sandpaper.
Dabbing a small amount of toothpaste onto a cotton swab or clean cloth and rubbing it in a circular motion on the affected area with smooth the scratch and ready it for new paint.
Step 4: Sand the scratch. For scratches that take up a larger area, you’ll want to use sandpaper.
Use a fine sandpaper - one that is 2000-grit should work fine. Sandpapers that are more coarse could inadvertently remove further layers of the exterior, causing further damage and more money spent on repairs.
Using small, circular strokes, rub the sandpaper around the affected area, wiping occasionally with a clean cloth to remove any flecks of paint or primer that been removed.
Part 3 of 4: Repairing shallow scratches
Materials Needed
- Clean cloth
- Rubbing compound
- Soap and water
Note: Most car waxes come with an applicator (usually a foam pad). If you don’t have an applicator, a microfiber towel can be used as a substitute.
Many small and shallow scratches (ones that have gone through the clear coat only) can be repaired by using a combination of rubbing compound and wax. Rubbing compound works in much the same way as fine sandpaper or toothpaste, smoothing the surface of your vehicle.
Step 1: Wash the affected area. It is important to make sure that you are working with a clean surface.
Be sure to wash and dry the affected area of the vehicle with soap and water.
Step 2: Apply the rubbing compound. Start by applying a small amount of rubbing compound to a clean cloth.
By starting with a small amount and adding more as needed, you ensure you do not remove any more of the vehicle’s clear coat than is necessary.
Step 3: Rub in the compound. Rub the compound on the area in small, vigorous circles.
You should begin to notice the scratch disappear. When the scratch is completely gone, you can move on to waxing.
Step 4: Apply the wax. By applying wax to the repaired area, you’re essentially replacing the worn down clear coat.
Using a thin layer of wax, gently apply to the car’s surface in a circular motion, using a microfiber or other clean cloth to wipe away the haze.
Step 5: Wash the vehicle again. Washing the vehicle after waxing will reveal the quality of the wax job.
A well-waxed car should repel water, beading on the surface of the car.
Part 4 of 4: Repairing deep blemishes
Materials Needed
- Painter’s tape
- Primer
- Sandpaper (1500-grit)
- Scuffing pad
- Touch-up kit of paint
- Wax
Scratches or chips that have penetrated your vehicle’s paint and primer require additional repair including the application of new paint and primer. Deep blemishes, if left untreated, will be more prone to rust and should be dealt with in a timely fashion.
Step 1: Find a touch-up kit that matches your paint. Expecting that scratches will happen, many companies sell what are called “touch up kits,” which allow the user to repair scratches using the vehicle’s original car color.
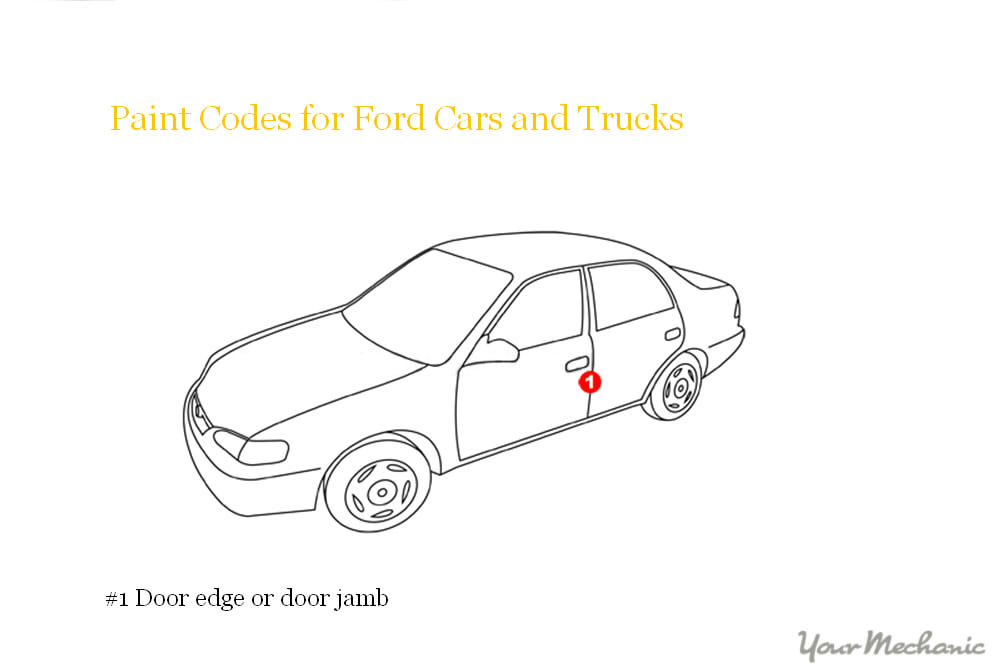
When considering repairing the paint and primer on your vehicle, you should first find a kit that matches your vehicle’s factory color. Your vehicle's paint color has an associated code. This code can be found in a number of different places depending on the make, model and year. Automotive Touch Up has created a helpful database to help you find your vehicle’s code.
- Note: While you can buy automotive paint and primer separately, kits are convenient because they usually provide applicator tools which can be especially helpful when working with small scratches.
Step 2: Prepare the surface. Before painting, you’ll want to prepare the area as described in Part 2.
For deeper scratches, you may need to use a more coarse sandpaper (1500 grit) to break down the surrounding area.
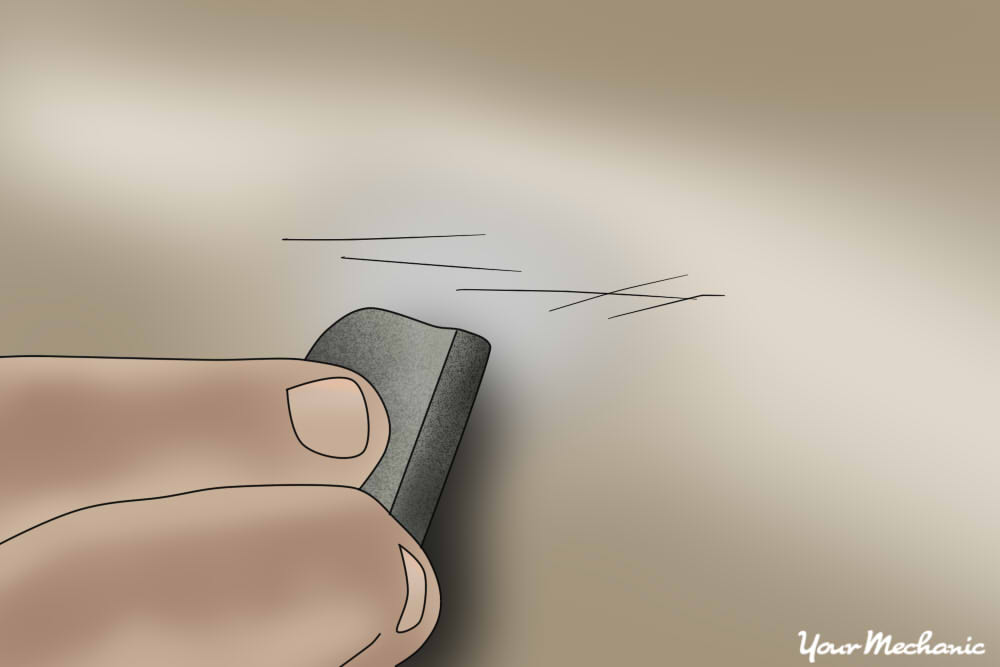
Step 3: Scuff the surface. To further break down the affected area and prepare it for new paint, use a scuffing pad.
Scuffing pads create a rough surface, which is easier for the paint to stick to.
Rub the scuff pad along the path of the scratch back and forth until the surface feels rough to the touch.
- Note: Use caution when using a scuff pad that you don’t cause abrasions on parts of your vehicle's paint that are still good. You can always cut a scuff pad to make it small, decreasing the chance of a mistake.
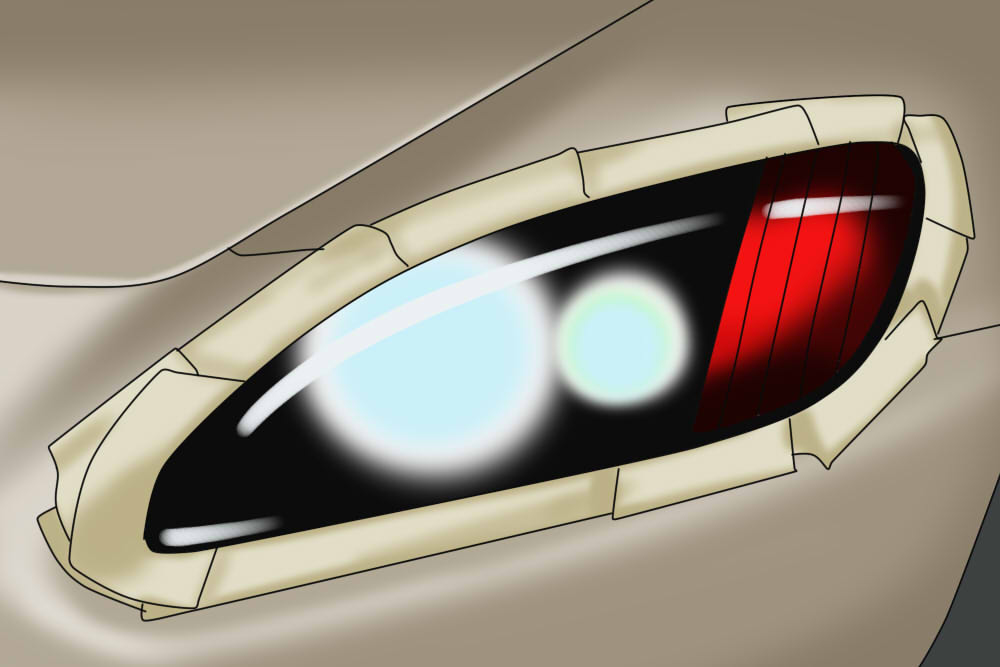
Step 4: Tape off the headlights. Use painters tape to tape off areas like the headlights that you don’t want to be sprayed by the paint.
Step 5: Apply primer. If the scratch has gone through the primer, you should first add a few coats of new primer to the affected area using a brush or pen (usually provided in most touch-up kits).
Let the primer dry overnight before adding paint.
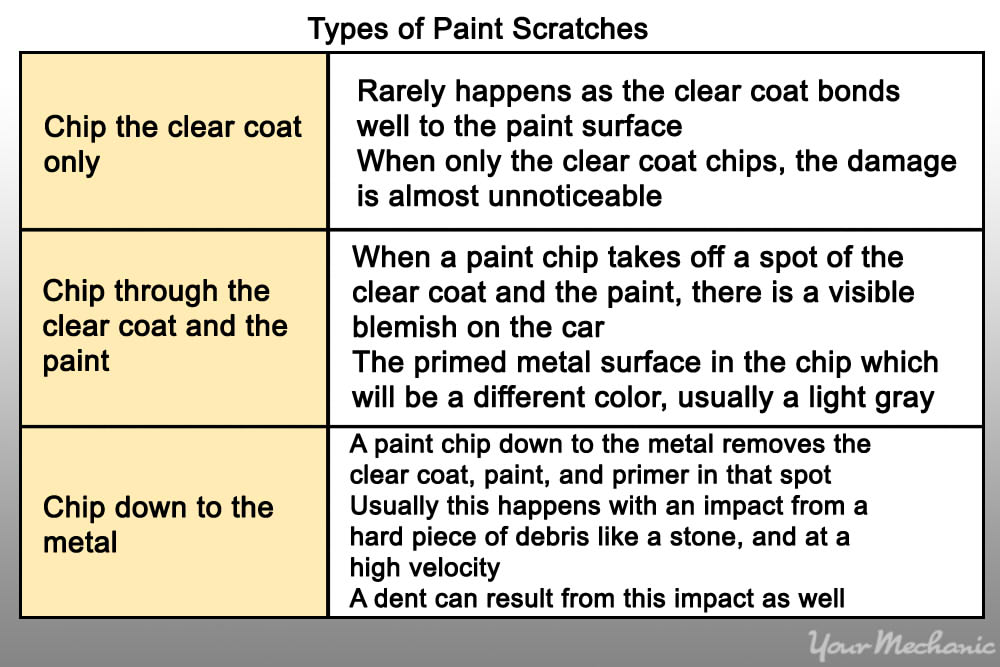
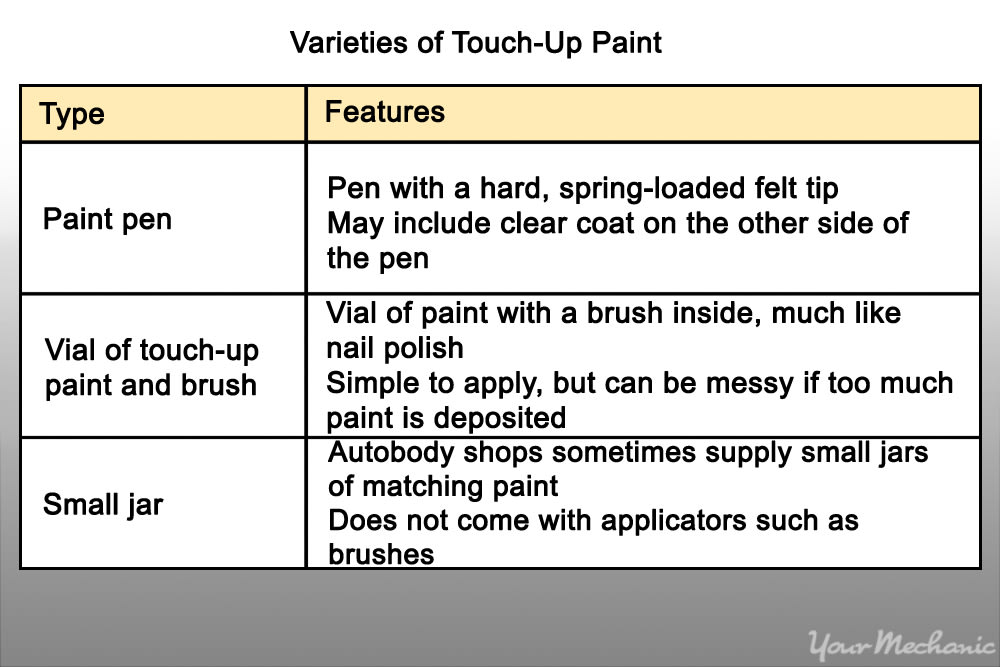
There are several varieties of touch-up paint you might come across for your vehicle, which are presented in the table below:
Step 6: Shake the touch-up paint well. This is especially important if there are metal flecks in the paint or if the area being painted is larger than a dime.
Shake the paint for a minimum of 30 seconds to ensure that the paint will leave an even color deposit.
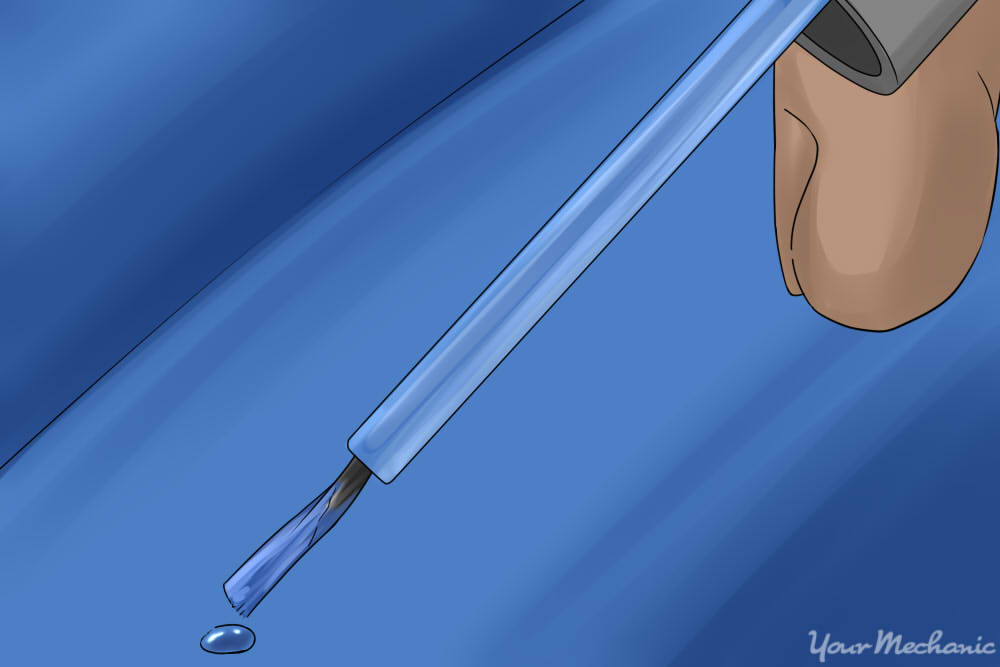
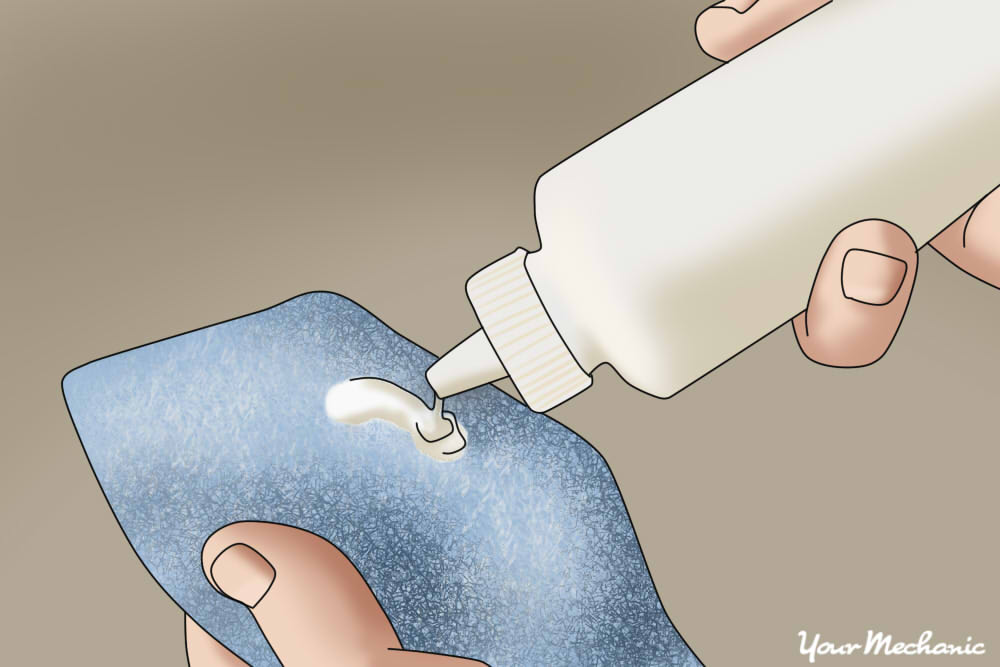
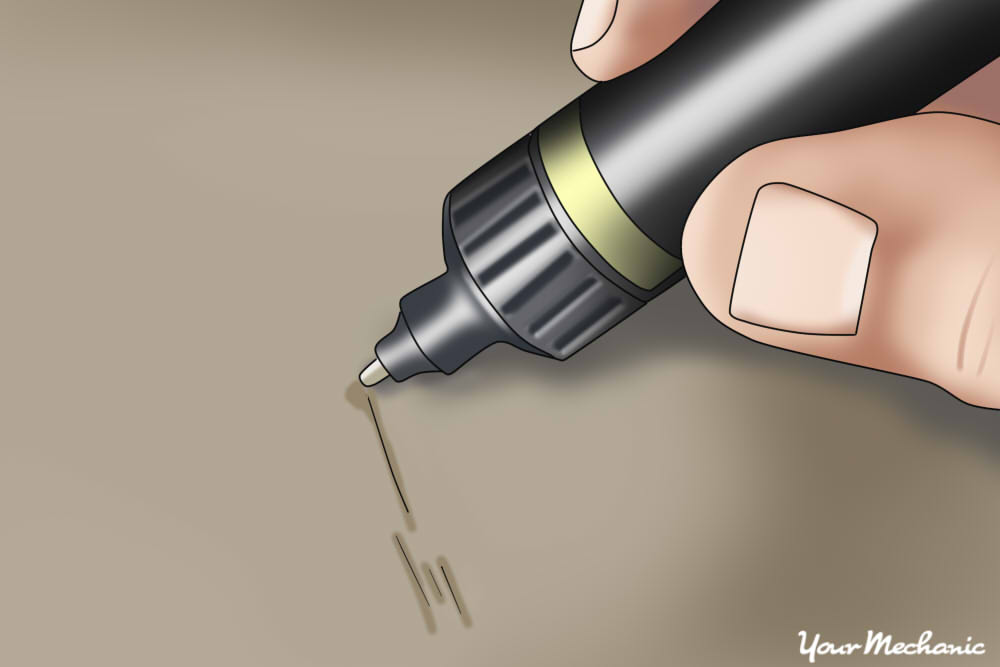
Step 7: Dab the touch-up paint onto the paint chip. Use just enough paint to create a layer of paint that touches all edges of the chip.
Allow the touch-up paint at least 15 minutes to dry. It must be dry to the touch before you continue.
- Note: When adding new paint, test to make sure that the paint matches. You may not be able to tell if the paint matches until you apply it to the car. If the paint does not match, wipe it off and find a matching tint. If the paint does match add a few coats and allow it to dry. Ideally, you should try to paint when weather conditions are conducive to drying (above 50° F).
Step 8: Use thin layers. When applying paint, be sure to use thin layers, slowing building up until the replacement paint matches the original paint.
- Tip: If you apply too much paint and the finished product looks too thick, or inconsistent with the rest of the vehicle, you can use a fine sandpaper to smooth the paint.
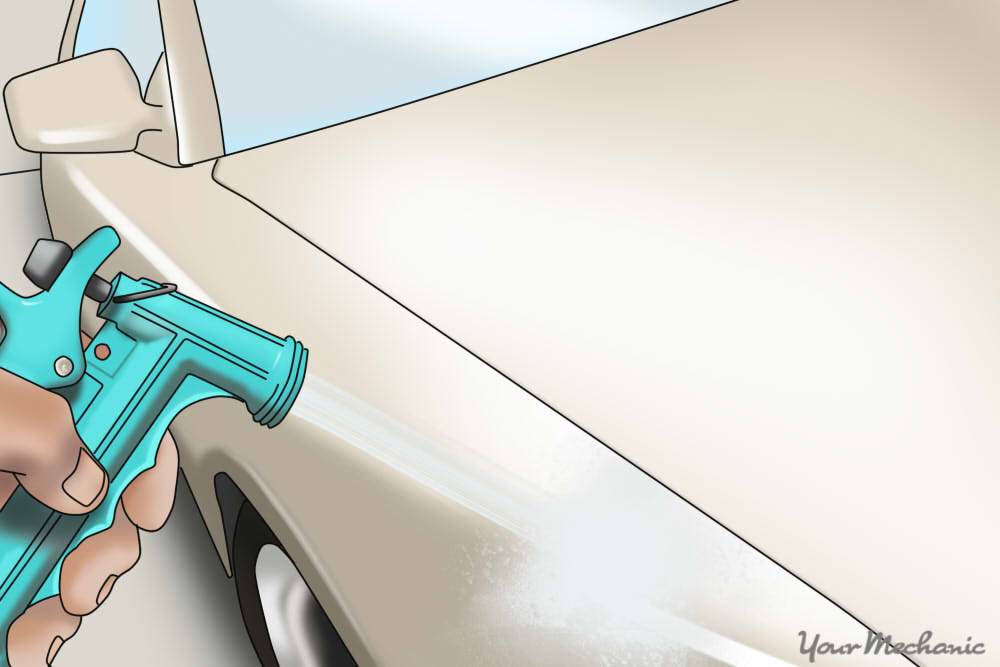
Step 9: Re-apply clear coat. After letting the paint dry (up to 2 days depending on weather conditions), you can apply a new layer of clear coat onto your vehicle.
Replacement clear coat typically comes in an aerosol can and can be sprayed directly onto the vehicle.
Note: For large paint jobs (whole panels and larger), it is recommended that you wait up to 60 days before waxing. In this time, the paint is releasing vapor which may get trapped underneath the wax, expanding and causing unsightly bumps.
Tip: For scratches on non-metallic parts of the car, especially plastic bumpers, you can purchase matching automotive spray paint to fix the scratch.
Part 4 of 4: Wax the repaired paint
Step 1: Wax the area. Wax the repaired paint chip area with the car wax you normally use. The wax will cover the dull appearance from sanding the paint chip.
Step 2: Wax the whole vehicle. To prevent a small section of your car from being shinier than the rest of your paint, apply a coat of wax to the whole car.
Overall, touching up your car paint is a straightforward job that you can accomplish on your own. If you care about the appearance of your paint, the instructions above will help you restore the look of your vehicle so that it looks clean and new. If you are curious about learning how to take care of an even larger paint job, follow the steps in our article. You’ll achieve the best uniform results by applying a full coat of wax to your entire car. This will blend the freshly-waxed, repaired spot so it doesn’t stand out.
