Every vehicle is equipped with a fuel gauge to tell the driver how much fuel is left in the fuel tank. A fuel pump is a device that creates a flow to transmit the fuel from the fuel tank to the fuel rail.
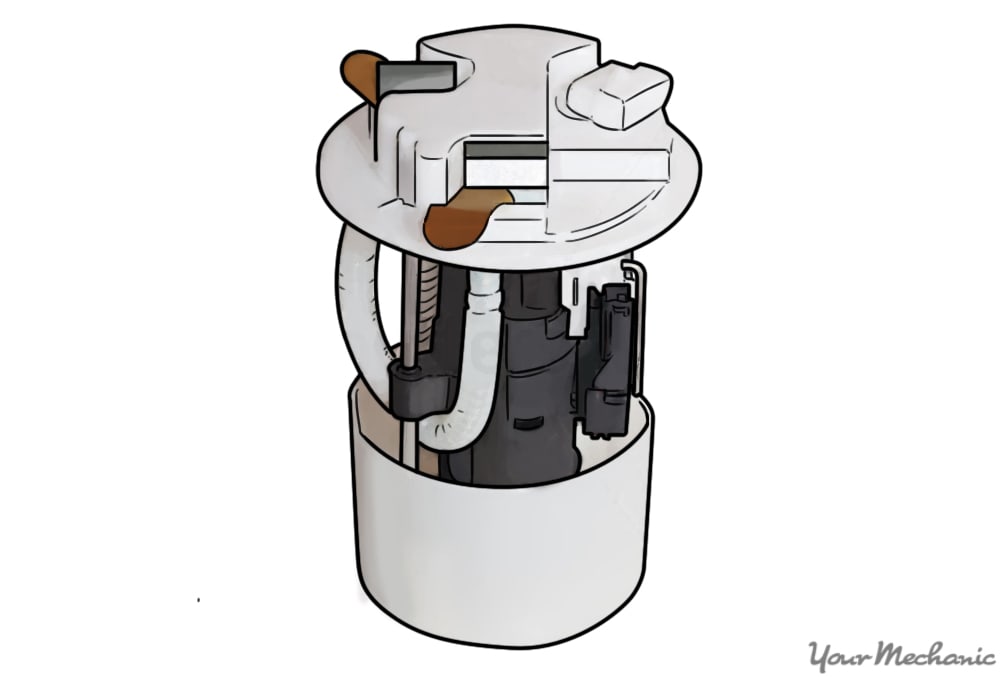
The fuel pump is located in the fuel tank and attached to the fuel gauge sender. The pump has gears or a rotor inside it to create a flow to push the fuel through the fuel lines. The fuel pump usually has a screen on it to keep out the large particles. Most pumps today have filters in them to screen out the small particles.
The fuel pump on an older vehicle before fuel injection was introduced to the automotive industry was attached to the side of engines. These pumps worked like water pikes that pushed up and down to create a flow. There was a rod on the fuel pump that would be pushed down by a cam lobe on the camshaft. It would not matter if the camshaft was out of timing or not.
Some older vehicles would break off the cam lobe on the camshaft causing the fuel pump to fail. Well, a quick fix to get fuel to the fuel management system was to use a 12 volt electric fuel pump. This electronic fuel pump is good, but can create too much flow for the volume of the fuel in the lines.
Fuel pump signs of failure
As the fuel is constantly being filled at the pump, drained by engine operation, and sloshed around due to driving conditions, the fuel pump constantly heats up and cools down causing the motor to burn slightly. Over time, the motor will have burned enough to cause too much resistance on the electrical contacts. This will make the motor stop working.
When the fuel is low all the time, fuel pumps tend to operate a hotter temperature causing them to burn the contacts up. This will also make the motor stop working.
With the fuel pump working, listen for unusual noises and high-pitched whining noises. This can be a sign of the gears wearing out inside the pump.
When driving the vehicle around during a test drive throttle the engine hard to demand the fuel management system for more fuel. If the fuel pump is working the engine will accelerate quickly; however, if the fuel pump is failing or has failed then the engine will stumble and act as it wants to shut off.
- Warning: Do not use starting fluid to start an engine with a failed fuel pump. This will damage the engine.
Other things that happen to cause failure to the fuel pump is the type of fuel is poured into the fuel tank. If fuel was poured in at a gas station while a gas pump truck is fueling the station, junk in the bottom of the large storage tanks will stir up and end up into the fuel tank of the vehicle. The particles can get inside the fuel pump and increase the resistance as the rotor or gears begin to grind.
If the fuel was poured in at a gas station with very little traffic to the station, there may be an excessive amount of water in the fuel causing the fuel pump gears or rotor to rust and cause more strain on the electric motor or get stuck.
Plus, if any of the wiring from the battery or computer to the fuel pump get corroded will cause more resistance than normal making the fuel pump to stop working.
Fuel gauge sender failure on computer controlled vehicles
If the fuel pump fails, the engine management system will record this event. A fuel pressure sensor will let the computer know if the fuel pressure has decreased more than five psi (pounds per square inch).
Engine light codes related to the fuel gauge sender
Part 1 of 9: Verify the fuel pump condition
As the fuel pump is located inside the fuel tank, there is no real way to check it. However, you can check the electronic plug on the fuel pump for any damage. If you have a digital ohm meter, you can check for power at the plug on the harness. You can check for resistance to the motor through the plug on the fuel pump. If there is resistance but not high, then the electric motor should be in good order. If there is no resistance on the fuel pump, then the electric motor contacts have been burned.
Step 1: Check the fuel gauge to see the level. Document the location of the needle or percentage of the fuel level.
Step 2: Start the engine. Listen for any problems within the fuel system. Check to see how long the engine cranks for. Check for any rotten egg smell as the engine is running very lean.
- Note: The rotten egg smell is caused by the catalyst becoming too hot due to the emissions burning above the pyrometer temperature.
Part 2 of 9: Prepare to replace the fuel pump
Having all of the necessary tools and materials prior to starting the work will allow you to get the job done more efficiently.
Materials Needed
- Allen wrench set
- Boxed end wrenches
- Breaker bar
- Buffer pad
- Combustible gas detector
- 90 degree die grinder
- Drip pan
- Flash light
- Flat tip Screwdriver
- Floor jack
- Fuel resistant gloves
- Fuel transfer tank with pump
- Jack stands
- Needle nose pliers
- Protective clothing
- Safety glasses
- Soft grit sandpaper
- Ratchet w/metric and standard sockets
- RTV silicone
- Torque bit set
- Torque wrench
- Transmission jack or similar type (large enough to support a fuel tank)
- Wheel chocks
Step 1: Park your vehicle on a flat, hard surface. Make sure that the transmission is in Park (for automatics) or in First gear (for manuals).
Step 2: Place wheel chocks around the rear tires that will be remaining on the ground. In this case, the wheel chocks will be around the front tires since the rear of the vehicle will be lifted up. Engage the parking brake to the lock the rear tires from moving.
Step 3: Install a nine volt battery saver into your cigarette lighter. This will keep your computer live and keep your setting current in the vehicle. If you do not have a nine volt battery saver, that okay.
Step 4: Open the vehicle’s hood to disconnect your battery. Take the ground cable off of the battery’s negative post disabling the power to the fuel pump and sending unit.
Step 5: Raise the vehicle. Using a floor jack that is recommended for the weight of the vehicle, lift under the vehicle at its specified jacking points until the wheels are completely off the ground.
Step 6: Place the jack stands. The jack stands should go under the jacking point locations. Then lower the vehicle onto the jack stands. For most modern cars, the jacking points for jack stands will be on the pinch weld just under the doors along the bottom of the car.
- Note. Follow the owner's manual for proper jacking locations**.
Part 3 of 9: Remove the fuel pump
Removing the fuel pump from fuel injected vehicles
Step 1: Open the fuel door to gain access to the fuel filler neck. Remove the mounting screws or bolts attached to the cutaway. Remove the fuel filler cap cable from the fuel neck and place aside.
Step 2: Grab a creeper and tools for the job. Go under the vehicle and locate the fuel tank.
Step 3: Take a transmission jack or similar jack and place it under the fuel tank. Loosen and remove the straps to the fuel tank. Lower the fuel tank a little.
Step 4: Reach up on top of the fuel tank. You will have to feel for a harness attached to the tank. This is the harness for the fuel pump, or sending unit on older vehicles. Disconnect the harness from the connector.
Step 5: Lower the fuel tank more to reach the vent hose attached to the fuel tank. Remove the clamp and small vent hose to allow more clearance.
- Note: Vehicles made in 1996 or after will have a return fuel charcoal canister attached to the vent hose to collect fuel vapors for emissions.
Step 6: Remove the clamp on the rubber hose attaching the fuel filler neck. Twist the fuel filler neck and pull it out of the rubber hose. Guide the fuel filler neck out of the area and remove it from the vehicle.
Step 7: Remove the fuel tank from the vehicle. Be sure to transfer any fuel out of the tank prior to removing the fuel tank.
It is best to have the vehicle at a 1/4 tank of fuel or less when removing the fuel filler neck.
Step 8: Once the fuel tank is out of the vehicle, inspect the rubber hose for any cracks. If there are any cracks, the rubber hose is to be replaced.
Step 9: Clean the harness on the vehicle and the connector to the fuel pump on the fuel tank. Use electrical cleaner and a lint free cloth to remove any moisture and debris.
While the fuel tank is out of the vehicle, it is recommended to remove and replace the one way breather valve on the tank.
If the breather valve on the fuel tank is non serviceable, then you will need to use a pump to check the valves condition. If the valve has failed, you will need to replace the fuel tank.
The breather valve on the fuel tank allows fuel vapors to release into the canister but not allow any water or debris into the tank.
Step 10: Clean any dirt and debris around the fuel pump. Remove the mounting bolts to the fuel pump. You may need to use allen wrenches torques bit to remove the bolts. Put on safety glasses and pull out the fuel pump from the fuel tank. Remove the rubber seal from the fuel tank.
- Note: You may have to rotate the fuel pump to get the float that is attached to it out of the fuel tank.
Part 4 of 9: Remove the fuel pump from carbureted engines
Step 1: Locate the fuel pump that is damaged or failed. Remove the hose clamps that hold on the fuel hose to both supply and feed ports.
Step 2: Place a small drip pan under the fuel hose. Pull the hoses off of the fuel pump.
Step 3: Remove the mounting bolts to the fuel pump. Pull off the fuel pump from the engine block. Pull out the fuel rod from the engine block.
Step 4: Remove the old gasket on the engine block where the fuel pump mounted. Clean the surface the using a fine grit sand paper or buffer pad on a 90 degree die grinder. Wipe off any debris with a clean lint free cloth.
Part 5 of 9: Install the new fuel pump
Installing the fuel pump onto fuel injected vehicles
Step 1: Install a new rubber gasket to the fuel tank. Install the fuel pump with the New float into the fuel tank. Install the mounting bolts to the fuel pump. Tighten the bolts hand tight then an additional 1/8 turn.
Step 2: Place the fuel tank back under the vehicle. Wipe out the rubber hose on the fuel tank with a lint free cloth**. Place a new clamp onto the rubber hose. Take the fuel filler neck and twist it into the rubber hose. Put the clamp in place and tighten up the slack. Allow the fuel filler neck to twist but not allow the clamp to move.
Step 3: Raise up the fuel tank to the vent hose. Attach the vent hose with using a new clamp. Tighten the clamp until the hose will not twist and turn 1/8 turn.
- Warning: Make sure that you do not use the old clamps. They will not hold tight and cause a vapor leak.
Step 4: Raise up the fuel tank all the way up to align the fuel filler neck to the cutaway. Align the fuel filler neck mounting holes. Lower the fuel tank and tighten the clamp. Keep the fuel filler neck from moving.
Step 5: Raise up the fuel tank to the harness. Connect the fuel pump or sending unit harness to the fuel tank connector.
Step 6: Attach the fuel tank straps and tighten them up till they stop. Torque the mounting nuts to specifications on the fuel tank using a torque wrench. If you do not know the torque value, you can tighten the nuts 1/8 turn more with blue locktite.
Step 7: Align up the fuel filler neck to the cutaway in the fuel door area. Install the mounting screws or bolts into the neck and secure it tight. Attach the cable of the fuel filler cap to the neck. Screw on the fuel filler cap until it locks in place.
Part 6 of 9: Install the fuel pump onto carbureted engines
Step 1: Put a little amount of RTV silicone onto the engine block where the gasket came off of. Let stand for about five minutes and put on the new gasket.
Step 2: Install the new fuel rod into the engine block. Place the fuel pump onto the gasket and install the mounting bolts with RTV silicone on the threads. Tighten the bolts hand tight then additional 1/8 turn.
- Note: The RTV silicone on the bolt threads will prevent any oil leaking out.
Step 3: Install new clamps onto the fuel hoses. Install the fuel hoses to the supply and feed ports of the fuel pump. Tighten the clamps up tight.
Part 7 of 9: Check for leaks
Step 1: Open the vehicle’s hood. Reconnect the ground cable back onto the battery’s negative post.
Remove the nine volt battery saver from the cigarette lighter.
Step 2: Tighten the battery clamp up tight to ensure that the connection is good.
- Note: If you did not have a nine volt battery saver, you will have to reset all of the settings in your vehicle, like your radio, electric seats, and electric mirrors. If you had a nine volt battery saver, you will need to clear the engine codes if any before starting the vehicle up.
Step 3: Turn the ignition key on. Listen for the fuel pump to activate. Turn off the Ignition after the fuel pump stops making noise.
- Note: You will need to cycle the ignition key on and off 3 to 4 time to ensure all the fuel rail is full of fuel.
Step 4: Use a combustible gas detector and check all of the connections for any leaks. Sniff the air for any fuel odors.
Part 8 of 9: Lower the vehicle
Step 1: collect all tools and your creeper and place them out of the way.
Step 2: Raise the vehicle. Using a floor jack that is recommended for the weight of the vehicle, lift under the vehicle at its specified jacking points until the wheels are completely off the ground.
Step 3: Remove the jack stands and keep them far away from the vehicle.
Step 4: Lower the vehicle to where all four wheels are on the ground. Pull out the jack and put it aside.
Step 5: Remove the wheel chocks from the rear wheels and put the aside.
Part 9 of 9: Test drive the vehicle
Step 1: Drive the vehicle around the block. During the test, listen for any unusual noise from the fuel pump. Also, accelerate the engine quickly to make sure that the fuel pump is working correctly.
Step 2: Monitor the dash for the fuel level and for any engine light to appear.
If your engine light comes on after replacing the fuel pump, then there may be further diagnosis of the fuel pump assembly or a possible electrical issue within the fuel system.
If the problem persists, then you should seek out help from one of our certified mechanics who can inspect the fuel pump and diagnosis the problem.
