
Weather pack connectors started off as a Delphi product and quickly became commonplace in the automotive world. Most wiring systems use weather pack connectors in their assembly due to their benefits when compared to standard connectors. Weather pack connectors are able to protect from dirt, corrosion, and moisture, allowing them to last longer in the demanding conditions found under the hood of your vehicle.
These connectors can still fail over time and eventually need to be replaced or repaired. This is why it is important to recognize how and when the electrical system can be damaged.
At any point, the professionals at YourMechanic are always willing to help. If you have additional questions during the weather pack connector assembly, do not hesitate to Ask a Mechanic.
This article will explain how to assembly weather pack connectors, whether you are building your own custom wiring harness for a performance vehicle, or you are simply replacing an old weather pack connector.
Part 1 of 2: Preparing the wiring
Materials Needed
- Terminal tool for weather pack connector
- Weather pack kit
- Weather pack crimp tool
- Wire
- Wire stripper and cutter

Step 1: Install the correct seal. Select the correct size seal and put it over the wire.
This should be a tight fit as this will be part of the seal for the connector.
The seal is directional and the ribbed end should face away from the end of the wire.

Step 2: Strip the wiring. Use the wire stripper to set the the correct size for the wiring being used.
Strip as close to 3/16in from the end of the wiring as possible. This is done to avoid excess exposed wiring.

Step 3: Insert the terminal. The correct size terminal should be inserted into the crimp tool.
The direction in which the terminal is inserted into the tool matters: one end will have two wings that will be crimped over the wire while the end that fits through the crimp tool hole will be slightly blade shaped. This is what will be installed into the connector.
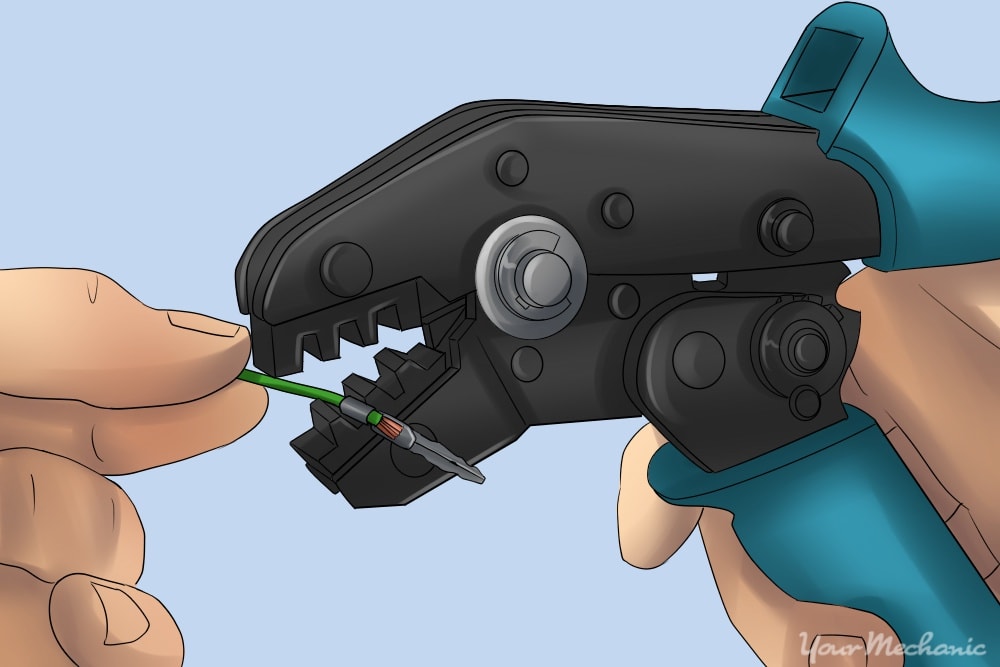
Step 4: Perform the crimp. With the terminal installed into the crimp tool, the wire should now be placed through the center of the terminal and should fit without much difficulty if the proper size is used.
Next, the tool handle will be compressed. This will push the ears of the terminal onto the exposed wire and form a tight connection.
Remove the wiring with the terminal attached from the crimp tool and pull gently on the terminal to make sure it is secured.
Part 2 of 2: Installing the wiring
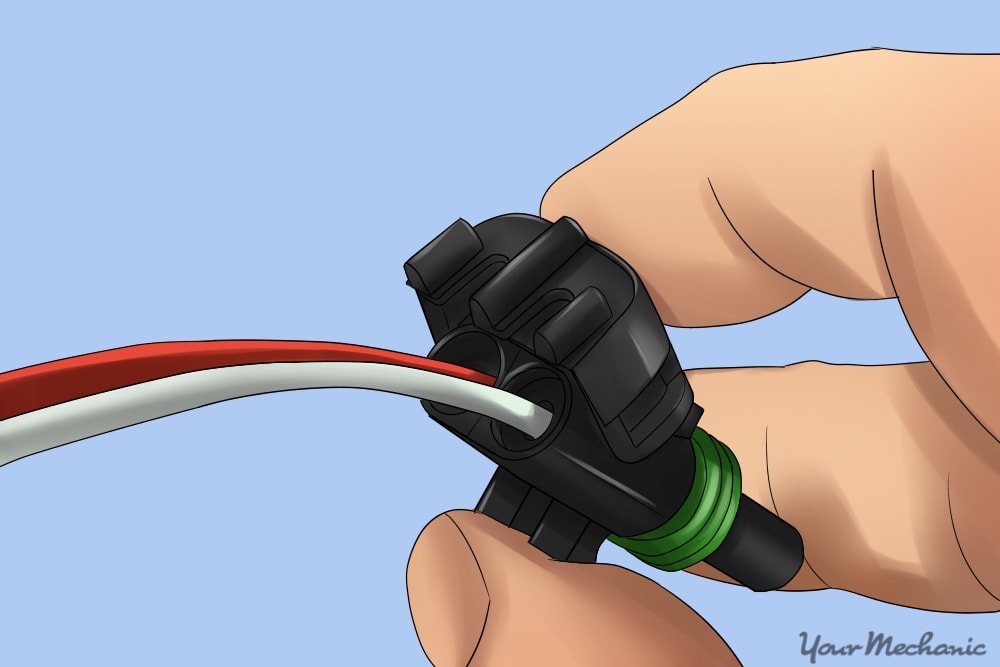
Step 1: Install the wiring into the connector. Be aware that there are female and male connectors. Which one you will use is determined by what job is being performed and the layout of the wiring.
The wire, terminal, and seal should all be assembled as one piece. The terminal should be installed into the back side of the connector in the corresponding slot. Push the wiring in until a click is heard. The click signifies that the barbs on the side of the terminal have hooked into the connector.
Pull gently on the wiring to make sure it is sealed all the way.
- Tip: If the terminal does not seal into the connector all the way or was installed into the wrong spot, the terminal tool must be used to release the terminal. The terminal tool should be slipped inside the front side of the connector. This will release the barbs holding the terminal into the connector and allow it to be moved or reinstalled.

Step 2: Lock the connector together. There will usually be 2-4 wires all installed into the same connector. Once all the wires that are needed are installed into the connector, the connector lock can be shut, and then the connector is ready to go.
With the connector finished, it can then be reinstalled into the wiring, or you can continue building the wiring harness. These seals should last much longer under the hood than other styles of connectors and will keep the elements out.
The biggest challenge with weather pack connectors is the initial cost of the tools needed to assemble them or perform repairs. Do not attempt this job without the proper crimp tool and terminal tool in case a wire has to be moved. Attempting to use improper tools will damage the wiring and the connector.
