
As you turn the steering wheel in the direction you want to go, your vehicle’s steer wheels will turn in that direction. However, the real procedure is more entangled, and modern day guiding frameworks have turned out to be unimaginably perplexing blends of mechanical parts and hardware. One essential segment is your controlling point sensor.
There are two types of sensors used: analog and digital. Analog sensors rely on different voltage readings as the vehicle drifts through a corner at varied angles. Digital sensors rely on a tiny LED light that transmits information about the angle the wheel is currently in and sends the information to the vehicle's computer.
The steering angle sensor finds a disparity between the course your vehicle is traveling and the position the steering wheel is held at. Then the steering angle sensor balances out the steering and puts the driver in more control.
The steering angle sensor helps correct the vehicle’s alignment during an event of understeering or oversteering. If the vehicle goes into an understeering condition, then the sensor tells the computer to activate the brake module in relation to the rear wheel on the inside of the steering direction. If the vehicle goes into an oversteering condition, then the sensor tells the computer to activate the brake module in relation to the rear wheel on the outside of the steering direction.
If the steering sensor is not working, the vehicle is unstable and an engine light will illuminate. Other common symptoms include the Traction Control Light coming on, the steering wheel feeling loose, and the car driving differently after a front end alignment.
Engine light codes related to the steering angle sensor:
C0051, C0052, C0053, C0054, C0053
Part 1 of 3: Verifying the condition of the steering angle sensor
Step 1: Check to see if an engine light is on. If the engine light is on, it may be for the steering angle sensor or something else.
Check to see what codes are listed if the light is on.
Step 2: Get in the vehicle and drive it around the block. Try to oversteer and understeer the vehicle and determine if the steering angle sensor is working or not.
If the sensor is working, then the ABS module will attempt to top or slow down the rear wheels to correct the condition. If the sensor is not working, then the ABS module will do nothing.
Part 2 of 3: Replacing the steering angle sensor
Materials Needed
- Allen wrench set SAE / Metric
- Boxed end wrenches
- Cross tip screwdriver
- Dental picks
- Flathead screwdriver
- Protective gloves
- Ratchet w/metric and standard sockets
- Safety glasses
- Slip joint pliers
- Snap ring pliers
- Steering wheel puller kit
- Torque bit set
- Wheel chocks
Step 1: Park your vehicle on a flat, hard surface. Make sure that the transmission is in park (for automatics) or in 1st gear (for manuals).
Step 2: Place wheel chocks around the tires. In this case, the wheel chocks go around the front tires since the rear of the vehicle will be lifted up.
Engage the parking brake to lock the rear tires from moving.
Step 3: Open the vehicle’s hood to disconnect your battery. Take the ground cable off of the battery’s negative post disabling the power to the the steering column and air bag.
- Warning: Do not hook up the battery or attempt to apply any power to the vehicle for any reason while removing the steering angle sensor. This includes keeping the computer live. The airbag will be disabled and it may go off if energized.
Step 4: Put on safety glasses. The glasses prevent any object from coming out and hitting an eye.
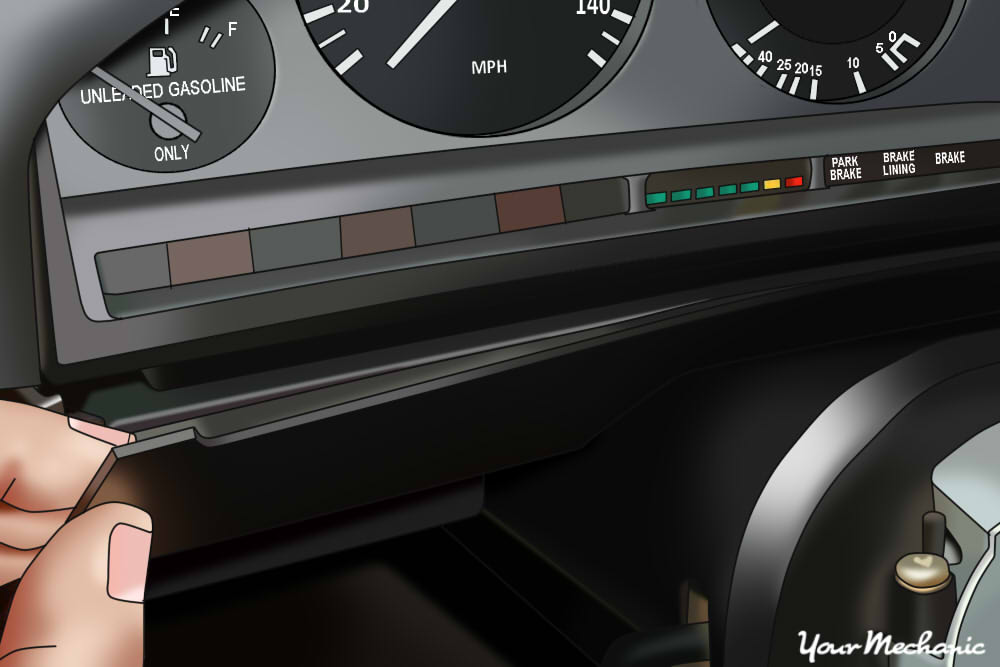
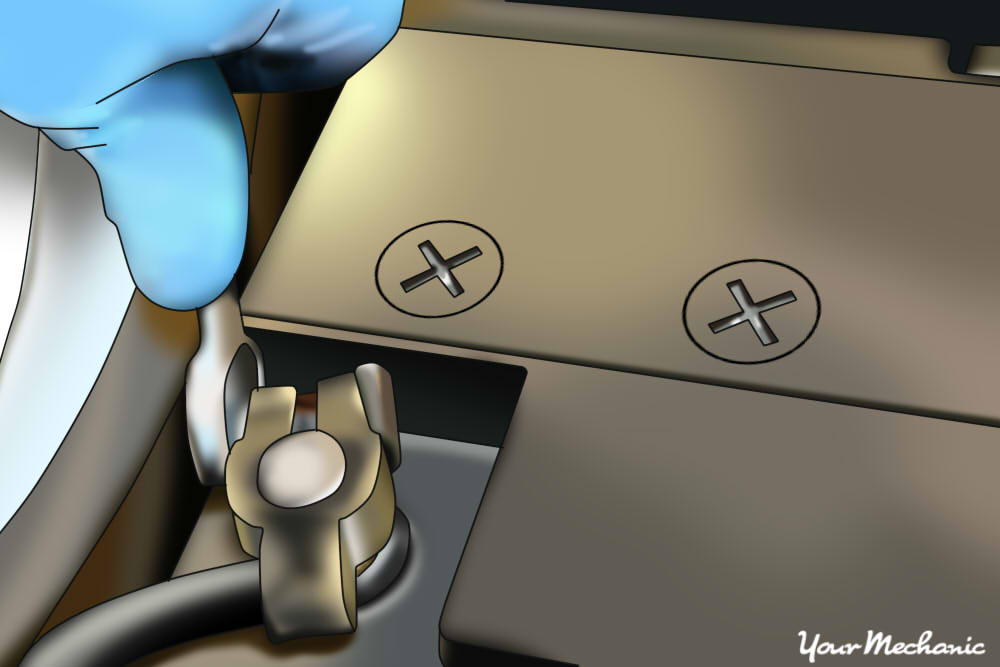
Step 5: Remove the mounting screws to the dash panel. Pull off the dash panel so you can have access to the mounting nuts to the steering wheel base.
Step 6: Remove the mounting nuts located in the back of the steering column.
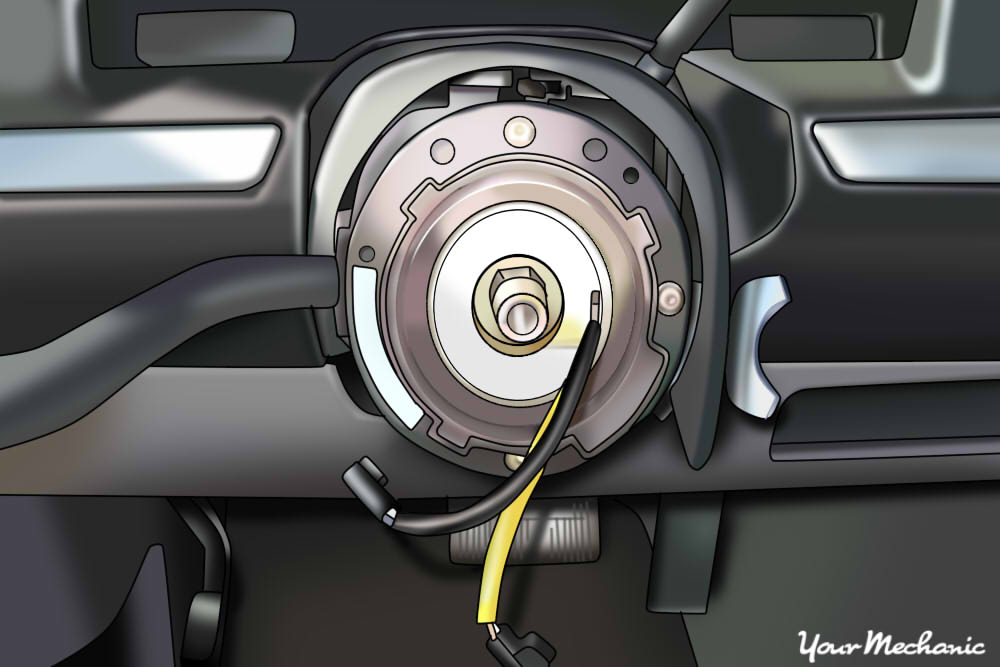
Step 7: Remove the horn button from the steering column. Disconnect the power wire to the horn button.
Make sure that you catch the spring under the horn button. Disconnect the yellow power wire to the airbag, making sure that you mark the location of the airbag connection.
Step 8: Remove the mounting nut or bolt to the steering wheel. You need to hold the steering wheel from moving.
If the nut does not come off, you can use a breaker bar to remove the nut.
Step 9: Get a steering wheel puller kit. Install the steering wheel puller and remove the steering wheel assembly from the steering column.
Step 10: Remove the tilt lever with a pair of slip joint pliers. This allows you to gain access to the covers on the steering column.
Step 11: Remove the plastic covers to the steering column. Do this by removing 4 to 5 mounting screws on each side.
You may find some hidden mounting screws in the back of the cover by the trimming of the dash panel.
Step 12: Release the pin in the pin hole. Turn the key to the start position and use your straight dental pick to release the pin in the pin hole.
Then gently remove the ignition tumbler from the steering column.

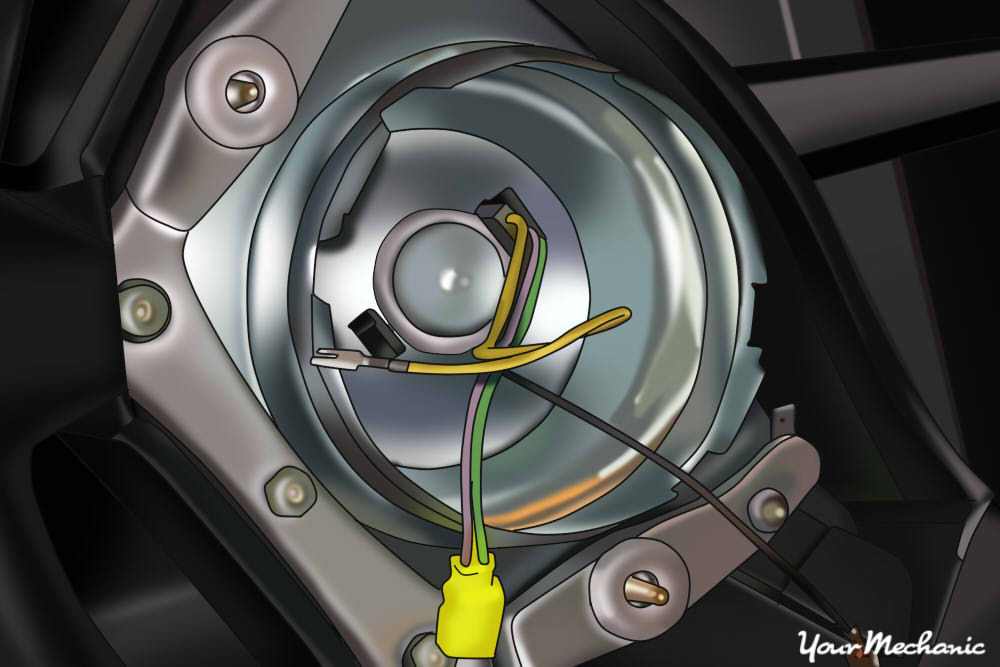
Step 13: Remove three plastic clips to take out the clock spring. Be sure to remove any brackets that may interfere with the clock spring removal.
Step 14: Remove the connectors in the lower portion of the steering column.
Step 15: Take out the multifunction switch. Disconnect the electrical harness from the switch.
Step 16: Remove the snap ring. Use a pair of snap ring plyers and remove the snap ring that connects the tilt section to the steering shaft.
Step 17: Use a large flat screwdriver and take out the tilt spring. Be very careful, the spring is under pressure and will come out of the steering column with a rush.
Step 18: Remove mounting screws on tilt section. Now you can prep the tilt section for removal by removing the mounting screws holding it on.
Step 19: Remove the nut to the bolt on the steering shaft to the u-joint. Remove the bolt and slide the tilt section out of the vehicle.
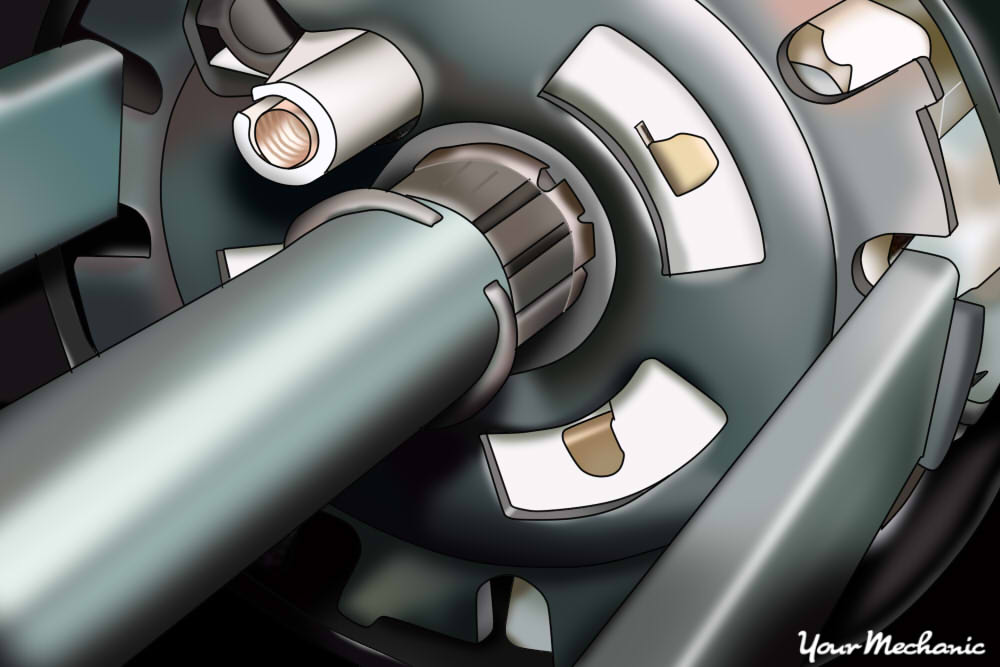
Step 20: Remove the steering angle sensor from the steering shaft. Unplug the harness to the sensor.
- Note: It is suggested you remove and replace the tilt bearing on the back of the tilt section before reinstalling it.
Step 21: Hook up the harness to the new steering angle sensor. Install the sensor onto the steering shaft.
Step 22: Install the tilt section back into the vehicle. Put the bolt into the u-joint and install the nut.
Torque the nut down to finger tight and 1/8 turn.
Step 23: Install the mounting screws securing the tilt section to the steering column.
Step 24: Use your large screwdriver and install the tilt spring. This part is not easy and the spring is hard to install.
Step 25: Install the snap ring onto the steering shaft. Secure the shaft to the tilt section.
Step 26: Install the multifunction switch. Be sure to hook up the harness to each part that you marked.
Step 27: Install the connectors in the lower part of the steering column.
Step 28: Put the clock spring into the steering column. Install any brackets you took off and the three plastic clips.
Step 29: Reinstall the key tumbler into the steering column. Remove the key and lock the tumbler in place.
Step 30: Install the plastic covers and secure them with the mounting screws. Don’t forget the screw that is hidden in the back of the steering column.
Step 31: Reinstall the tilt lever onto the steering column.
Step 32: Put the steering wheel on the steering shaft. Install the mounting nut and draw the steering wheel into the steering column.
Make sure that the nut is tight. Do not over tighten the nut or it will strip out.
Step 33: Grab the horn and airbag assembly. Hook up the yellow wire for the airbag to the connector you marked earlier.
Hook up the power supply to the horn. Place the horn spring onto the steering column. Snap the horn and airbag onto the steering column.
Step 34: Install the mounting bolts onto the back of the steering column. You may have to push in on the tilt section.
Step 35: Put the dash panel back onto the dashboard. Secure the dash panel with the mounting screws.
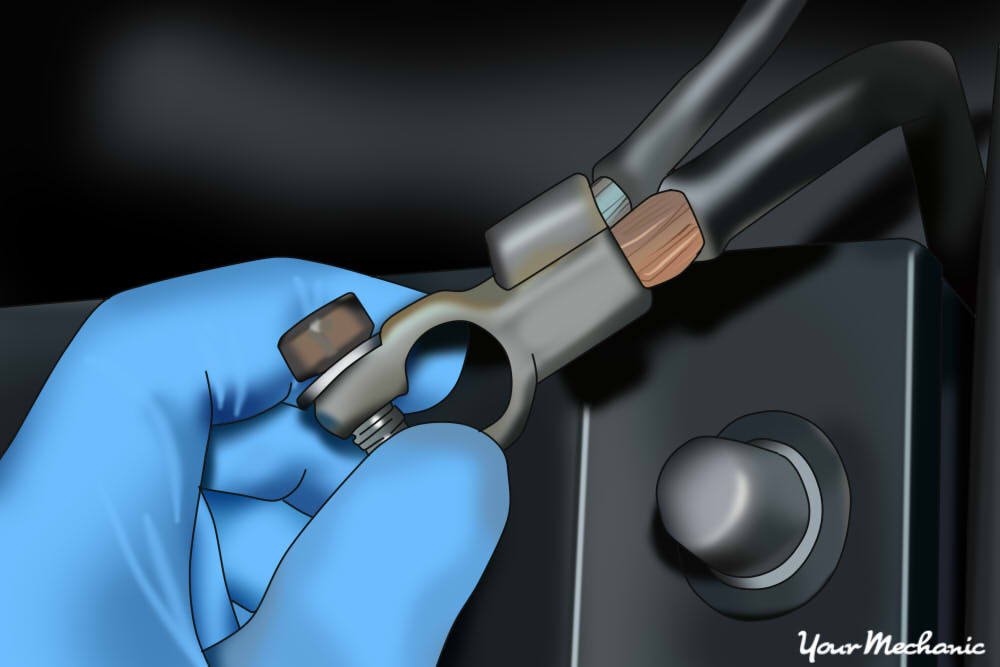
Step 36: Open the vehicle’s hood. Reconnect the ground cable back onto the battery’s negative post.
Step 37: Tighten the battery clamp. Ensure that the connection is good.
- Note: Since the power was depleted completely, you will have to reset all of the settings in your vehicle, like your radio, electric seats, and electric mirrors.
Step 38: Remove the wheel chocks.
Part 3 of 3: Test drive the vehicle
Step 1: Put the key into the ignition tumbler. Start the engine up and drive the vehicle around the block.
Step 2: Go a slow pace and steer the steering wheel from lock to lock. This allows the steering angle sensor to calibrate itself without programming the computer.
Step 3: Check for a break in the ignition sequence. After the road test, adjust the tilt steering wheel up and down to see if there is a break in the ignition sequence.
If your engine will not start after replacing the steering angle sensor, then there may be further diagnosis of the steering angle sensor needed. If the problem persists, then you should seek out help from one of YourMechanic’s certified technicians who can inspect the steering angle sensor circuitry and perform a replacement if needed.