For people who took auto shop in high school, replacing the distributor cap and rotor was one of the first mechanical repairs they'll remember. As technology has improved, and electronic ignition systems have slowly become the norm, the lost art of replacing these critical parts found on nearly every vehicle on the road prior to the mid-2000s has become less commonplace. However, there are still millions of vehicles running strong on the highways of America that require this service be completed every 50,000 miles.
On older cars, trucks, and SUVs without full computerized electronic ignition systems, the distributor cap and rotor are vital for passing voltage from the ignition coil directly to each cylinder. Once the spark plug receives the electricity from the plug wires, the air/fuel mixture in the cylinder is ignited, which begins the combustion process. The coil supplies the power directly to the rotor and as the rotor spins, distributes this electricity to each cylinder by way of plug wires that are attached to the distributor cap. When the tip of the rotor passes a contact on the cylinder, the high voltage pulse goes from the coil to the cylinder through the rotor.
These components are exposed to high levels of voltage every time the engine runs and if they are not maintained and replaced on a regular basis, the engine efficiency can and often will suffer. During routine service, when the distributor cap and rotor are replaced, it's customary to check the ignition timing to verify that everything is still aligned the way it should.
Like any other mechanical component, the distributor cap and rotor have a few indicators that they are worn out or damaged. In fact, as the image above indicates, there are several problems that can cause the distributor cap to fail including:
- Small cracks in the housing
- Broken spark plug wire tower
- Excessive carbon tracks embedded on the distributor cap terminal
- Burned distributor cap terminals
These two parts go hand in hand for replacement and maintenance, similar in many ways to oil and an oil filter. Since the distributor rotor and cap can go bad over time because they are located in a harsh environment, it is important to know the symptoms this part will give off before it completely fails.
Some of the common symptoms of a damaged or broken distributor cap or rotor may include the following:
The Check Engine Light is illuminated: The distributor cap and rotor are vital parts of the ignition system on most older vehicles on the road today. However, on most vehicles made after 1985, a Check Engine Light was connected to major components including the distributor and illuminates when a problem exists. In most cases, the Check Engine Light will come on when the distributor cap is cracked and has condensation inside, or if the electrical signal coming from the distributor is inconsistent.
The vehicle does not start: If the distributor cap or rotor are broken, voltage will be unable to flow to the spark plugs, which means the engine will not fire. It's very common for both the rotor and distributor cap to fail at the same time; especially if the rotor fails first.
The engine idles rough: There are small electrodes on the bottom of the distributor cap called terminals. When these terminals become covered in carbon buildup or become burnt because of over exposure to voltage, the engine can idle and run very rough. Essentially, what's happening is that the engine is skipping a cylinder from the firing order in this instance. For purposes of this HOW TO article, we'll focus on the best recommended methods for replacing the distributor cap and rotor. However, it's a good idea to purchase and review your service manual for exact steps if they are different for your vehicle.
Part 1 of 3: Determining when to replace the distributor cap and rotor
According to most service manuals, replacing the distributor cap and rotor together are recommended on most domestic and imports every 50,000 miles at a minimum. During routine tune-ups, which happen every 25,000 miles, the distributor cap and rotor are often inspected for premature signs of wear and tear and will be replaced if they are damaged. Although the distributor caps and rotors are designed differently based on the vehicle manufacturer, engine size and other factors, the process and steps for replacing them on most engines is rather similar.
In many cases, the reason why the distributor cap and rotor fail at the same time is that they work together to accomplish the same task; which is distributing voltage from the ignition coil to the spark plug. When the rotor begins to wear out, the bottom terminals on the distributor cap does the same. If the distributor cap becomes cracked, condensation can enter the inside of the cap, which will literally drown out the electrical signal.
Replacing the distributor cap and rotor at the same time should be completed every 50,000 miles, regardless of whether or not they are damaged. If your vehicle does not put on a lot of miles every year, it's also a good idea to replace them every three years. This task is very simple to perform, as most vehicles with this set up have distributor caps that are very easy to access. Most service manuals suggest that this task should take about one hour to complete.
- Warning: Anytime you are working with electrical components, you must remove the battery cables from the terminals. Always remove the positive and negative terminals before you remove any components on the vehicle. It's is always recommended to fully review the manufacturers service manual before attempting to complete this job. As we've indicated above, the instructions below are general steps for replacing the distributor cap and rotor. If you do not feel comfortable completing this job, always defer to an ASE certified mechanic.
Part 2 of 3: Preparing the vehicle for replacing the distributor cap and rotor
When you decide to remove the distributor cap and rotor, there are a few things you need to accomplish before you actually start the job. The first step is to purchase a replacement distributor cap and rotor kit. Most OEM parts manufacturers sell these two items as a kit, to ensure they are both replaced at the same time. There are also several aftermarket part suppliers that also make kits for specific vehicles. In some cases, the kits will come with replacement hardware, gaskets and sometimes, new spark plug wires.
If your kits come with these items, it's a good idea to use them all; especially the new bolts for securing the distributor cap and rotor. Some rotors fit freely on the distributor shaft; while others are secured with a screw. If your vehicle has a rotor secured with a screw; always use the new screw. According to most service manuals, the job of removing the distributor cap and rotor itself is only about one hour to complete. The most time consuming part of this job will be removing ancillary components that restrict access to the distributor. It's also vital to take time to mark the location of the distributor, the distributor cap, spark plug wires and the rotor on the bottom of the distributor before it's removed; and during the removal process. Failure to properly mark the wires and reinstall the new distributor cap exactly as the used one was removed can result in ignition problems.
To complete this job, you won't have to raise the vehicle on a hydraulic lift or on jack stands. The distributor is typically located on the top of the engine or on the side of the engine. In most cases, the only part you'll have to remove to gain access to it is the engine cover or the air filter housing.
In general, the materials you'll need to remove and replace the distributor and the O-ring; after removing ancillary components will include the following:
Materials Needed
- Clean shop rags
- Replacement distributor cap and rotor kit
- Screwdriver(s) flat and Phillips head
- Socket set and ratchet
After collecting all these materials and reviewing the instructions set forth in your service manual, you should be ready to complete this job.
Part 3 of 3: Replacing the distributor cap and rotor
As with any service, replacing the distributor cap and rotor will begin with making sure you have clear access to all the tools and supplies you need to complete this task. You don't have to jack the vehicle up or raise the vehicle on a hydraulic lift to complete this job. Please refer to your service manual for detailed instructions as the steps listed below are general steps.
Step 1: Remove battery cables: Remove the positive and negative battery cable and place them away from the battery terminals before proceeding.
Step 2: Remove engine cover and air filter housing: In many instances you'll have to remove the engine cover and air filter housing in order to have free access to remove the distributor cap and rotor. Refer to your service manual for exact instructions on how to remove these components.
Step 3: Mark the distributor components: Before removing the distributor cap, you want to take some time to mark the location of each components. This is vital for consistency and to reduce the potential of misfire when you install the new rotor and distributor cap.
Mark the following individual components:
- The spark plug wires: Using a marker or tape, mark the location of each spark plug wire as you are removing them. A good tip is to start at the 12 o'clock position on the distributor cap, and mark them in order in a clockwise motion. This will ensure that when you reinstall the spark plug wires on the new distributor cap they will be in order.
Step 4: Remove spark plug wires: After you've marked the spark plug wires remove the spark plug wires from the distributor cap.
Step 5: Remove distributor cap: Once the plug wires have been removed, you'll be ready to remove the distributor cap. Typically the distributor is held in place by two or three bolts or a few clips on the side of the cap. Locate these bolts or the clips and remove them with a socket, extension and ratchet. Remove them one at a time then take the old distributor cap off the distributor.
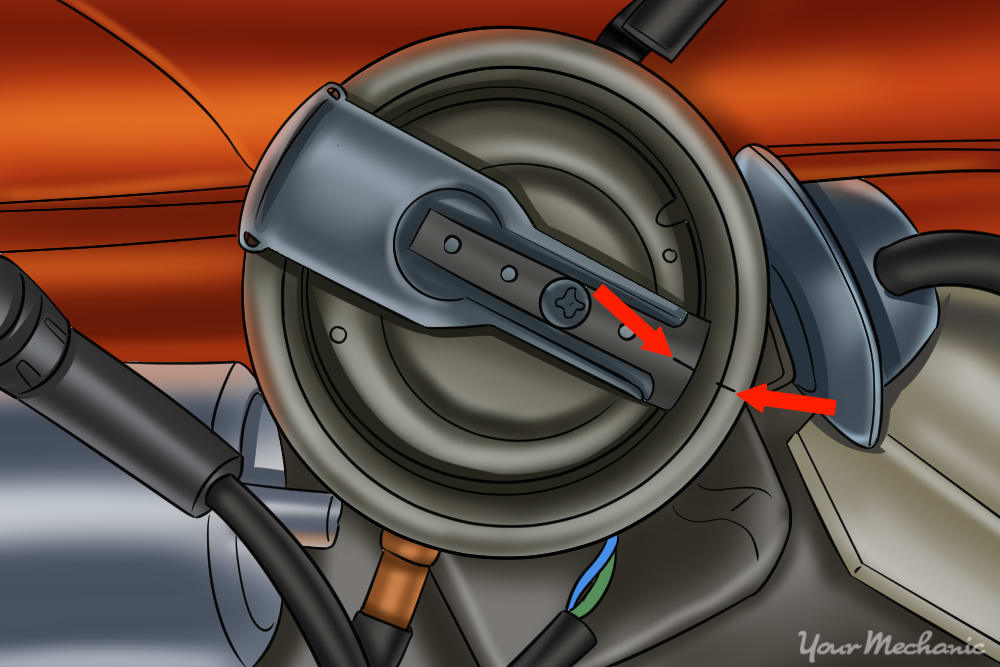
Step 6: Mark the location of the rotor: When you remove the distributor cap you'll see the rotor in the center of the distributor housing. The rotor will have a pointed end and a blunt end. Using a screw driver, place the screwdriver along the edge of your rotor as indicated in the image. This will help you mark where the "pointed end" of the new rotor should be placed.
Step 7: Remove the rotor screw and remove the rotor: On some distributors, the rotor will be secured to a small screw, typically in the middle of the rotor or along the edge. If your rotor has this screw, carefully remove the screw using a magnetized screw driver. You do NOT want this screw to fall into the distributor shaft, as that may find its way into the engine and create a huge headache for you.
If you have a rotor without a screw or once the screw has been removed, take the old rotor out of the distributor. Match it with the replacement one before you throw it away.
Step 7: Install new rotor: After removing the old rotor, you don't usually need to perform any other maintenance. Some people like to use a can of compressed air to spray into the distributor to loosen any debris or excess carbon buildup. However when you install the new rotor, make sure to complete the following:
Reset the rotor in the precise location as the old rotor. Use the guide marks you completed in step 6 to verify that the pointed end is facing that direction.
Install the new screw from the kit in the rotor hole (if it has one) DO NOT USE THE OLD SCREW
Step 8: Install new distributor cap: Depending on the type of distributor cap you have, it can only be installed one or two potential ways. The holes where the screws secure the cap to the distributor or the clips attach must align. However, the distributor cap is not designed to only fit one way. As long as the clips or the screws align to the holes or places on the distributor cap, and the cap fits flush on the distributor, you should be fine.
Step 9: Reinstall spark plug wires and coil wire: When you marked the spark plug wires locations, you did that so it would be easier to install on the new cap. Follow the same pattern for installing the spark plug wires on the same tower where they were installed on the old distributor cap. The coil wire goes to the center post on the distributor cap.
Step 10: Replace engine cover and air filter housing.
Step 11: Reconnect battery cables.
Some mechanics believe it's a good idea to check the ignition timing after you've replaced the rotor and the distributor cap. If you have the required tools and would like to complete this additional safety measure; by all means this is a good idea. However, it's not required; especially if you've followed the steps above to ensure the rotor, distributor cap or spark plug wires were correctly installed.
When you have finished this task, the replacement job of the distributor cap and rotor has been completed. If you've reviewed the steps in this article and are not confident completing this project or need an extra set of professional hands to help fix the problem, contact YourMechanic.com today and one of our local ASE certified mechanics will be happy to assist you replace the distributor cap and rotor.