Today's engines monitor virtually every function to ensure your vehicle runs strongly and efficiently every day. One of the most important systems to monitor is the cooling system, which includes the radiator, water pump, radiator fan, coolant lines, and overflow tank. The coolant temperature sensor, also known as the coolant temperature switch, is the engine management system that monitors the temperature of the coolant and relays this information to the ECM. When the sensor is functioning properly, it will tell your on board computer if the temperature is too high, alerting the driver that a problem exists by illuminating a warning light on the dashboard.
The coolant temperature sensor (switch) utilizes electrical resistance to measure the coolant's temperature. When the signal is sent to the ECM, the computer adjusts the vehicle's ignition timing, fuel flow, and other factors that trim or enhance performance based on the coolant temperature.
Due to the fact that engine temperature plays a vital role in the overall performance of any vehicle, having a properly functioning coolant temperature sensor is essential. If you discover that the sensor is failing, you will need a coolant sensor replacement. If this is the case, this step-by-step guide will teach you how to replace a coolant sensor.
Part 1 of 3: Diagnosing a Problem With the Coolant Temperature Sensor
The coolant system on today's cars, trucks, and SUV's is composed of multiple components that work together to keep your engine running well. When a problem occurs with engine heating or overheating, it may be due to one or multiple broken parts. Taking time to properly diagnose the precise cause of the overheating situation is very important to providing a solution and actually fixing what is broken. Before you make the decision to replace the coolant temperature sensor, make sure to diagnose some of the warning signs of a faulty coolant temperature sensor. Noted below are a few of the warning signs that will alert you that the coolant temperature sensor is damaged and needs to be replaced.
The engine is getting poor fuel economy: when the coolant temperature sensor is not functioning correctly, it tends to relay false information to the engine control module. This in turn triggers the ECM to either add more fuel or reduce air mixture to create a “rich” situation, designed to cool the cylinders and reduce the potential of overheating. The side effect of this reaction is that the fuel economy will drastically be cut. If you notice that your temperature warning light is on and the fuel mileage is really poor, it may be caused by the sensor.
Black smoke from the exhaust: Another side effect of a rich engine is that black smoke (or unburnt carbon from fuel) will be present from the vehicle's exhaust when you accelerate. When the fuel mixture is rich (meaning more fuel than air in the vapor inside the combustion chamber) the cylinder will not be able to burn all the fuel. The result will be more black smoke being expelled from the exhaust port of the cylinder head and out the tailpipe.
The engine is overheating: on the reverse side, sometimes the sensor will fail entirely and won't be able to monitor the engine's coolant temperature. If this occurs, the potential of overheating becomes greater. If your engine is overheating occasionally, the problem may be with the coolant temperature sensor.
Coolant is leaking under the motor: it's also common for the coolant temperature sensor to become loose and cause engine coolant to leak from under the motor. If you notice coolant in front of the motor, it may be coming from the engine coolant temperature sensor's location.
Note: The process of removing the coolant temperature sensor is very consistent, regardless of the type of vehicle you own. However, since all vehicles are unique, it's important to verify specific instructions with your vehicle’s manufacturer’s service manual before proceeding.
Part 2 of 3: Replace the Coolant Temperature Sensor
The actual process of replacing the coolant temperature sensor is extremely simple. However, the difficult work comes in the preparation of the cooling system - both before and after.
Materials Needed
- Coolant collection pan
- Flat head screwdriver
- Funnel
- Jack
- Jack stands
- New coolant
- Pliers
- Replacement coolant temperature sensor
- Safety equipment including safety glasses and gloves
- Socket wrench set
Work light
Tip: This job should only be completed when the engine is cold and has not been running for a minimum of one hour. Since you'll be underneath the car and the potential of coolant hitting your face is high, it may be a good idea to wear a safety shield to protect your face. Make sure you wear safety glasses and gloves to protect your hands from hot coolant if the engine is not cold.
Step 1: Make Sure the Vehicle is on a Level Working Area
Since you need to jack the front end up and will be placing the front end on jack stands, make sure your vehicle is on a flat surface.
Do not jack up a vehicle on a driveway or incline.
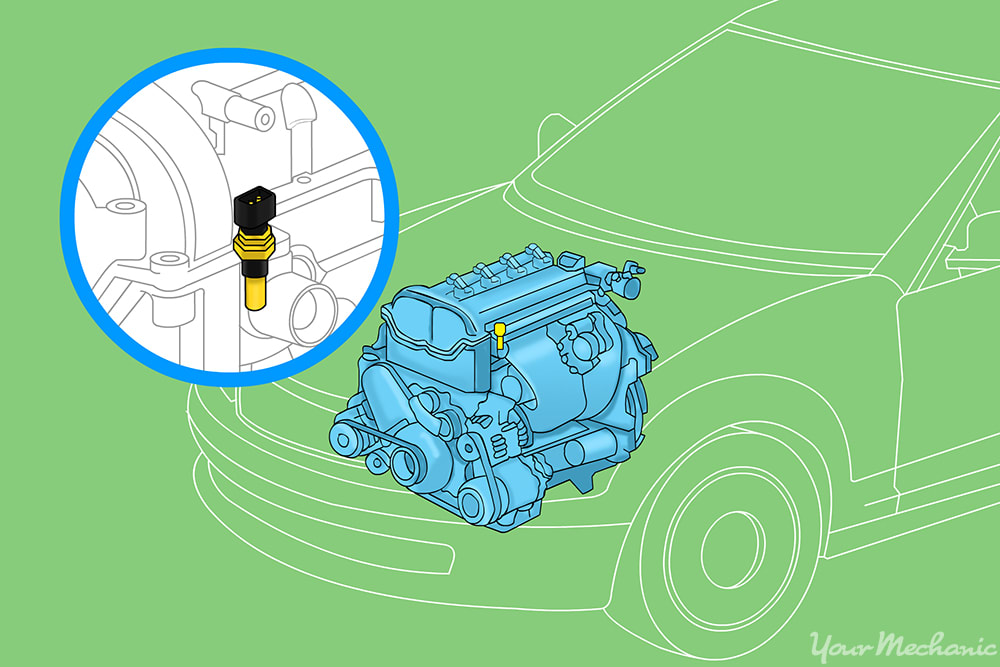
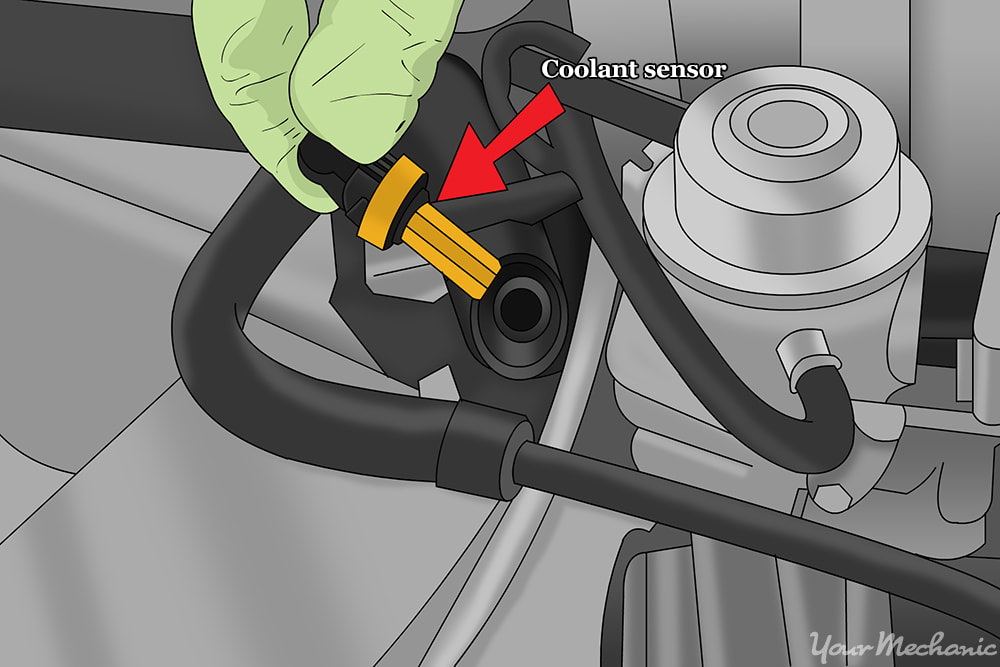
Step 2: Locate the Coolant Temperature Sensor
The first item that needs to be completed after you compiled all of your tools and assets is to locate the coolant temperature sensor.
But where is the engine coolant temperature sensor located?
In the image above, you can see that most coolant temperature sensors are located on the top, driver side of the engine. However, the location of this sensor may be different with your specific engine. Make sure you consult with your manufacturer or purchase a service manual for the make and model of your vehicle for precise location and instructions.
Step 3: Jack The Front End for Clearance
Make sure you have enough clearance to crawl underneath your vehicle.
This can be done by driving your front end onto ramps or jacking up the front end and placing the jack stands underneath for safety.
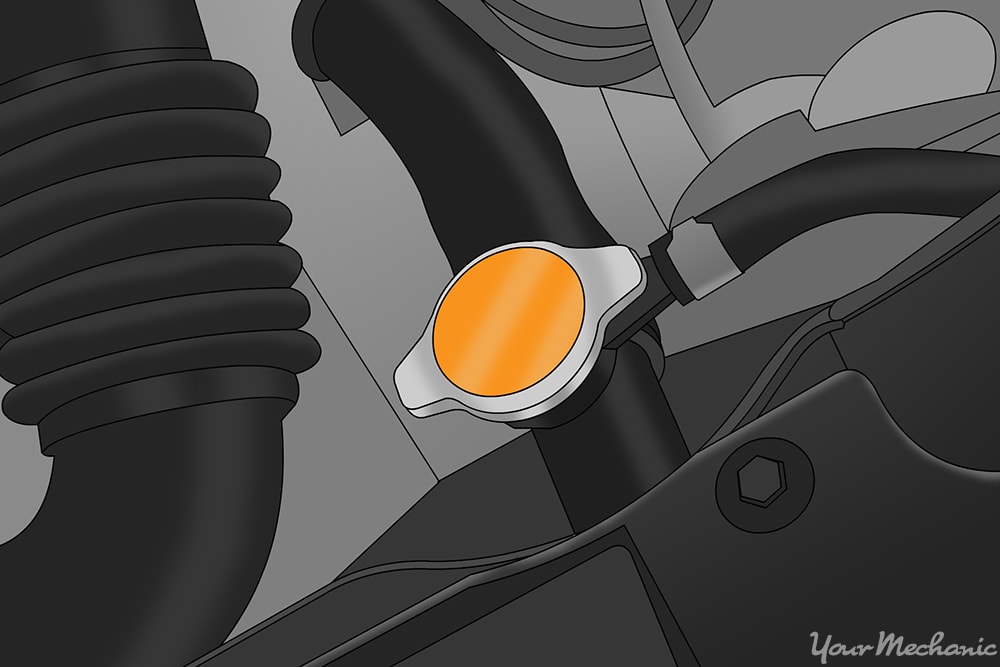
Step 4: Remove Radiator Cap and Overflow Cap
Once the vehicle has been raised and you've opened the hood, the next step is to remove the radiator cap and coolant reservoir cap.
This removes the vacuum pressure inside the coolant system allowing you to drain the radiator fluid so you can replace the coolant temperature sensor.
Step 5: Drain the Radiator
Underneath your vehicle, typically on the driver side, the radiator will have two different drain plugs.
One of them is a petcock, which is located on the left side of the radiator near the main drain plug (on most vehicles).
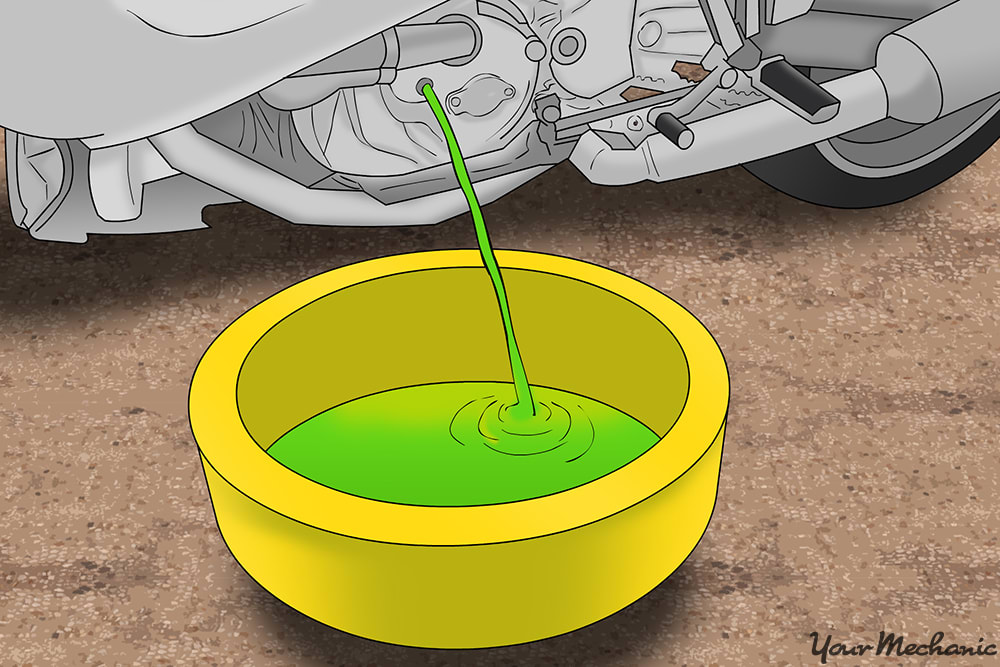
There are two ways to drain a radiator:
- Remove the petcock valve and let the radiator drain slowly
- Remove the radiator drain plug and expect a high volume of coolant to flow quickly
Based on your specific coolant collection pan or method, make the decision on which way fits your situation best and drain the coolant from your radiator.
Step 6: Replace Drain Plug
Once your radiator has been drained, make sure to replace your drain plug or reinsert the petcock before proceeding.
This will ensure you don't forget to complete this step before adding more coolant once the coolant temperature sensor has been replaced.
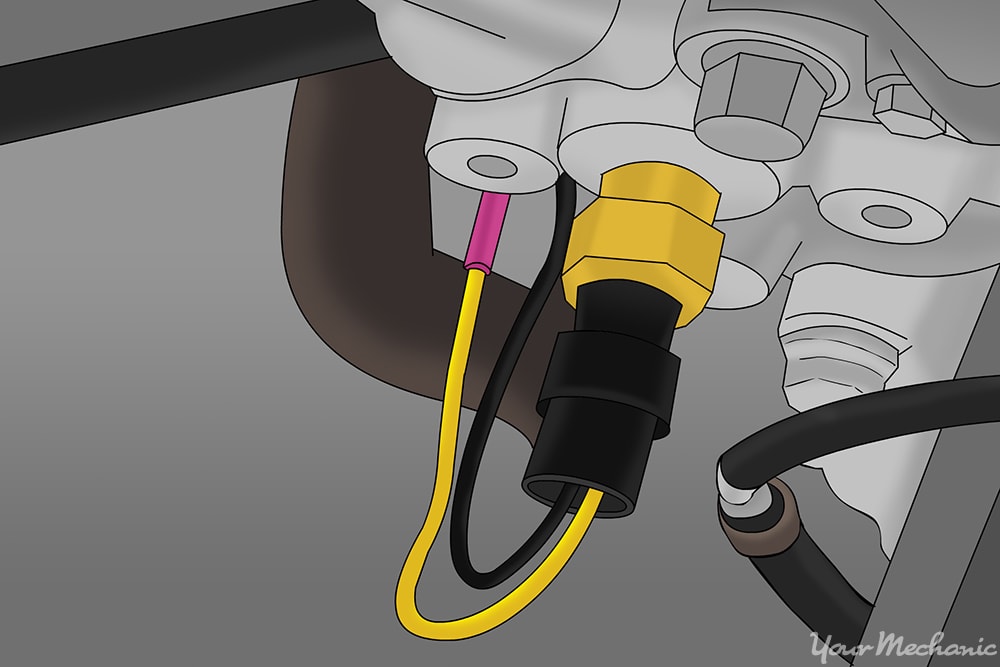
Step 7: Remove Electronic Harness from the Temperature Sensor
The first thing is to remove the electronic harness that connects to the sensor. Typically this sensor is attached with a plastic clip. To remove the clip, take a flat head screwdriver and slowly pry the clip from the outside edge of the temperature sensor.
Step 8: Remove the Coolant Temperature Sensor
Using a ¼" drive socket and extension and the correct sized socket (usually 19mm), loosen the sensor from the engine block and remove it entirely.
Step 9: Clean the Hole Where the Sensor is Located
Make sure to clean the sensor's insert area before you reinstall the temperature sensor.
In some cases, dirt, debris, and other particles will impact the function of the coolant temperature sensor, so you want to make sure you have a clean area before installing the new one.
Step 10: Install the New Sensor
Using your fingers, hand screw the coolant temperature sensor into its placement hole until the sensor is flush against the engine. Remove the extension from the ratchet and hand-tighten the sensor manually with the socket and extension.
- Warning: For a successful coolant temperature sensor replacement, the sensor needs to be installed very carefully and not tightened down too tight. This is why we recommend hand tightening the sensor with the socket and extension, but not the ratchet.
Step 11: Reattach Wiring Harness to Sensor
Once the sensor has been successfully tightened, reattach the wiring harness.
It should "snap" into place.
Step 12: Verify the Radiator Drain Plug Has Been Tightened
Before proceeding with refilling the radiator, it's crucial to double-check that the radiator drain plug has been securely tightened. Using a suitable wrench, ensure that the plug is snugly in place to prevent any leaks.
Step 13: Add Radiator Coolant
Although you may have collected the radiator coolant when you drained it from the radiator, it is highly recommended that you add new coolant.
This will ensure that the coolant temperature sensor will work correctly. Add new coolant, mixed with distilled water as recommended by your specific vehicle manufacturer.
- Warning: Many newer cars, trucks, and SUV's have coolant systems that require a priming step. This is unique and specific to each vehicle manufacturer, so it's VITAL that you contact your automotive manufacturer and receive the precise process for priming the coolant system. Failure to do this will often result in air bubbles being trapped in the coolant system and overheating problems.
Step 14: Add Coolant to Coolant Reservoir
After your radiator is full, you need to add fresh coolant to your coolant overflow reservoir. It's likely that when you start your vehicle for the first time that you'll have to add coolant. Be proactive by adding some to the coolant reservoir to reduce the potential of air bubbles in the coolant lines.
Step 15: Remove Coolant Buckets
After draining the coolant, it's important to properly dispose of the used coolant. Use designated coolant disposal containers and avoid pouring the coolant onto the ground, as it can be harmful to the environment.
Step 16: Lower Vehicle from Jack Stands
With the radiator maintenance tasks completed, safely lower the vehicle back to the ground. Make sure the vehicle is on a level surface before completely removing the jack stands.
Part 3 of 3: Start the Engine and Test Drive the Vehicle
Once the coolant temperature sensor has been replaced, you need to start the engine, check for leaks, and refill the radiator fluid in most cases before you test drive the vehicle. The best way to complete any road test is to have a planned route that will bring your engine to proper operating temperature and open the thermostat of your radiator.
Step 1: Start the Vehicle
Begin by starting the vehicle and allowing it to warm up to its normal operating temperature. This ensures that the engine reaches an optimal temperature for effective radiator maintenance.
Step 2: Check for Leaks
After the vehicle has warmed up, check for leaks around the radiator drain plug, petcock, and the coolant temperature sensor. If you notice any leaks, address them immediately to prevent coolant loss and potential damage to the cooling system.
Step 3: See if the Check Engine or Low Coolant Level Light is Illuminated
Ensuring the removal of all air from the system is paramount for the proper functioning of your vehicle's coolant system. To address this and to ensure that all air is properly purged from the system, seeking assistance from an expert is strongly recommended. Professionals can efficiently manage the coolant system, ensuring optimal functionality and preventing potential issues caused by air pockets within the system.
Step 4: Test Drive the Vehicle
Make sure to drive the vehicle until you hear the radiator fan come on.
Once you do, return home while keeping an eye on the thermostat or engine temperature.
Step 5: Check the Coolant Level
Once the vehicle has cooled for a minimum of one hour, check the coolant level inside the reservoir and fill if needed.
After you've completed the installation and test drive, your coolant sensor replacement was successful and you should be good to go. However, if you have doubts and are not 100 percent confident in completing this job on your own, contact one of our certified professional mechanics to replace the coolant temperature sensor for you.