Before the days of electronic cruise control, a vehicle's throttle was controlled by a cruise control cable that attached to the throttle linkage next to the throttle cable. In fact, most cars, trucks and SUV's manufactured prior to 2005 had the cruise control cable system installed under the hood.
This cable is attached from the cruise control servo and is strategically plumbed through the engine compartment and then attached to the throttle body. The cable is comprised of a metal wire cable contained within a rubber-coated, flexible metal sheath.
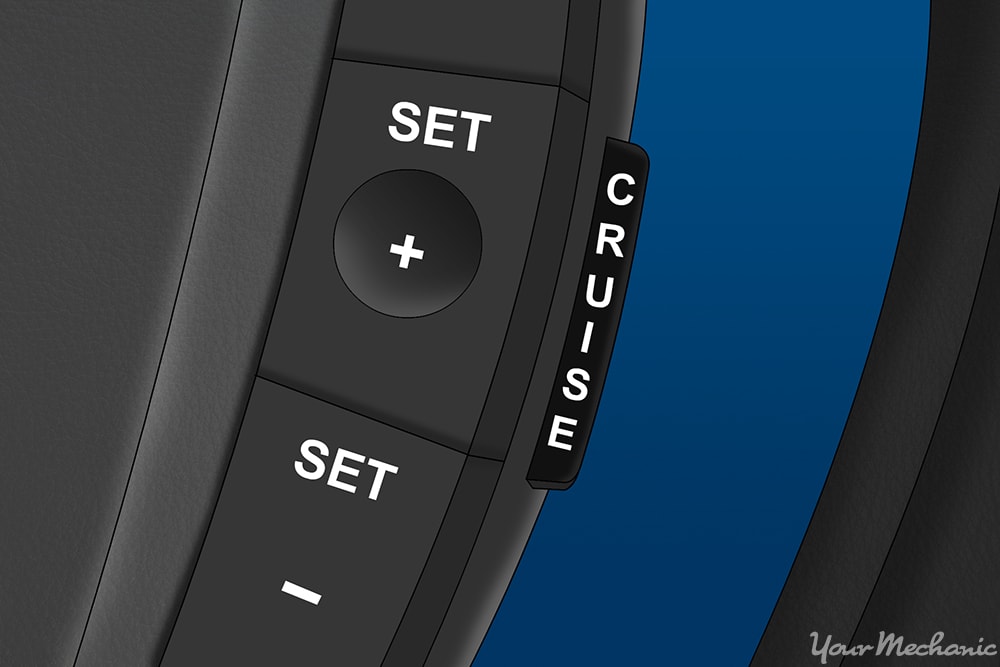
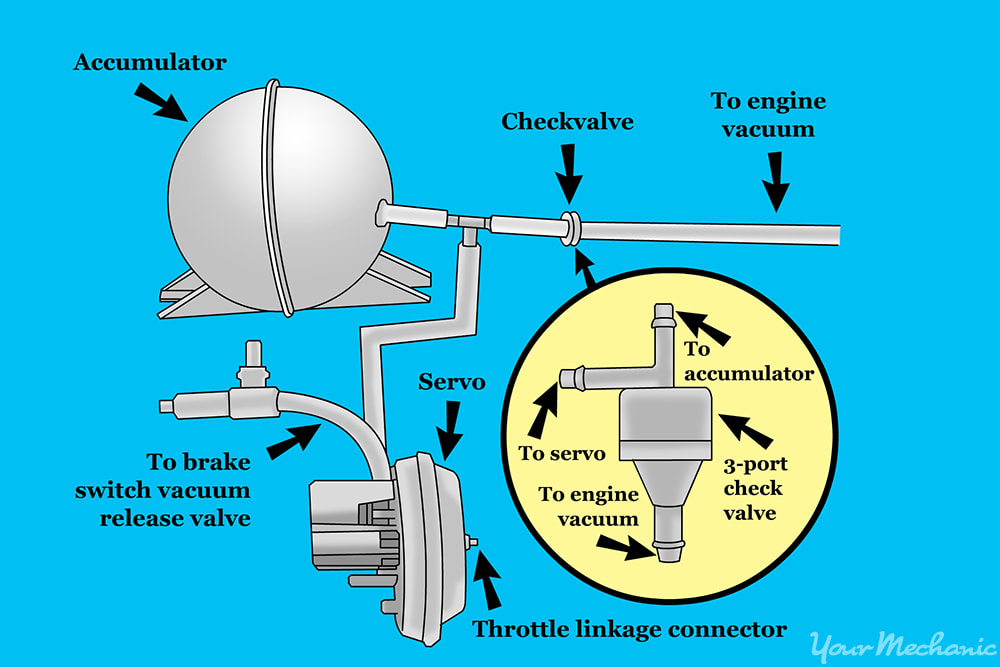
The automatic throttle control works by setting the cruise control at a desired speed by activating the cruise control switch on the steering wheel or a turn signal indicator. Once you activate the cruise control on the vehicle, a vacuum-operated servo pulls the cruise control cable that is attached to the throttle linkage and sets the throttle at a determined position. Speed sensors inside the transmission then relay information through the vehicle's ECM and additional throttle is engaged or released based on the vehicle's speed, navigating hills or different driving conditions.
The cruise control cable is prone to wear and tear, seizing due to lack of lubrication, and the connections attached to the throttle linkage getting worn out. If any of these issues occur, it's likely that the cruise control cable needs to be replaced. Routine service of the cruise control cable including lubrication and adjusting the throttle linkage can extend the life of this component.
If it's been determined that your cruise control cable is damaged to the point that the cruise control does not work correctly or the throttle sticks occasionally, it will need to be replaced.
Note: This article is targeted to DIY mechanics or ASE certified mechanics that are looking for additional tips on how to replace the cruise control cable. In this specific article, we are talking about removing the mechanical cable that might be present in vehicles manufactured before 2005. The steps we are describing here are general instructions, so make sure to verify specific steps and guidelines with your vehicle’s manufacturer service manual before proceeding.
Warning: Removing the cruise control cable requires working in closed spaces and, in many cases, accessing the cruise control servo is very difficult. If you don't feel 100 percent confident about replacing the cruise control cable or don't have the recommended tools or help, please contact an ASE certified mechanic to complete this job for you.
Part 1 of 3: Determining the symptoms of a bad cruise control cable
One of the biggest mistakes a casual mechanic makes is misidentifying the root cause of the problems with their vehicle. With multiple individual components that can fail or contribute to similar symptoms, it's very easy to assume that one mechanical part is broken and needs to be replaced. This could be a serious problem due to the fact that the cruise control cable is nearly identical in design, location, and mode of operation to a standard throttle cable.
The smart thing to do, before taking steps to replace the cruise control cable, is to properly diagnose the symptoms that you're experiencing, so that you can be 100% certain that the cruise control cable is indeed the problem.
When a cruise control cable is broken or beginning to wear out, it typically displays the following symptoms:
Accelerator pedal gets stuck: This is a problem that could be extremely dangerous if not properly repaired. However, one of the more common symptoms is that the throttle pedal gets stuck due to the fact that the cruise control cable control arm attached to the throttle cable assembly on the throttle body either loses vacuum pressure from the control servo or the cable attachment breaks off, causing the throttle linkage to twist and stick open. This also might cause the vehicle to jerk suddenly during acceleration or when the cruise control is active.
Cruise control does not engage: It's also very common for the cruise control to not set when the cable is broken. However, this may also be contributed to a problem with the servo, the vacuum lines, the brake switch or the control switch that controls the cruise control. If the cable is out of alignment or snaps from the throttle body, it is unable to hold the throttle to the desired position.
When you set the cruise control and the vehicle does not hold the same speed on a flat surface, it is likely a problem with the cable, the cruise control module, or the motor. Once again, before you make the decision to replace it, make sure to complete a physical inspection which we will outline below.
Part 2 of 3: Replacing the cruise control brake switch
The cruise control cable is typically attached to the throttle body directly next to the throttle cable. Vehicles with electronic throttle controls will not have a cruise control cable. However, the other attachment and location of this device is unique to the vehicle you're working on, it is highly recommended to purchase a service manual for the specific make, model and year of vehicle you're working on.
On most domestic and import trucks, SUV's and cars, the cruise control cable is attached to the cruise control servo, which is typically a thin, round shaped metal object that is attached to the firewall or to the side of the engine compartment. Before you order replacement parts, make sure you clearly identify the location of the servo along with taking note of the connections that the cruise control cable has at both the servo and throttle linkage. Make sure to verify these connections once you receive the replacement cable before attempting to install.
Purchase a service manual for the precise make, model, and year of vehicle you are working on. The service manual will typically give you the exact location of the servo along with several replacement tips from the manufacturer.
Materials Needed
- Boxed end wrench or ratchet wrench
- Flashlight
- Flat blade screwdriver
- Replacement cruise control cable
- Replacement cruise control cable clips (if necessary)
- Safety glasses
- Service manual
- Socket set (usually metric)
Step 1: Complete a physical inspection to locate the cruise control cable. There are three specific items you should be looking for that will determine if the cable is in need of replacement.
Check the throttle attachment: On the throttle body, you'll see two cables, the throttle cable and the cruise control cable. The cruise control cable is mounted on the outside of the linkage. Check to see if the linkage is loose or if you're able to "wiggle" the cruise control cable. If the connector attached to the linkage is damaged, the entire cable must be replaced. Also, if the cable is frayed or burned, replace the cable.
Check the servo attachment: The cruise control cable attached to the servo may also be damaged. Check the connection to the servo and inspect for similar symptoms as indicated above.
Check the entire cable for burns or frays in the line: If you've inspected both attachments, make sure to run the entire cruise control cable to see if it has any kinks, frays, or burn marks. The cruise control cable can come into contact with hot exhaust or intake manifolds, causing the cable to fail.
Step 2: Prepare the vehicle. Make sure you have the vehicle located on a flat surface, minimizing the potential for rolling while you're under the hood.
Always make sure to set the parking brake, and, for added safety, chalk the rear tire with a block of wood or wheel chalk.
-
Warning: In order to replace the cruise control cable, you’ll need to remove engine covers and sometimes throttle body covers. In some cases, you'll have to remove air cleaners or turbo lines. If you're not 100% confident in completing this job, do not attempt it. Contact a local ASE certified mechanic to help you with this replacement job, as if this is done incorrectly, it could become a serious safety concern.
Step 3: Disconnect the vehicle's battery. Although you most likely won't be removing anything electric, it's always a good idea to remove the vehicle's battery cables before starting the job.
Locate the vehicle's battery and disconnect the positive and negative battery cables before proceeding.
Step 4: Remove vehicle's engine cover. After removing the power supply, remove the engine covering on your particular vehicle.
As all vehicles are unique, refer to your service manual for specific instructions on how to complete this process.
Step 5: Remove air filters or other obstructions covering the cruise control cable. Many vehicles also have an air filter box and throttle tube that attaches to the intake manifold.
Refer to your vehicle's service guide and remove these items if they are in the way of carefully removing the cruise control cable.
Step 6: Remove the cruise control cable from the servo. This step is specific to the make and model of your vehicle.
Refer to the service manual to complete this step.
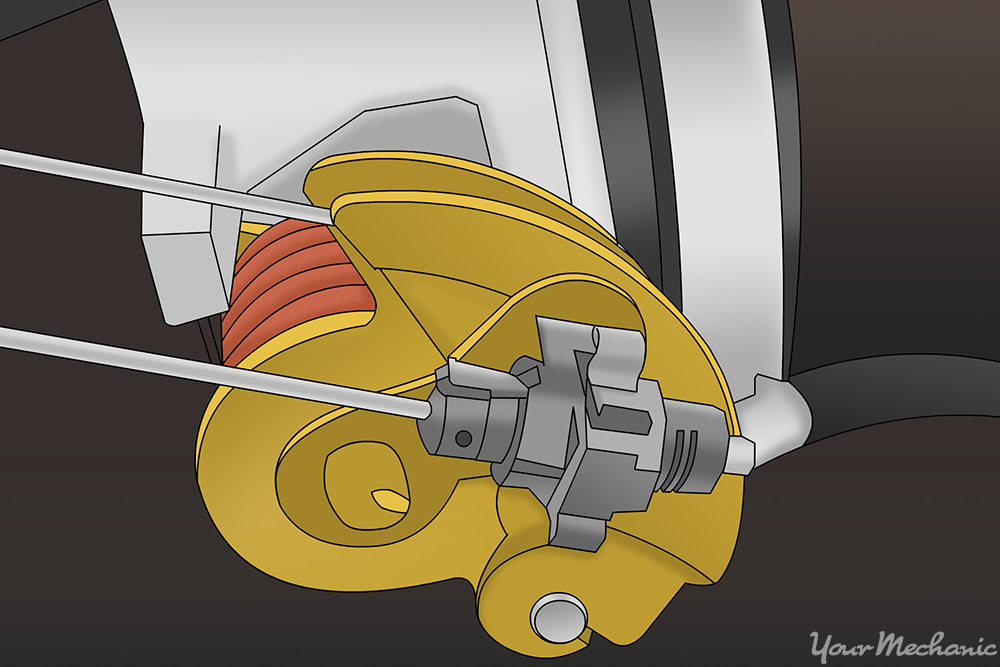
On most domestic and import vehicles, in order to remove the cruise control cable from the servo, you'll need to remove the servo itself from the vehicle. The servo is typically attached by two or three bolts to the firewall or to the side of the engine compartment as indicated in the image above.
Once the servo is removed, there are two clips that attach the cruise control cable to the servo. Using a small flat blade screwdriver, lift the two clips and pull the cruise control cable by the head (not the wire as it may strip). Once that outer clip is removed, you can press the spring that is attaching the cable to the servo and release the cable.
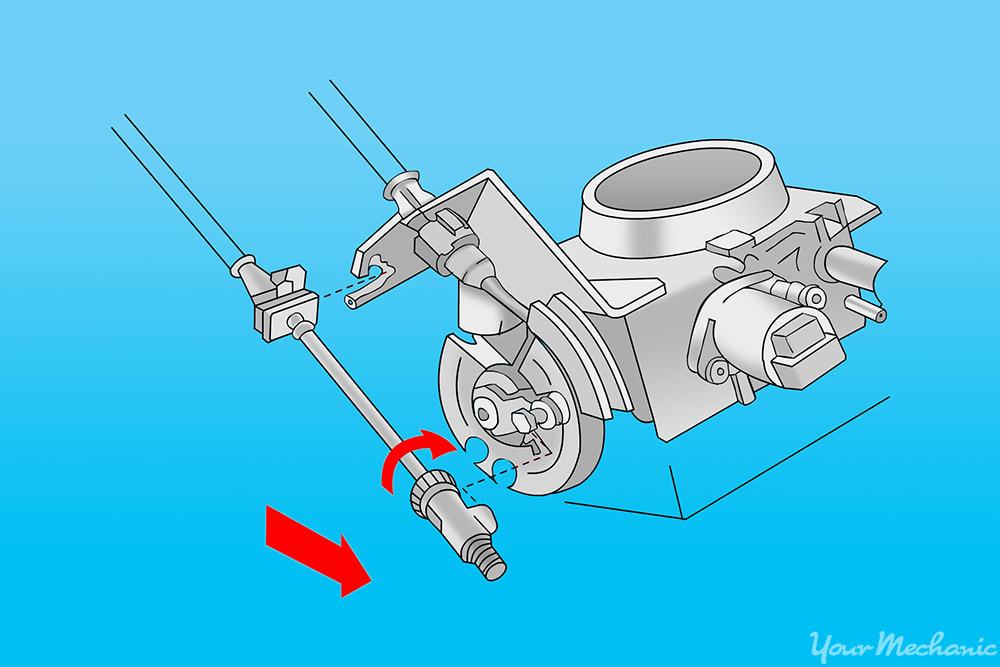
Step 7: Remove the cruise control cable at the throttle linkage. After removing the cable from the servo, you need to remove the cable from the throttle linkage.
Again, each manufacturer is unique, however, as the image above shows, the cable is attached with a clip that pushes forward and then easily slides off the throttle ball. There will also be a throttle bracket clip that secures the cable to the throttle housing. Remove this clip as well.
Step 8: Lubricate the new cruise control cable. One of the leading causes of premature wear of a cruise control cable is improper lubrication.
Follow the manufacturer's service manual on proper lubrication techniques and proper grease to use to complete this job.
Step 9: Run the new cruise control cable next to existing cable. To ensure proper installation, run the new cable exactly where the old one is running.
If it is snaked between fuel, oil, or coolant lines, make sure to run the new cable precisely where the old one was located.
Step 10: Remove the cruise control cable from vehicle. Before you attempt this, make sure there are no other vacuum lines or support lines in the way of the cable.
Once you've removed the cable from the control module or servo and the throttle, and you've run the new cable, pull the cable out of the engine compartment and put aside.
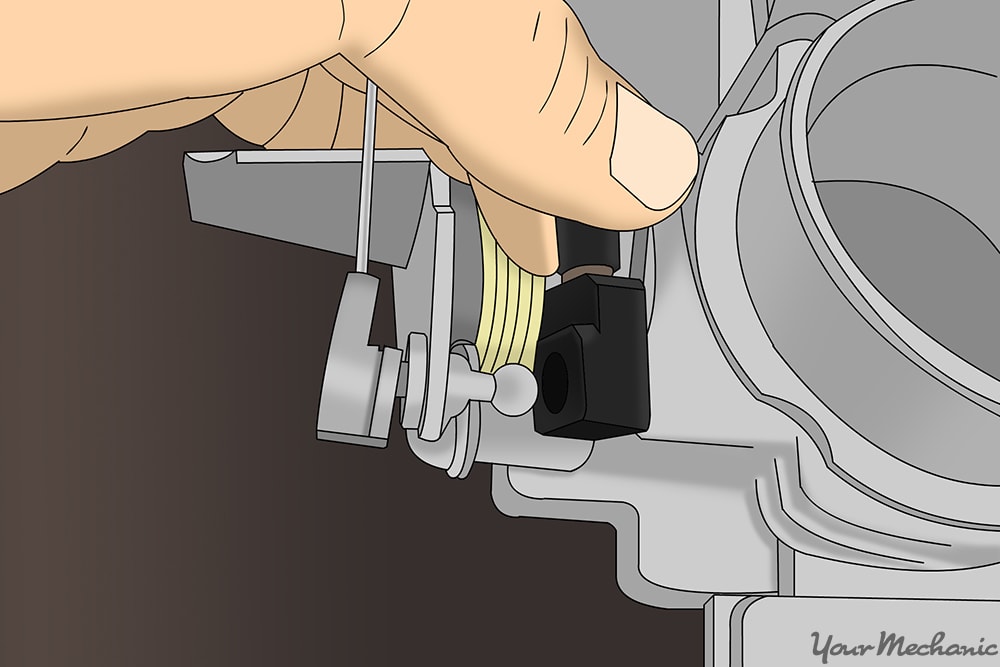
Step 11: Attach the new cable end to the throttle linkage. On the end of the cable attached to the throttle linkage, there is either a nub that slides back or a bolt that attaches the cable to the linkage.
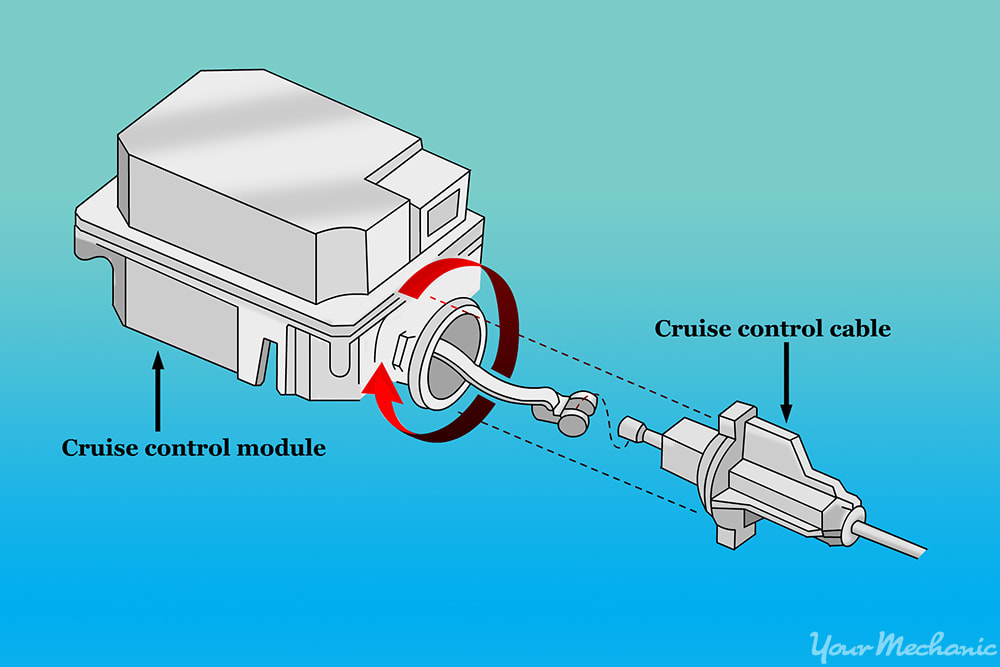
Referring to your vehicle service manual, first properly attach your cruise control cable and ensure it is flush with the throttle linkage. Secondly, secure the support clip to the throttle linkage bracket as indicated in the image displayed above.
Step 12: Thread the other end of the cable into the servo or cruise control module. Install the other end of the cruise control cable attached to either the servo or the cruise control module.
Again, make sure you follow your manufacturer’s recommendations in the service manual to do this properly. Make sure the cable is 100% secured and attached before proceeding.
Step 13: Reinstall the servo or cruise control module. After the cable is secure, reinstall the servo to the firewall or side of the engine compartment using the same bolts you used to remove them initially.
Step 14: Replace the air filter housing and any lines you removed. Replace these how you found them originally.
Step 15: Replace engine cover. Put the engine cover back on.
Step 16: Remove all tools and equipment from the engine compartment.
Step 17: Reattach positive and negative battery terminals. Make sure the cables are properly secured.
Part 3 of 3: Test drive the vehicle
In order to verify that the new cruise control cable is correctly installed, there are two independent tests to perform. The first is to start the vehicle and test the throttle control without having the vehicle in motion. This verifies that the throttle attachment was completed correctly and that the cruise control cable is not twisted or misaligned.
- Warning: Do not road test any vehicle until you've first checked throttle operation while the vehicle is in neutral or park. Many accidents have occurred due to stuck throttles caused by a cruise control cable that was twisted.
Once you've tested the throttle control in the garage or outside, you can then road test the vehicle. The best way to complete this test drive is to plan your route first. Since you'll be testing the cruise control, make sure you find a highway with very little traffic in order to test the device.
Step 1: Start the vehicle. Let it warm up to operating temperature
Step 2: Drive your vehicle to the test highway. Accelerate to highway speeds.
Step 3: Set your cruise control. Set it at 55 or 65 MPH.
Step 4: Tap your brake pedal. After the cruise control is set, slightly tap your brake pedal to verify the cruise control shuts off.
Step 5: Reset the cruise control again and drive for 10 to 15 miles. Verify that the cruise control does not shut off automatically.
The replacement of the cruise control cable is not one of those jobs that any casual mechanic should attempt. Each vehicle has a unique cruise control system and different connections within the cruise control cable. Make sure to follow the specific instructions as indicated by the vehicle's service manual. If you've read these instructions and still don't feel 100% confident completing this repair, please contact one of YourMechanic’s ASE certified mechanics to complete the cruise control cable replacement for you.