Although today's new cars, trucks, and SUVs are filled with bells and whistles that showcase new technology, some mechanical components are still manufactured the same way they were in the old days. One of the best examples of this is the exhaust system. The exhaust system is comprised of individual sections that are connected together either by a weld or a series of clamps. In some cases, the vehicle will have a clamp attached to a weld point for additional support. This is the duty of the exhaust clamp on most cars, trucks, and SUVs made since the 1940's.
In many cases, exhaust clamps are used with aftermarket exhaust pieces, such as performance mufflers, headers, or other customized components made to enhance the exhaust system. They are used to connect individual pieces or support welds, just like they are used in original equipment manufacturer (OEM) applications. They come in different shapes and sizes and with unique attachments processes.
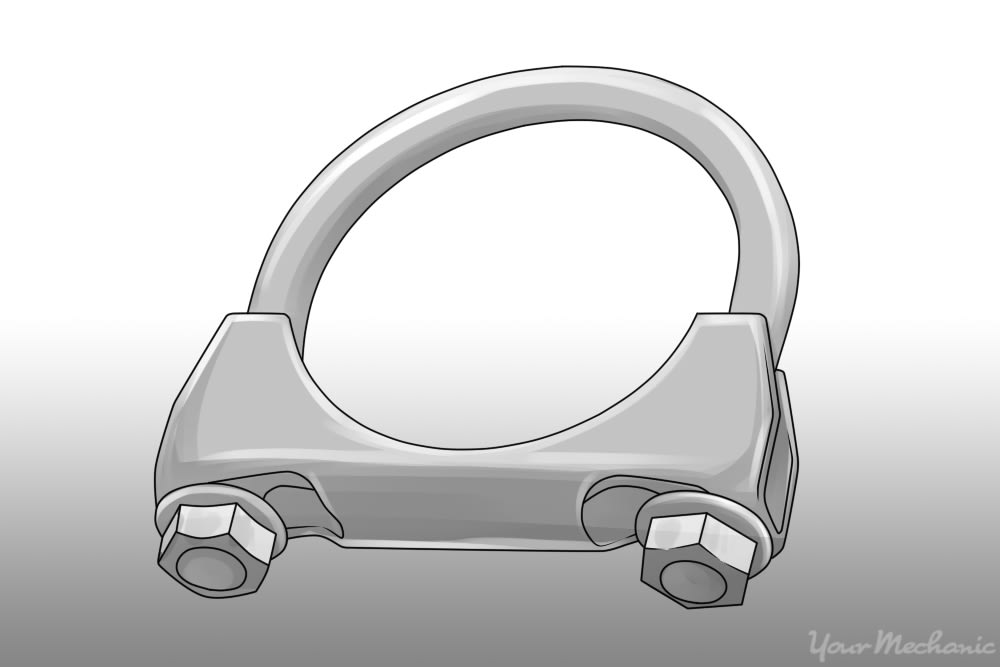
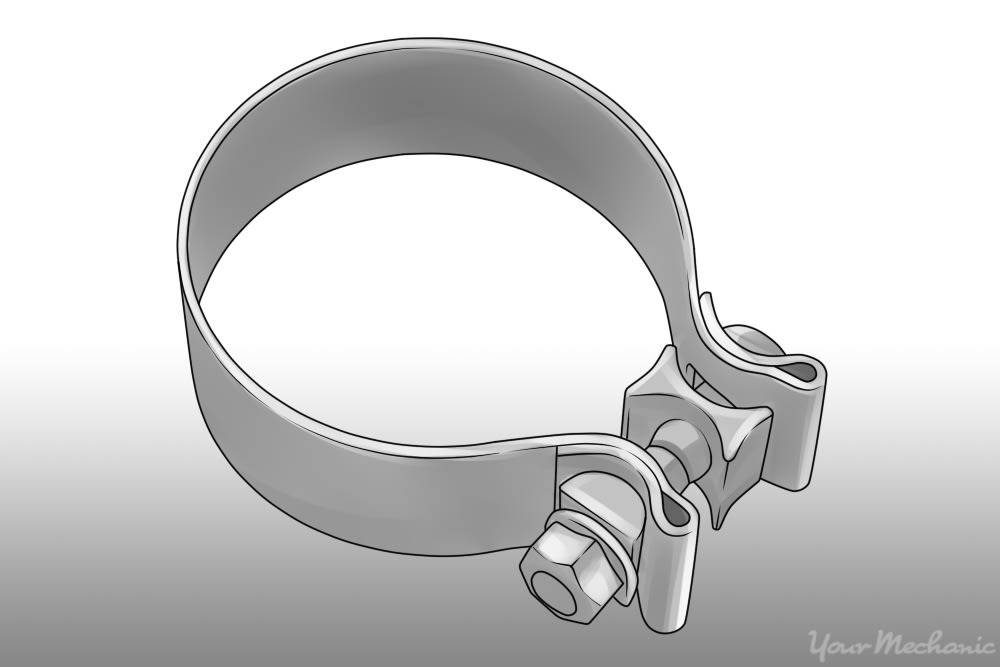
Some of them are U-shaped, some are circular, and there are a few that consist of two hemispherical parts joined into one clamp. These clamps are often referred to as V-band clamps, lap band clamps, narrow band clamps, U-clamps, or hanger clamps.
Once the clamp is broken, it can't be repaired on the exhaust system; it will need to be replaced. If a clamp becomes loose or broken or begins to wear out, it might fall off, which permits the exhaust pipe to come loose. This can lead to serious issues like broken exhaust pipes, which can expose exhaust fumes that can circulate through the cabin of the vehicle and lead to serious respiratory conditions for the driver and passengers.
The exhaust system is mechanical in nature, meaning that it's not typically controlled or monitored by sensors. The only part of the exhaust system that is monitored by the engine control unit (ECU) is the catalytic converter. In some cases, an OBD-II code of P-0420 will indicate that a leak has been detected near the catalytic converter. This is usually due to a loose bracket or exhaust clamp that secures the catalytic converter to the adjoining exhaust pipes. This error code will be triggered by the leak and stored inside the ECU. In most cases, it will also trigger the Check Engine Light on the dashboard.
If the vehicle does not have an onboard computer that stores these codes, you'll have to do some manual diagnostic work to determine if a problem with the exhaust clamps exists.
Noted below are a few of the physical warning signs or symptoms that a problem with this component exists:
You hear excessive noise from below the vehicle. If an exhaust clamp is broken or loose, it's possible that it may lead to separation of the exhaust pipes or the development of cracks or holes in the tubing. A broken or loose exhaust pipe will typically cause additional noise to sound near the crack, as the purpose of the exhaust system is to circulate exhaust fumes and noise through multiple chambers inside a muffler to ensure a quiet sound. If you notice excessive noise coming from below your vehicle, especially during acceleration, it could be caused by a broken exhaust clamp.
The vehicle does not pass emissions testing. In some cases, a loose exhaust clamp will cause the exhaust system to leak. This will cause excessive emissions outside of the vehicle. Since most emissions tests include measuring emissions from the tailpipe as well as using an outside sensor that can measure exhaust leaks, this could cause the vehicle to fail an inspection.
The engine misfires or backfires. Another indicator of an exhaust leak is when the engine backfires during deceleration. This problem is commonly amplified the closer the leak is to the exhaust manifold, but it can also be caused by a leak from a broken or loose exhaust clamp, especially in aftermarket applications.
If you notice any of these warnings signs, there are a few things you should do before you make the decision to replace this part, just to be sure. These include the following:
Examine the exhaust pipes. If they are hanging below the vehicle (more than usual at least), it's possible that the exhaust clamp has broken. With the vehicle safely parked on a flat surface and turned off, crawl underneath and determine if the exhaust pipe itself is damaged. If it is, you should have the pipe replaced.
Listen for excess noises. If you notice a loud noise coming from under your vehicle during acceleration, it's probably coming from an exhaust leak. A broken or loose exhaust clamp may be the cause of the leak. Again, inspect underneath to ensure the exhaust pipes are not broken or cracked before you replace the exhaust clamps.
Warning: Exhaust clamps are designed to be supports of the exhaust system, NOT a patch. Some DIY mechanics will attempt to install an exhaust clamp to plug a cracked exhaust pipe or an exhaust pipe that has rusted and has a hole. This is NOT recommended. If you notice holes or cracks in any exhaust pipes, these need to be replaced by a professional service technician. An exhaust clamp may reduce the noise, but the exhaust gases will still leak, which can cause death in serious cases.
Note: The instructions described below are general instructions for replacing most exhaust clamps used in OEM applications. Many exhaust clamps are used in aftermarket applications, so it's best to seek the advice of the aftermarket manufacturer on the best way and location to install this sort of clamp. If it's an OEM application, make sure to purchase and review the vehicle's service manual before you replace the exhaust clamp.
Part 1 of 2: Replacing an exhaust clamp
In many cases, the symptoms you may notice of a bad clamp are actually caused by exhaust system cracks or holes that, once again, can't be repaired or fixed by an exhaust clamp. The only time you should replace the clamp is when the clamp has broken or is wearing out BEFORE it has caused the exhaust pipes to crack.
If the exhaust clamp is broken or worn out, there are a few things you need to do before taking on this job:
Get the right clamp. There are several types of exhaust clamps, but it's critical that you get the right size and style of clamp for your specific application. Refer to your vehicle's service manual if you're replacing an OEM clamp, or contact the aftermarket part supplier if you are replacing an aftermarket exhaust clamp.
Verify the right circumference. There are multiple sizes of exhaust pipes, and it's incredibly important to match it with the right sized exhaust clamp. Always physically measure the circumference of the exhaust clamp to verify that it matches the exhaust pipe where it is being installed. Installing the wrong sized clamp can cause additional damage to your exhaust system and may lead to the need for a complete exhaust system replacement.
Materials Needed
- Flashlight or droplight
- Clean shop rags
- Boxed end wrench(s) or ratchet wrench set(s)
- Impact or air wrench
- Jack and jack stands
- Replacement exhaust clamps specific to your needs (and any appropriate gaskets)
- Torque wrench
- Steel wool
- Penetrating oil
- Safety equipment (i.e., safety glasses and protective gloves)
- Service manual specific to your vehicle (if you are replacing a clamp used in an OEM application)
Note: According to most service manuals, this job will take about an hour to complete, so make sure that you have adequate time set aside. Also be aware that you'll have to raise your vehicle in order to have clear access to the exhaust clamps. If you have access to a vehicle lift, use this so you can stand underneath the vehicle, as this will make the job much easier to complete.
Step 1: Disconnect the vehicle's battery. Even though there are not many electrical parts that are touched when replacing exhaust clamps, it's a good habit to always disconnect the battery cables when doing any service to your vehicle that involves removing parts.
Remove the positive and negative battery cables and set them aside where they cannot make contact with anything metal.
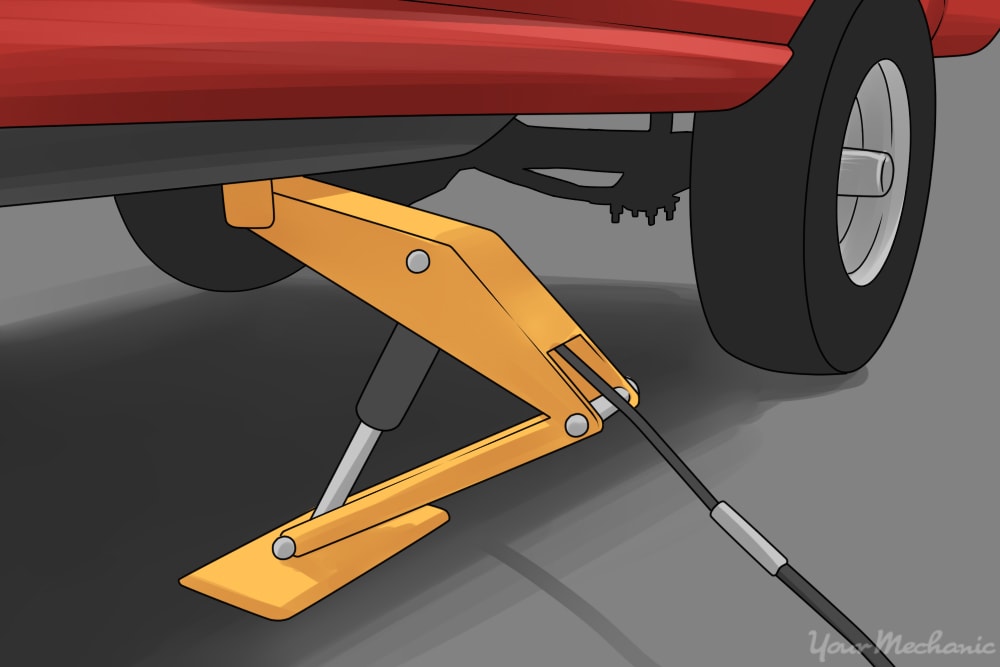
Step 2: Raise and secure the vehicle. You'll be working underneath the vehicle, so you will need to raise it with jacks or use a hydraulic lift if you have access to one.
Make sure to place wheel chocks around the tires on the side of the vehicle you won’t be lifting for support. Then jack up the other side of the vehicle and secure it on jack stands.
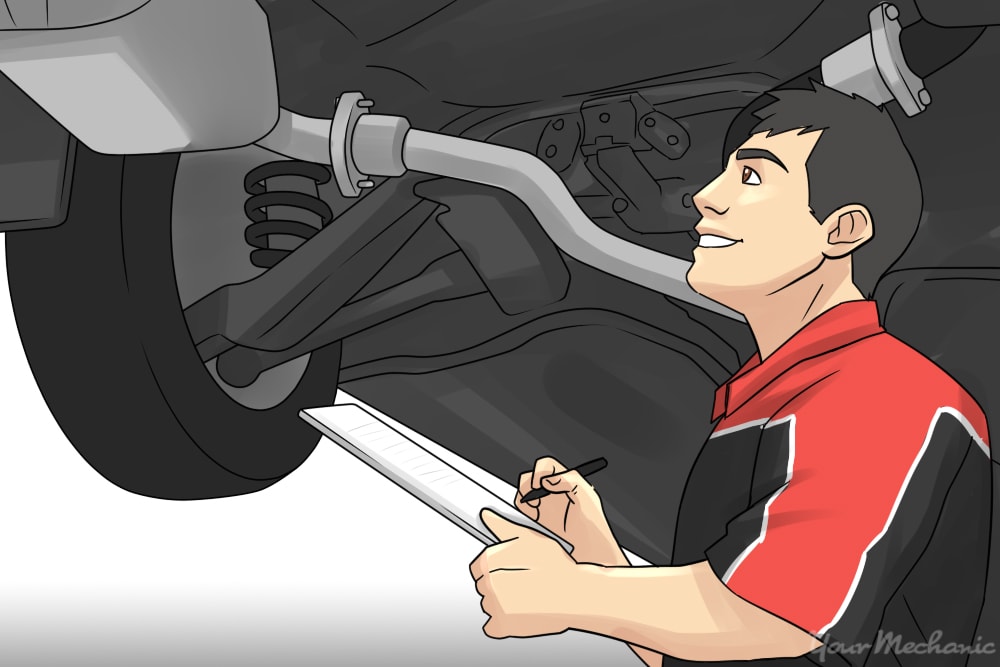
Step 3: Locate the damaged exhaust clamp. There are some mechanics that recommend starting the vehicle to find the exhaust clamp that is damaged, but that is very dangerous, especially when the vehicle is raised in the air. Complete a physical inspection of the exhaust clamps to find those that are loose or broken.
- Warning: If during your physical inspection of the exhaust clamps, you find any cracks in the exhaust pipes or holes in rusted pipes, STOP and contact a professional mechanic to replace the exhaust pipes in question. If the exhaust clamp is damaged and has not broken the exhaust pipe or the welds, you may proceed.
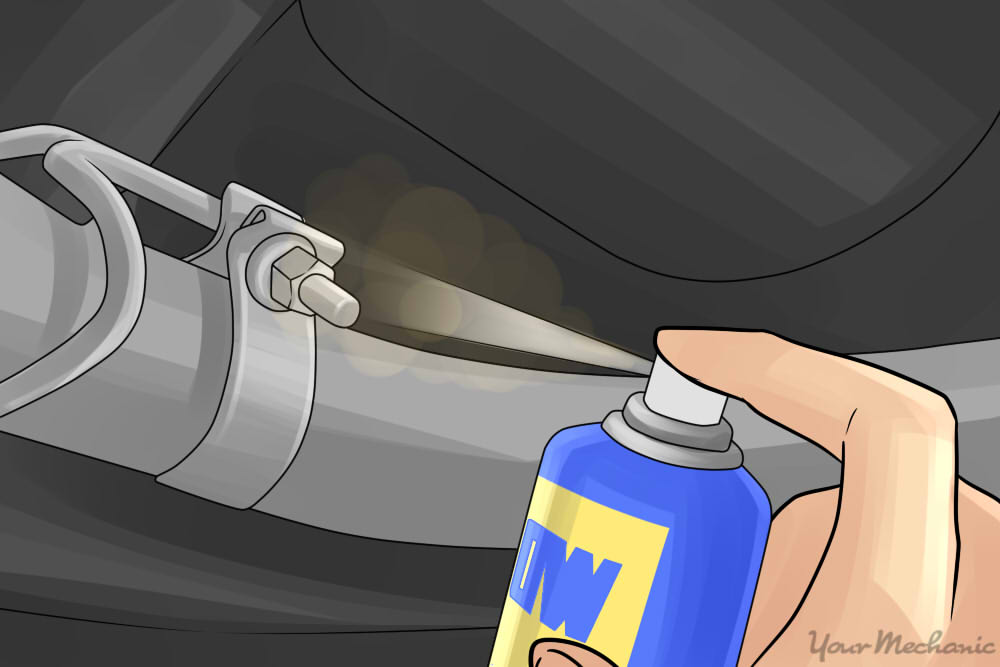
Step 4: Spray the bolts or nuts on the old exhaust clamp with penetrating oil. Once you find the damaged exhaust clamp, spray the nuts or bolts that are holding the clamp onto the exhaust pipe with penetrating oil.
Since these bolts are exposed to the elements under your vehicle, they can easily become rusted. Taking this quick extra step can reduce the potential of stripping nuts and bolts which could lead to you having to cut off the clamp and potentially damaging the exhaust pipes.
Let the penetrating oil soak into the bolts for five minutes.
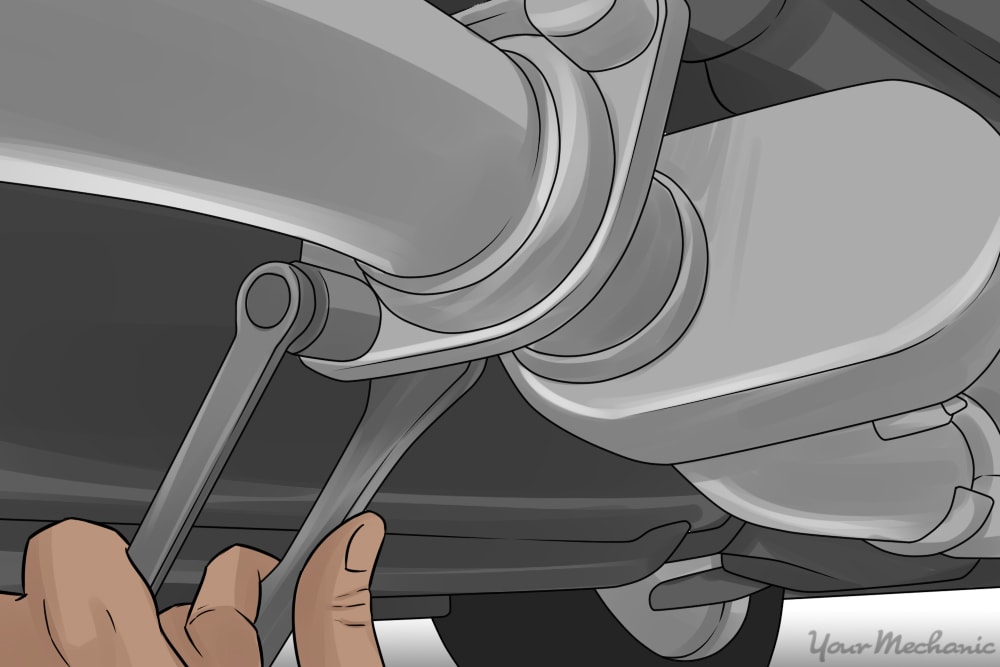
Step 5: Remove the bolts on the old exhaust clamp. Using an impact wrench (if you have one) and the appropriate socket size, remove the bolts or nuts holding the old exhaust clamp in place.
If you don't have an impact or air wrench, use a manual ratchet and socket or boxed end wrench to remove these bolts.
Step 6: Remove the old exhaust clamp. Once the bolts have been removed, you can take the old clamp off the exhaust pipe.
If you have a clamshell-type of clamp, simply pry the two sides off the exhaust pipe and remove. A U-shaped clamp will come off easily.
Step 7: Inspect the clamp area on the exhaust pipe for cracks or leaks in the system. Sometimes, small cracks may be present underneath the exhaust clamp when it's removed. If this is the case, make sure these cracks are serviced by a professional or the exhaust pipe is replaced before installing a new exhaust clamp.
If the connection is good, proceed to the next step.
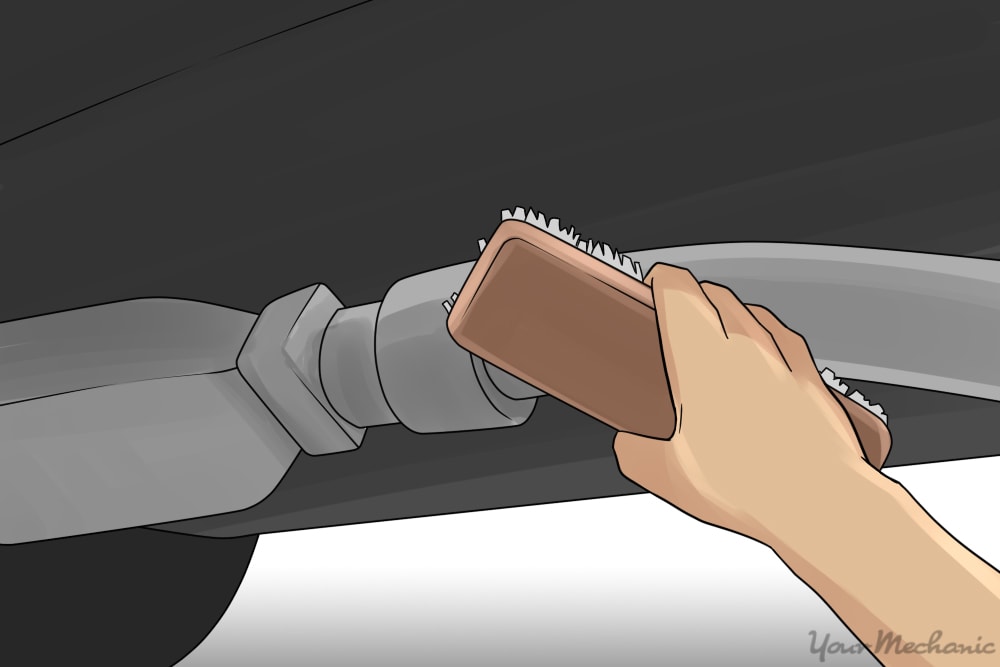
Step 8: Clean the clamp area with steel wool. The exhaust pipe might be rusted or corroded. In order to verify that the connection with the new exhaust clamp is secure, lightly clean the surrounding area of the exhaust pipe with steel wool.
Do not get aggressive with the steel wool, just make sure to dust off any debris that will hinder the connection of the new exhaust clamp.
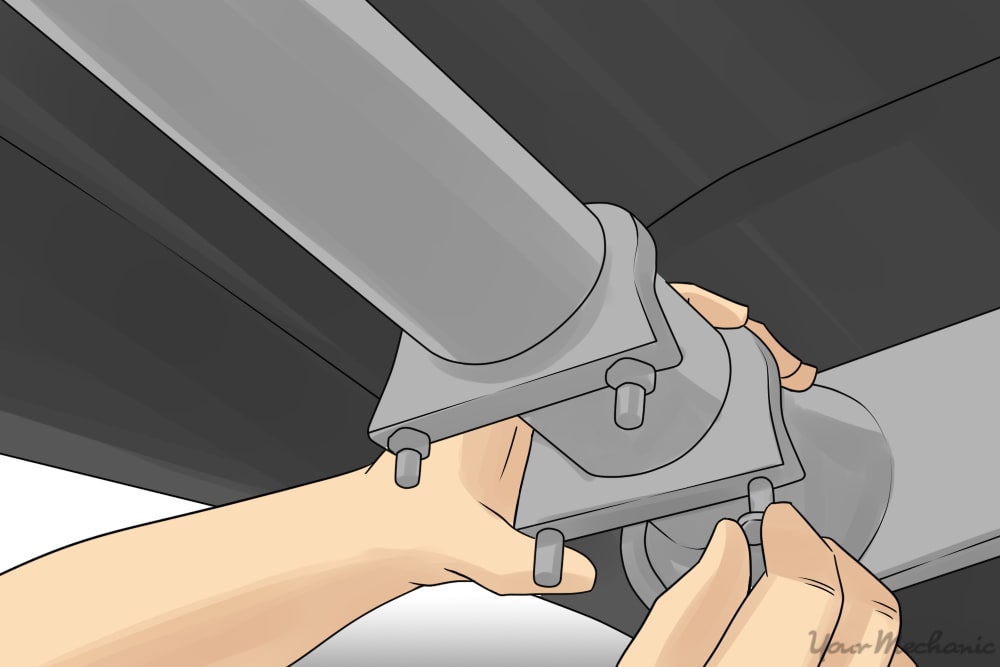
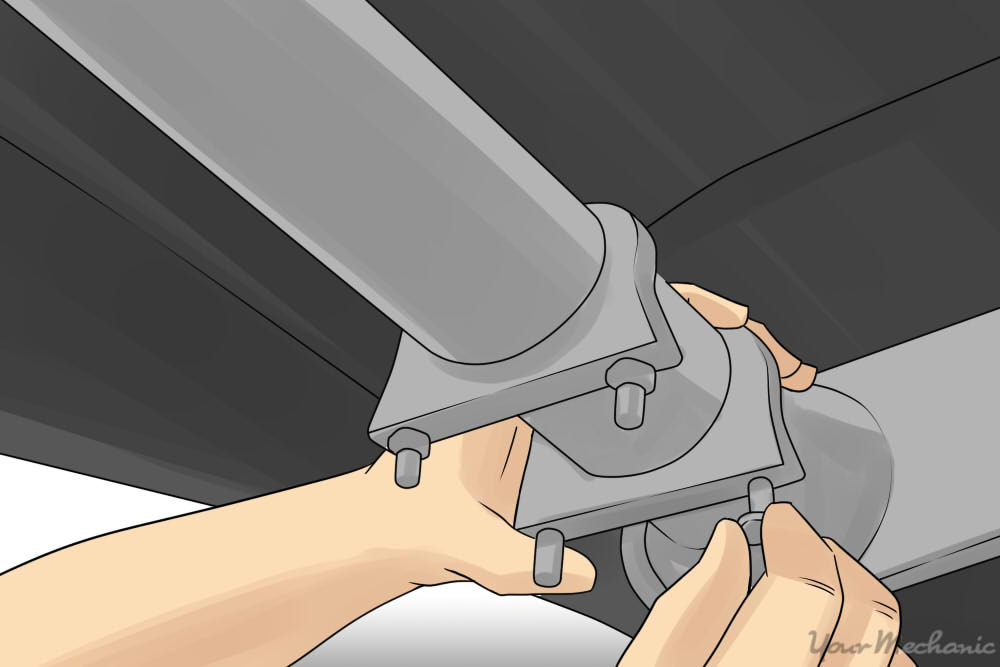
Step 9: Install the new exhaust clamp. The installation process is unique according to what type of clamp you are using. In most cases, you'll be using a U-shaped exhaust clamp.
To install this type of clamp, place the new U ring over the exhaust pipe in the same direction as the U ring from the old clamp. Place the support ring on the other side of the exhaust pipe. While holding the clamp in place with one hand, screw one nut onto the threads of the U ring and hand tighten it until you reach the support ring.
Install the second nut on the other side of the clamp in the same way, making sure to hand tighten it until you reach the support ring.
Tighten the nuts further using an end wrench or ratchet. Use a progressive method for tightening these bolts to ensure that one side is not tighter than the other; you want a clean connection on the exhaust clamp. Do NOT tighten them with an impact wrench; using an impact wrench may twist the exhaust clamp, which is way it's best to install these nuts with a hand tool.
Tighten the exhaust clamps fully with a torque wrench. You can find the recommended torque settings in the vehicle service manual.
- Tip: Many certified mechanics will always finish tightening important nuts that are attached to studs with a torque wrench. By using an impact or air tool, you may cause the bolts to be secured higher than the torque settings. You should ALWAYS be able to turn any nut or bolt at least ½ of a turn with the torque wrench.
Step 10: Prepare to lower the vehicle. Once you're done tightening the nuts on the new exhaust clamp, the clamp should be successfully installed on your vehicle. You should then clear all tools from under the vehicle so that you can lower it.
Step 11: Lower the vehicle. Using your jack or lift, lower the vehicle to the ground. If you are using a jack and jack stands, raise the vehicle slightly first to remove the jack stands, and then proceed to lowering it.
Step 12: Reconnect the vehicle's battery. Reinstall the negative and positive battery cables unto the battery to restore power to the vehicle.
Part 2 of 2: Testing the repair
Most of the time, testing the vehicle after completing an exhaust clamp replacement is very simple.
Step 1: Visually inspect the exhaust pipes. If you noticed previously that the exhaust pipes were hanging low, and you can physically see that they are no longer doing this, then the repair was successful.
Step 2: Listen for excessive noise. If the vehicle was previously making excessive exhaust noise, and now when you start the vehicle the noise is gone, a successful replacement of the exhaust clamp was completed.
Step 3: Test drive the vehicle. As an added measure, it is a good idea to road test the vehicle with any audio off in order to listen for any noise coming from the exhaust. If an exhaust clamp is loose, it will usually create a rattling sound under the vehicle.
Depending on the make and model of the vehicle you are working on, the replacement of this component is rather simple. However, if you've read these instructions and still don't feel 100% confident about completing this repair yourself, if you’d just prefer to have a professional address your exhaust system for you, or if you've noticed cracks in your exhaust pipes, contact one of the certified mechanics at YourMechanic to complete an exhaust system inspection so that they can verify what is wrong and recommend the correct course of action.