Since the creation of the internal combustion engine, the exhaust manifold has been utilized to efficiently flow burnt exhaust gases outside of the motor during the exhaust stroke. The location, shape, sizes, and installation procedures vary based on each vehicle manufacturer, engine design and year.
One of the most durable mechanical parts on any car, truck, or SUV is the exhaust manifold. Utilized on all combustion engines, the exhaust manifold is responsible for collecting exhaust gases coming from the exhaust port on the cylinder head in an efficient method, distributing the exhaust gas through the exhaust pipes, through the catalytic converter, the muffler and then out the tail pipe. They are typically made out of cast iron or stamped steel, due to the fact that they collect tremendous amounts of heat while the engine is running.
The exhaust manifold is connected to the cylinder head; and is customized in design to match the exhaust ports on the cylinder head. Exhaust manifolds are an engine component that is found on all internal combustion engines. The exhaust manifolds that are made out of cast iron are typically a solid piece, while stamped steel is comprised of several sections that are welded together. Both of these designs are customized by the vehicle manufacture to enhance performance of the engines they support.
The exhaust manifold is subject to absorbing extreme heat and toxic exhaust gases. Due to these facts, they can be subject to developing cracks, holes or having problems with the interior portion of the exhaust manifold ports. When the exhaust manifold is wearing out or has broken, it will typically display a few warning indicator that will alert the driver that a potential problem exists. Some of these warning signs may include:
Excessive engine noise: When the exhaust manifold is cracked or has a leak, the exhaust gases will leak, but will also release un-muffled exhaust, which will be louder than normal. In some cases, the engine will sound as if it's a race car - that's how loud of a noise a cracked exhaust pipe or manifold can produce.
Reduced engine performance: Although the noise might sound like a race car, the performance of the engine that has a leaking exhaust manifold will not be similar. In fact, in most cases, an exhaust leak can reduce the engine's operational efficiency by as much as 40%. This causes the engine to "bog down" when under acceleration.
Weird "smell" from under the hood: When exhaust is distributed through the entire exhaust system, it is circulated through the catalytic converter, which removes a large percentage of particulate matter or unburnt carbon from the exhaust. When there is a crack in the exhaust manifold, it will leak gases that can be toxic in many cases. This exhaust will smell different that the exhaust that comes out of the tail pipe.
When you combine all three of these warning signs, it is rather obvious that there is an exhaust leak somewhere near the motor. It is the job of the mechanic to determine the precise location of the exhaust leak in order to properly diagnose the damaged component and make the appropriate repairs. Exhaust manifolds can reach temperatures in excess of nine hundred degrees Fahrenheit. This is why most exhaust manifolds are protected by a heat shield, in order to protect other engine components like wires, sensors and fuel, or coolant lines.
- Note: Removing the exhaust manifold on any vehicle is a very long and tedious process; as in most cases, it will require the removal of multiple engine components to gain access to and remove the exhaust manifold. This job should only be completed by an experienced mechanic with the proper tools, materials and resources to complete the job correctly. The steps documented below are general instructions for replacing an exhaust manifold. It is recommended for any mechanic to purchase and review their vehicle's service manual for the exact steps, tools and methods for replacing this part; as it will vary significantly for each vehicle.
Many mechanics prefer to remove the engine from the vehicle in order to replace the exhaust manifold however it is not always necessary.
Part 1 of 5: Determining the symptoms of a broken exhaust manifold
A broken exhaust manifold will negatively impact the complete operation of any combustion engine. In many cases, the exhaust leak can be detected by the sensors that connect to the vehicle's ECM. When this occurs, the Check Engine Light will typically illuminate on the dashboard. It will also trigger an OBD-II error code that is stored in the ECM and can be downloaded by using a digital scanner. In some cases, the OBD-II code (P0405) will indicate that there is an exhaust gas recirculation error with the sensor that monitors this system. Although this could be caused by an issue with the EGR system, in many cases, it's due to a cracked exhaust manifold of failing exhaust manifold gasket.
Although the exhaust manifold does not have a precise OBD-II error code assigned to it, most mechanics will use the physical warning signs as a good starting point for diagnosing a problem with this part. Since the job of replacing an exhaust manifold can be complex (based on the ancillary parts that need to be removed on your specific vehicle, it's important to be sure that this part is broken before attempting to replace it. If you are in doubt, contact a local ASE certified mechanic who can help diagnose this problem and complete the exhaust manifold replacement job for you if needed.
Part 2 of 5: Preparing the vehicle for replacement of the exhaust manifold
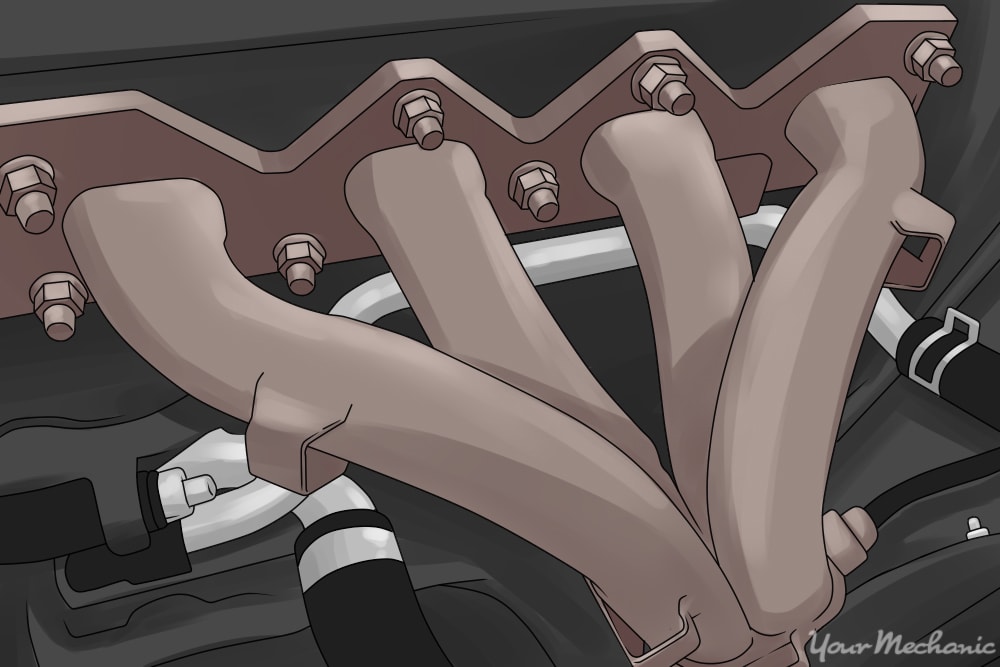
Once the engine covers, hoses and ancillary parts are removed, gaining access to the exhaust manifold and replacing it is a rather simple process. In this diagram, you can see that you'll need to remove the heat shield, then the exhaust pipes, the exhaust manifold and the old exhaust manifold gasket (which is made out of metal).
Once you or a certified mechanic has diagnosed that the exhaust manifold is broken and needs to be replaced, there are two ways of going about this. First, you can make the decision to remove the engine from the vehicle to complete this process efficiently, or you can attempt to replace the exhaust manifold with the engine still inside the vehicle. In many cases, the biggest hurdle or time consumer is removing ancillary parts that obstruct your ability to gain access to the exhaust manifold. Some of the most common parts that should be removed include:
- Engine covers
- Coolant lines
- Air intake hoses
- Air or fuel filter
- Exhaust pipes
- Alternators, water pumps or air conditioning systems
There is no way for us to articulate to you exactly what items need to be removed due to the simple fact that each vehicle manufacturer is unique. This is why we strongly recommend that you purchase a service manual for your precise make, year and model of vehicle that you're working on. This service manual will give you detailed instructions on completing most minor or major repairs. However, if you review all the required steps and you don't feel 100% confident about replacing the exhaust manifold on your vehicle, contact a local ASE certified mechanic from YourMechanic.
Materials Needed
- Boxed end wrench(s) or ratchet wrench set(s)
- Can of carb cleaner
- Clean shop rags
- Coolant container (extra coolant to refill radiator)
- Flashlight or droplight
- Impact wrench and impact sockets
- Light grit sandpaper, steel wool and gasket scraper (in some cases)
- Penetrating Oil (WD-40 or PB Blaster)
- Replacement exhaust manifold, new gasket
- Safety equipment (safety glasses and gloves)
Torque wrench
Tip: According to most service manuals, this job will take about three to five hours to complete. This job will be accessible through the top of the engine compartment however you might have to raise the vehicle in order to remove the exhaust manifold to the exhaust pipes under the vehicle. Some exhaust manifolds on smaller cars and SUV's are directly attached to the catalytic converter. In these cases, you'll be replacing both the exhaust manifold and the catalytic converter at the same time. Please refer to your vehicle's specific service manual for the exact materials and steps for replacing the exhaust manifold.
Part 3 of 5: Steps for replacing the exhaust manifold
Noted below are the general instructions for replacing an exhaust manifold. The precise steps and location of this part are unique to each vehicle manufacturer. Please refer to your vehicle's service manual for the exact steps needed to replace this component.
Step 1: Disconnect the vehicle's battery. Remove the positive and negative cables to disconnect power to all electronic components before removing any parts.
Step 2: Remove engine cover. On most vehicles made after 1991, there will be an engine cover on that covers access to the exhaust manifold. Most engine covers are held on by a series of snap connections and bolts. Remove the bolts using a ratchet, socket and extension and remove the engine cover.
Step 3: Remove engine components in the way of the exhaust manifold. Each vehicle will have different parts that are in the way of the exhaust manifold that will need to be removed before you attempt to remove the exhaust heat shield. Refer to your vehicle service manual for exact steps on how to remove these components.
The heat shield will vary in size, shape and materials it is constructed, but typically covers the exhaust manifold on most domestic and import vehicles sold in the US after 1980.
Step 4: Remove heat shield. On all cars, trucks and SUV's made after 1980, US automotive laws required that a heat shield be installed over the exhaust manifold to reduce the potential of vehicle fires caused by burning fuel lines, or other materials that come into contact with the excessive heat produced by the exhaust manifold. To remove the heat shield in most cases, you'll need to unscrew two to four bolts that are on top or to the side of the exhaust manifold.
Step 5: Spray the exhaust manifold bolts or nuts with penetrating fluid. Due to the excessive heat produced by the exhaust manifold, it's quite possible that the bolts holding this component to the cylinder head will become fused together or rusted. To avoid breaking the studs, apply a liberal amount of penetrating oil on each nut or bolt that holds the exhaust manifold on the cylinder heads.
Once this step has been completed, you might want to complete his step below the vehicle where the exhaust manifold connects to the exhaust pipes. Usually there are three bolts connecting the exhaust manifold to the exhaust pipes. Spray penetrating fluid on both sides of the bolts and nuts and let it soak in while you remove the top portion.
Remove the exhaust manifold using a socket, extension and ratchet. If you have access to impact or air tools, and have room in the engine compartment, you can use these tools to remove the bolts.
Step 6: Remove the exhaust manifold from cylinder head. After the bolts have soaked for about 5 minutes, remove the bolts that secure the exhaust manifold to the cylinder head. Depending on the vehicle you are working on, there will be one exhaust manifold or two; especially if it's a V-style engine. Remove the bolts in any order however when you install the new manifold, you'll need to tighten in a specific order.
Step 7: Remove exhaust manifold from exhaust pipe: Once you've removed the bolts holding the exhaust manifold to the cylinder head, crawl underneath the vehicle to remove the bolts and nuts securing the exhaust manifold to the exhaust system. Most of the time there is a bolt on one side and a corresponding sized nut on the other. Use a boxed end wrench to hold onto the bolt and a socket to remove the nut (or vice-versa depending on your ability to access this part).
Step 8: Remove old exhaust manifold gasket. On most vehicles, the exhaust manifold gasket will be metal and easily come off the cylinder head studs once you've removed the exhaust manifold from the vehicle. Remove the old exhaust manifold gasket and throw away.
- Warning: Do not reuse an old exhaust manifold gasket when you install a new exhaust manifold. This could lead to a compression issue and damage internal engine components, increase exhaust leaks and be hazardous to the health of those who travel in the vehicle.
Step 9: Clean the exhaust ports on the cylinder head. It's important to remove excess carbon build-up on the exhaust ports or inside the exhaust port before you install a new exhaust manifold. Using a can of carb cleaner, spray onto a clean shop rag and then wipe the insides of the exhaust ports until the port appears to be clean. Also, using some steel wool or very light weight sandpaper grit, lightly scrub the outsides of the ports to remove any pits or residue on the outside of the exhaust port.
On most vehicles you'll have to install the bolts holding the exhaust manifold onto the cylinder heads in a certain pattern. Please refer to the service manual of your vehicle for exact instructions and recommended torque pressure settings for reinstalling a new exhaust manifold.
Part 4 of 5: Install the new exhaust manifold
The steps for installing the new exhaust manifold are in reverse of the removal steps as indicated below:
Step 1: Attach the new exhaust manifold gasket onto the studs on the cylinder head.
Step 2: Install a new gasket between the bottom of the exhaust manifold and the exhaust pipes.
Step 3: Attach the exhaust manifold to the exhaust pipes below the vehicle.
Step 4: Slide the exhaust manifold onto the cylinder head studs.
Step 5: Hand-tighten each nut onto the cylinder head studs. Tighten nuts in the precise order as instructed by the vehicle manufacturer until each nut is hand-tight and the exhaust manifold is flush against the cylinder head equally.
Step 6: Tighten exhaust manifold nuts. Tighten to the require torque pressure and in the exact pattern as recommended by the vehicle manufacturer.
Step 7: Reinstall heat shield onto exhaust manifold.
Step 8: Reattach parts. Reattach engine covers, coolant lines, air filters and other parts that were removed to gain access to the exhaust manifold.
Step 9: Refill radiator with recommended coolant. Refill the coolant (if you had to remove coolant lines).
Step 10: Remove any tools, parts, or materials you used in this job.
Step 11: Reattach battery terminals.
-
Note: You will need to test fire the engine to ensure that this job was complete. However, if your vehicle had an error code or a light on the dashboard, you need to follow your manufactures recommended steps for clearing old error codes before you test the exhaust manifold replacement.
Part 5 of 5: Testing the repair
Since most problems with the exhaust manifold are easy to identify by sound or smell, once you test fire the vehicle; the repair should be obvious. After you've cleared the error codes from the computer, test-start your vehicle with the engine hood up so you can complete the following checks:
LISTEN: for any sounds that were symptoms of the broken exhaust manifold
LOOK: for any leaks or gases escaping from either the exhaust manifolds connection to the cylinder head or the exhaust pipes below.
OBSERVE: any warning lights or error codes that appear on the digital scanner after you start the engine
As an added test, it is a good idea to road test the vehicle with the radio off to listen for any road noise or excessive noise coming from the engine compartment.
As indicated above, if you've read these instructions and still don't feel 100% confident in completing this repair, or if during the pre-installation inspection you determine that removing additional engine components is beyond your comfort level, please contact one of our local ASE certified mechanics from YourMechanic.com to replace your exhaust manifold.