In the pursuit of cleaner burning engines that use less fossil fuels, many vehicle manufacturers have employed multiple techniques and processes in many different industries. Leading the way of innovation back in 1966 was the creation of the exhaust gas recirculation system, or EGR system for short. The EGR system is intended to bring exhaust gases containing unburned fuel back into the intake manifold where it is reintroduced to the combustion process. This permits less unburnt fuel (known as emissions), a second opportunity for fuel to burn efficiently. This accomplishes two important benefits:
It reduces the amount of toxic particles and unburnt fuel that exits the vehicle exhaust and enters our atmosphere.
It improves fuel efficiency and engine horsepower and extends the component lifespan of many internal combustion engine parts.

The early EGR system was controlled by a vacuum system, similar in many ways to the older cruise control devices used in the 1970's and 1980's. However, as technology advanced, the EGR system shifted to an electric valve controlled system which regulated the flow of exhaust gases and made the system operate even more efficiently. The sensor that monitors the EGR valve position in this system is called the EVP position sensor.
The EVP position sensor monitors the location of the EGR valve and then relays this information back to the engine control module (ECM), which adjusts the amount of EGR valve control to increase efficient operation of the EGR system. The EVP position sensor constantly updates the ECM, often taking measurements and sending updates multiple times per second. Because of its constant operation, the EVP position sensor is prone to wearing out or having internal electronic issues that can impact the operation of the whole system.
When the sensor fails, it typically impacts the complete operation of the EGR valve and can lead to increased vehicle emissions or in worst case situations cause the engine to misfire or not start at all.
The EVP position sensor is not a mechanical device, meaning that it typically is either working or not working. It can't be fixed on the vehicle, so if a problem exists, you'll have to replace the EVP position sensor itself or the entire EGR valve. In some cases, replacing the EGR valve is the best course of action as it's very common for both parts to malfunction at the same time or within a very short time span.
Like most sensors, if a faulty EVP position sensor is bad it will display a few warning signs. Typically the first will be an OBD-II error code that will illuminate the Check Engine Light on the dashboard. When downloaded, the error code that indicates a problem with this sensor is typically P-0405 (which indicates that the EVP position sensor is receiving low voltage or sending low signal strength). This is often the first indication that the EVP position sensor is damaged and needs to be replaced.
However, there are a few other warning signs that will alert a vehicle owner that a problem may exist with this component. These include the following:
The engine has difficulty starting when cold. One of the primary symptoms of a bad EVP position sensor is poor cold starting performance. When the EVP position sensor fails, it typically sends false information to the ECM. However, the ECM is not aware the info is not accurate and will adjust the EGR valve accordingly. This typically impacts startup performance including idle, which can also create rough idling, engine misfires, or low engine RPM.
The vehicle fails an emissions test. As the EVP position sensor and EGR valve are important components that control vehicle emissions, it is common that a faulty or damaged EVP sensor will lead to a failed emissions test. Usually the EVP position sensor failure will increase vehicle emissions of particulate matter or carbon monoxide, both of which are crucial to emissions passing standards in all 50 states. Many emissions testing facilities offer services to replace the EVP position sensor or EGR valve onsite once they diagnose the issue if they are asked to do so by the customer.
Replacing the EVP position sensor is rather simple due to it's easy-to-access location on most domestic and imported cars, trucks, and SUVs manufactured between 1993 and today.
-
Note: The information included in this article will focus on the general instructions for replacing an EVP position sensor. The exact location, size, shape, and steps for removal of this component may vary based on the manufacturer-specific specs. It is recommended that you refer to your vehicle's service manual for specific instructions on replacing this part as there may be other components that need to be removed in order to gain access to the EGR valve which is where the EVP position sensor is located.
Part 1 of 1: Replacing the EVP position sensor
Noted below are the general steps for removing the EGR valve and then replacing the EVP position sensor which is located on top of the EGR valve. You may choose to replace the EGR valve at the same time, which is a proactive way to ensure your EGR system works efficiently for many years.
Materials Needed
- Flashlight or droplight
- Clean shop rags
- Carburetor cleaner
- Boxed end wrench or ratchet wrench set; ¼" drive is recommended if your EGR valve is located next to the alternator
- OBD-II code scanner
- Replacement EVP position sensor or replacement EGR valve with the EVP position sensor alreayd installed
- Flathead and philips head screwdriver
- Safety equipment (e.g., safety glasses, protective gloves, etc.)
Service manual for your specific make, model, and year of vehicle
Note: Most service manuals indicate that this job will take between one to two hours to complete. The majority of this time is spent removing engine covers, air filters, and some electronic harnesses. The replacement of the EVP position sensor is done after removing the EGR valve, so make sure you have enough time and a clear workplace to complete this task.
Step 1: Obtain the appropriate service manual. The EGR valve is located on the top of the engine, so it's recommended to have a service manual handy so you know what covers or other components need to be removed in order to gain access to your EGR valve.
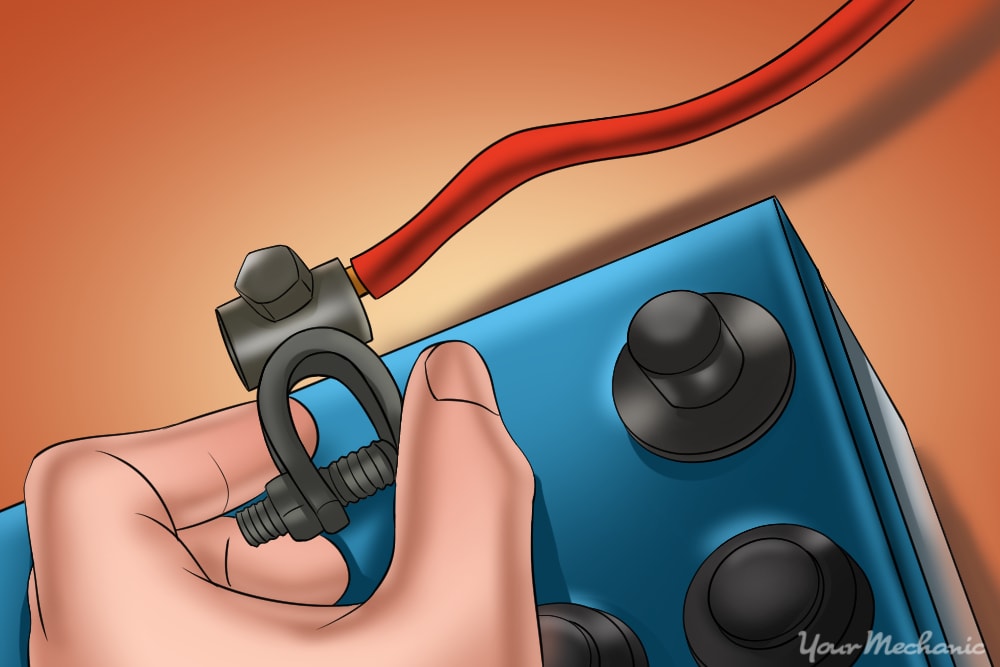
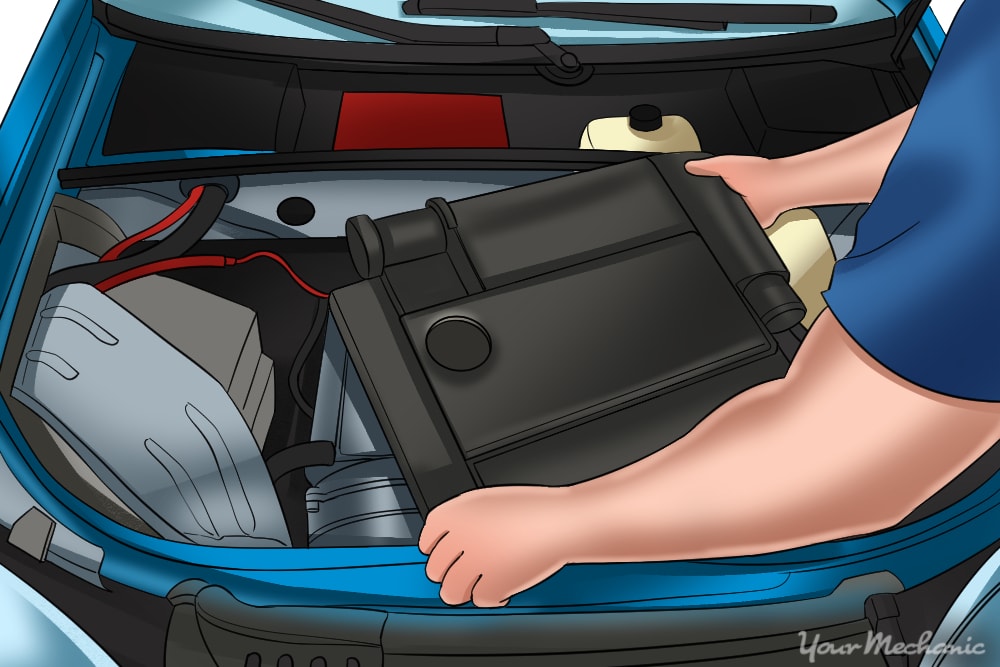
Step 2: Disconnect the vehicle's battery. Locate the battery and disconnect the positive and negative battery cables.
- Warning: Make sure to wear safety glasses and protective gloves when removing the battery cables.
Step 3: Remove the engine cover. Refer to your vehicle’s service manual for instructions on removing the engine covers that will allow you access to the EGR valve.
Step 4: Remove any air filter hoses and attachments running to the intake or throttle body. Remove any components that block your access to the EGR valve.
As noted above, this process is manufacturer specific, so refer to your service manual for exact instructions.

Step 5: Locate the EGR valve. On most domestic vehicles made since 1996, the ERG valve will be located on the front of the engine and on top of the alternator.
This location is especially common in minivans, trucks, and SUVs. Other cars may have the EGR valve located near the rear of the engine.
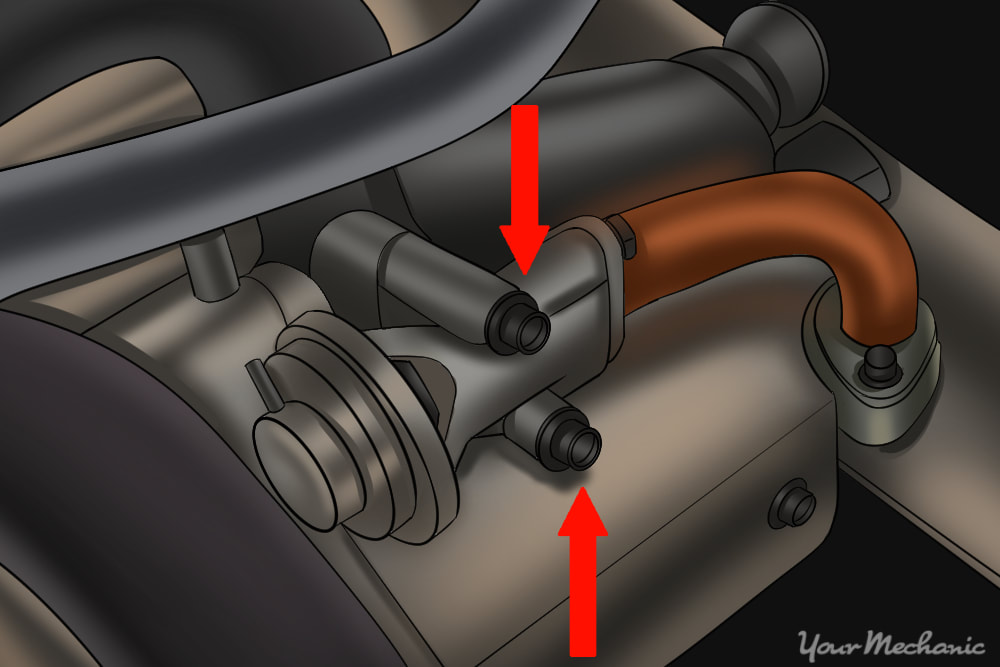
Step 6: Remove the hoses attached to the EGR valve. There are usually two metal connections or hoses that connect the EGR valve to the exhaust and intake. Remove both of these connections by using a boxed end wrench and corresponding socket.
In most cases, there will be screw holes in both pipes, however it could also be a bolt and nut configuration.
Step 7: Remove the EGR valve wiring harness. After you've removed the connecting hoses to the EGR valve, the next step will be to disconnect the electrical harness.
This is usually attached to the EVP position sensor by a clip or tab.
Using a flathead screwdriver, carefully pry the clip open or press down on the tab to allow the harness to slip off.
Step 8: Remove the EGR valve. The EGR valve itself is typically screwed into the engine block, the cylinder head, or a bracket attached to the intake manifold.
There will be two bolts that hold the EGR valve in place.
In some cases, the EGR valve will be very close to an alternator. If you use a ¼" drive socket with an extension, you can avoid removing the alternator to remove the EGR valve.
Unscrew the top bolt and remove it; then unscrew the bottom bolt until it is loose. Once it's loose, you can rotate the EGR valve to easily remove the bottom bolt.
Step 9: Clean the EGR valve connection. Since the EGR valve is removed, this is a great opportunity to clean this area, especially if you're intending to replace the entire EGR valve.
A major reason for faulty performance of the EGR valve is that it develops grime and excess carbon where it attaches to the engine.
Using carburetor cleaner, soak a shop rag and clean the outside and inside port edges where the EGR valve was attached.
- Tip: If you're going to immediately replace the EGR valve, there is no need for this tip. However, if you're going to remove the EVP position sensor from the EGR valve, you can use that same rag you used to clean the port edges and stuff it into the open port. In many cases this leads to the motor and you don’t want any debris to fall into the engine.

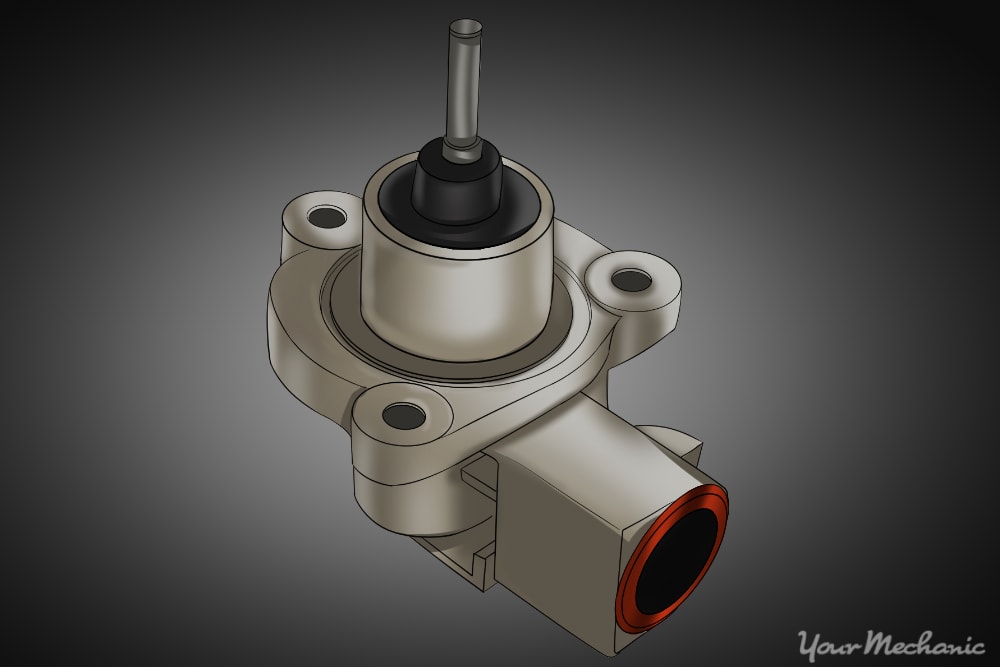
Step 10: Remove the EVP position sensor from the EGR valve. After you've removed the EGR valve from the vehicle, you need to remove the EVP position sensor from that component and replace it with the new one.
On most EGR valves, there are two screws that hold the EVP position sensor on the EGR valve. Remove these screws and take the EVP position sensor off of the EGR valve.
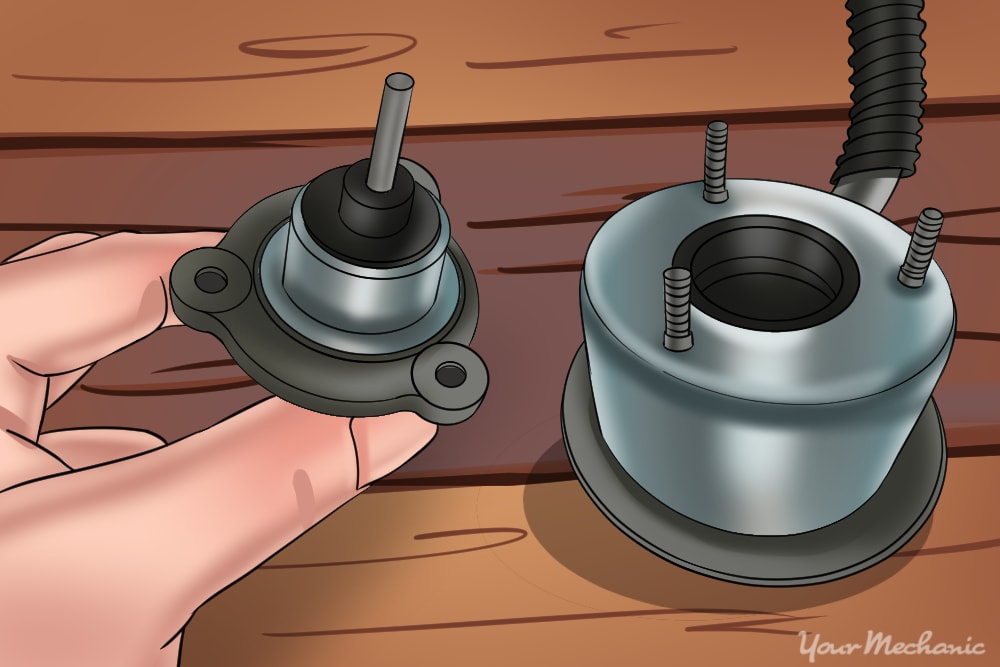
Step 11: Install the new EVP position sensor. Once you've removed the old EVP position sensor, install the new one onto the EGR valve.
- Note: It's a good idea to clean the EGR valve first before completing this step.
Step 12: Reinstall the EGR valve. Once the new EVP position sensor is attached, you can reinstall the EGR valve by putting it back in position and replacing the two bolts that hold it in place.
Step 13: Reconnect the electrical harness. Reconnect the EGR valve to the electrical harness by popping the connector back into its clip or tab on the valve.
Step 14: Replace the hoses or pipes that connect to the EGR valve. Reattach the two metal connections or hoses that connect the EGR valve to the exhaust and intake.
Step 15: Reattach the air filters and any other components. Replace any components that needed to be removed to access the EGR valve.
Step 16: Reinstall the engine cover. Once all of the engine components are back into place, reinstall the engine cover according to your vehicle’s service manual.
Step 17: Reattach the battery cables. Reinstall the positive and negative battery cables onto your vehicle’s battery.
Part 2 of 2: Testing the repair
Once you've replaced this part, you will need to start the vehicle and clear all error codes before you can complete a test drive. This will give you a clean slate to test the repair.
Step 1: Start the vehicle. Start the engine and let it warm up to operating temperature.

Step 2: Check the dashboard. Verify that the Check Engine Light does not come on.
If it does, you should shut the vehicle off and complete a diagnostic scan. The error codes will have to be cleared on most vehicles after completing this service.
If the Check Engine Light comes back on after clearing the error codes, it's likely that the replacement was done incorrectly or that a different component is causing the problem. However, if there are no error codes displayed after resetting them, move on to complete a standard test drive.
Step 3: Test drive the vehicle. Take the vehicle on a 10-mile road test and then return home to check for any leaks or error codes.
Replacing the EVP position sensor is a relatively simple task. However, on modern cars, trucks, and SUVs, the difficult part is often removing the ancillary parts that permit you access to this component. If you've read these instructions and still don't feel 100% confident in completing this repair yourself, you can always contact one of the certified mechanics at YourMechanic to complete the EVP position sensor replacement for you.