
Teaching a teen how to perform simple car maintenance gives them knowledge they can use for a lifetime. And while more complex tasks are probably over their ability level, teens should have no problem performing tasks such as checking fluids, changing the oil, or changing a flat tire. By being patient and explaining the tasks in detail, you can have your teen performing basic car maintenance in no time.
Part 1 of 2: Teaching a teen how to change a tire
Materials Needed
- Car jack
- Gloves
- Jack stand
- Spare tire
- Tire iron
- Torque wrench
Knowing how to change a tire saves a teen from having to call someone to do the task for them, saving both time and money. When you teach your teenage child how to change a tire, make sure he or she observes all safety precautions to prevent potential injury or damage to the vehicle.
- Tip: When checking the pressure in the tires, do not forget the spare tire. The worst time to find that you have a flat or under inflated spare is when you need it to replace a flat tire on the car.
Step 1: How to handle a blowout. What to do if you have a blowout is the first thing to teach a teen. When at highway speeds and a tire blows, the best thing to do is not panic and keep your wits about you.
Keep a firm grip on the steering wheel and let the car slow down without pressing the brakes.
As the car slows to a safe speed, pull to the side of the road as far to the right as possible, activate the hazard lights, and set the emergency brake.
Once it is safe to exit the vehicle, get out and get to the tire jack and spare tire, usually at the rear of the vehicle. Remember to keep an eye out for road traffic.
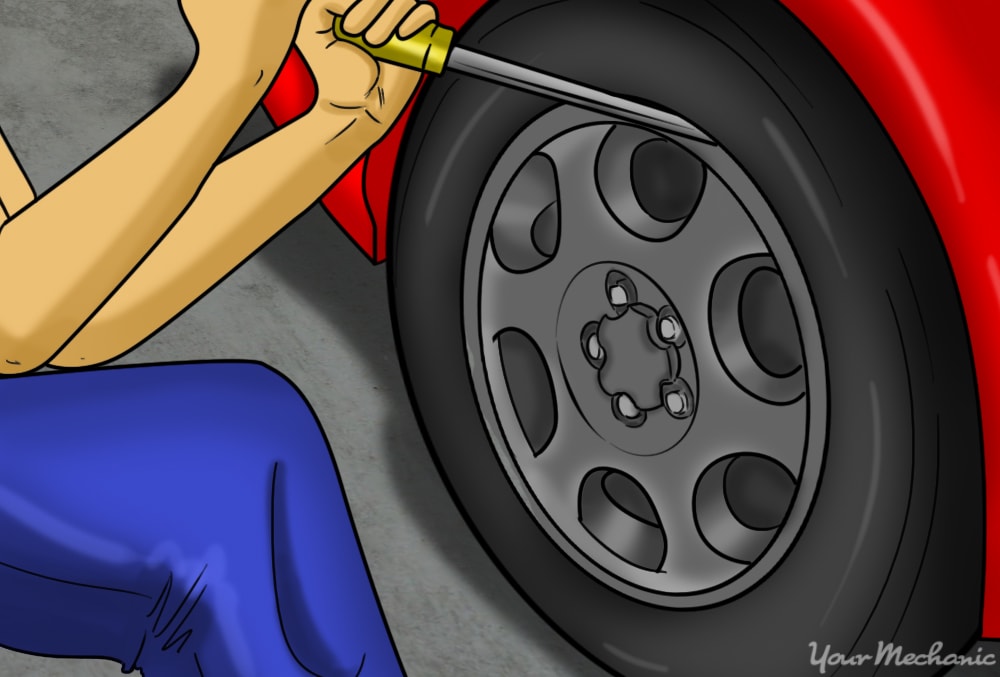
Step 2: Remove the hubcap. After retrieving the spare tire, car jack, and tire iron, start by removing the hubcap.
Most single-socket tire irons usually have a wedge on one end. Stick this wedge underneath the lip of the hub cap and gently pry, working around the edge of the hubcap until it pops off. Set the hubcap aside.
- Tip: The teen should wear mechanic gloves to help protect their hands from the wiring that threading sometimes has when the tire blows.
Step 3: Loosen the lug nuts. Loosen the lug nuts slightly at this point. Loosen them just enough so that they are easier to remove once the car is jacked up, without rocking the vehicle too much and potentially making it come off of the jack.
Step 4: Jack up the car. After the lug nuts are loosened, jack up car so that the rim is off the ground.
Now, remove the lug nuts the rest of the way. Set them aside in a safe location.
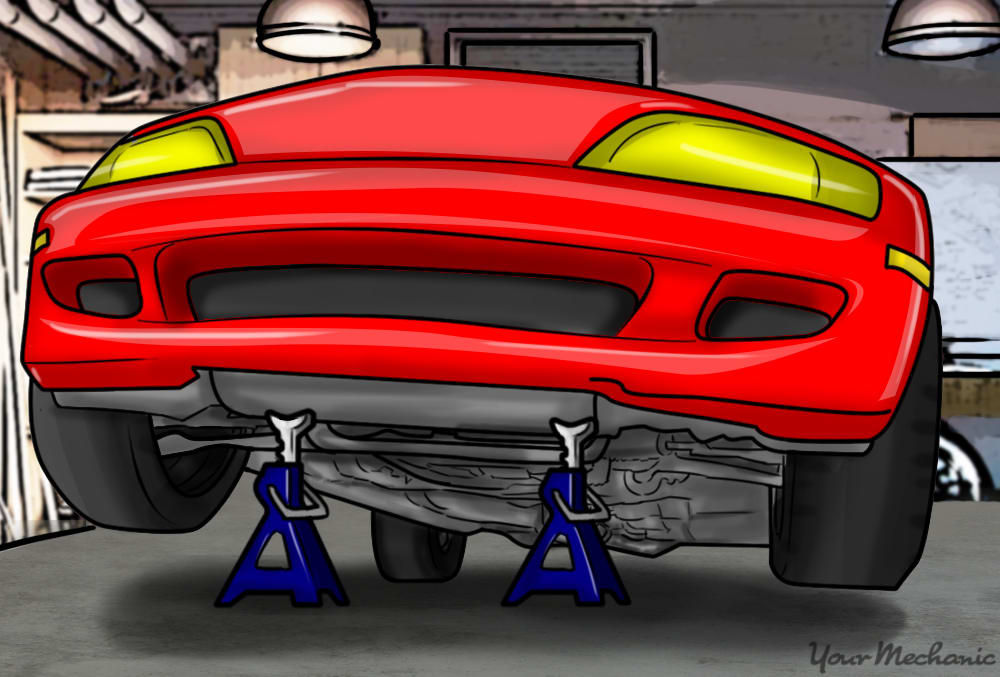
Step 5: Lower the car onto a jack stand. Jack up the car, and then lower it onto a jack stand to keep it from falling.
Step 6: Put on the spare tire. Place the spare tire on the hub, jacking the vehicle up higher if necessary, adjusting the jack stand as you do.
Once the spare tire is on the hub, replace the lug nuts and hand tighten until the tire is flush against the wheel hub.

Step 7: Tighten the lug nuts. Lower the car and tighten the lug nuts with the tire iron in the appropriate tightening pattern.
Make sure to tighten the lug nuts to where they no longer tighten, but don't over tighten. Tightening them any more can stretch the stud. You can use a torque wrench set to 80 to 85 pounds per foot to get the right amount of tightness.
- Warning: Make sure to follow the lug nut tightening pattern for your car. Otherwise the tire might not be flush with the wheel hub and could become unbalanced.
Part 2 of 2: Teaching a teen how to check the fluids and change the oil
Materials Needed
- Car jack
- Gloves
- Jack stand
- Clean rag
- Oil drain pan
- Oil filter (if changing oil)
- Oil filter removal tool
- Oil funnel
- Torque wrench
- Wheel chock
Making sure the fluids in a vehicle are at the proper levels can ensure that it remains in proper working order. The oil, the lifeblood of the engine, helps cool and lubricate vital engine components. Knowing how to change and maintain the oil helps ensure long engine life and proper operation.
Step 1: Prepare the car. Before changing the oil, make sure to set the emergency brake, chock the back tire, and jack up the vehicle so that your teen can slide underneath.
Step 2: Lower the car onto jack stands. Once the vehicle is jacked up to the desired height, lower it onto jack stands to keep the vehicle from falling and causing injury.
Step 3: Remove the oil drain plug. Next, remove the oil drain plug located underneath the engine in the bottom of the oil pan.
Use an oil drain pan to catch the oil as it drains from the vehicle. It helps to wear mechanic gloves to keep your hands clean and make it easier to grip parts.

Step 4: Pull out the dipstick. To check the oil, or other fluids, pull out the appropriate dipstick and wipe it off with a clean rag.
Stick the dipstick back into its receptacle for a few seconds before pulling it back out and checking the end of the dipstick. Most dipsticks have a mark of some sort to signify high and low levels.
- Warning: Fluid levels in a vehicle can fluctuate according to the temperature of the engine. Cold fluids will read lower, while the levels in a hot or warm engine should read higher if at the correct levels.

Step 5: Remove the oil filter. Use an oil filter tool to get a hold on the filter when removing it. Make sure to maneuver the oil drain pan to catch the oil as it drains from where the oil filter is attached to the engine.
- Tip: Loosening the oil fill cap at the top of the engine lessens some of the pressure and can make it easier to remove the oil filter.
Step 6: Replace the oil plug. After all of the oil has drained, replace the oil plug, making sure not to over tighten it.
Use a torque wrench to tighten the drain plug to 29 pounds per foot of pressure to make sure it is tight enough, using an extender if necessary.

Step 7: Add fresh oil. Fill up the oil filter about half way, and using one finger, lubricate the gasket on the bottom of the filter.
Hand tighten the filter until it is flush against the engine, and give it a one-fourth turn using the oil filter wrench to make sure it is secure.
Depending on the number of cylinders in the vehicle, fill the engine at the oil fill port with the appropriate amount of oil using an oil funnel.
Check the owner's manual for the specifications of the vehicle.
- Tip: The best way to pour oil is with the top of the oil container at the top of the pour. This allows you to tip the oil container further before the oil comes out.
Step 8: Take the car off the jack stands.
Step 9: Let the car idle. Start the vehicle and let it idle for about 15 minutes, giving the oil system time to pressurize.
Check the oil level. It should show full on the dipstick.
Also, check underneath the vehicle to make sure there are no leaks.
Changing the oil regularly is the best way to keep your vehicle in great working condition, and teaching a teen to change the oil in a car is the first step toward properly caring for a vehicle. By teaching a teen how to perform basic maintenance on a vehicle, you can ensure they can act independently whenever they encounter a flat tire or need to maintain a vehicle. If you’re not sure of the best way to show your child how to change the oil, one of our mobile mechanics can come to your home and show you.