How to Replace a Wheel Seal

Wheel seals are designed to keep dirt and any other types of debris away from the bearings so that the bearings can stay well lubricated and be able to do their job as they were intended to. If the wheel seal has gone bad, you will notice grease leaking from the wheel bearings and noise coming from the wheels.

Part 1 of 1: Replacing a wheel seal

Materials Needed

  • Allen set metric and standard sockets
  • Assorted pliers
  • Assorted screwdrivers
  • Breaker bar ½ Inch drive
  • Brass hammer
  • Combination wrench set, metric and standard
  • Disposable gloves
  • Emery cloth/sandpaper
  • Flashlight
  • Floor jack and jack stands
  • Metric and standard socket set ½ inch drive
  • Metric and standard wrench set
  • Pry bar
  • Ratchet â…œ drive
  • Seal remover
  • Socket set metric and standard â…œ drive
  • Socket set metric and standard ¼ drive
  • Torque wrench â…œ or ½ drive
  • Torx socket set
  • Wheel socket set ½ inch drive

Step 1: Prepare your work area. Make sure the vehicle is on a level, safe surface, and you have set the parking brake.

loosen lug nuts

Step 2: Loosen the lug nuts. Use a ½ inch drive breaker bar and a lug nut socket set to loosen all the lug nuts before you jack the vehicle up in the air.

jacking up a vehicle

Step 3: Jack the vehicle up and use jack stands. Jack the vehicle up and put it on jack stands. Place the wheels off to the side, away from the work area.

Be sure to jack the vehicle up in the correct location; usually on the sides underneath there are pinch welds you can use to jack from. Then make sure you place the stands on the body or frame and lower it down onto the stands.

removing old wheel seal

Step 4: Remove the old wheel seal. First, disassemble the brakes, starting by removing the caliper bolts. Next, take off the caliper bracket so that you can get to the hub/rotor.

There is a cap on the end of the hub/rotor; use a thin chisel and hammer to pop it off. You can also use a set of large pliers and wiggle it off that way.

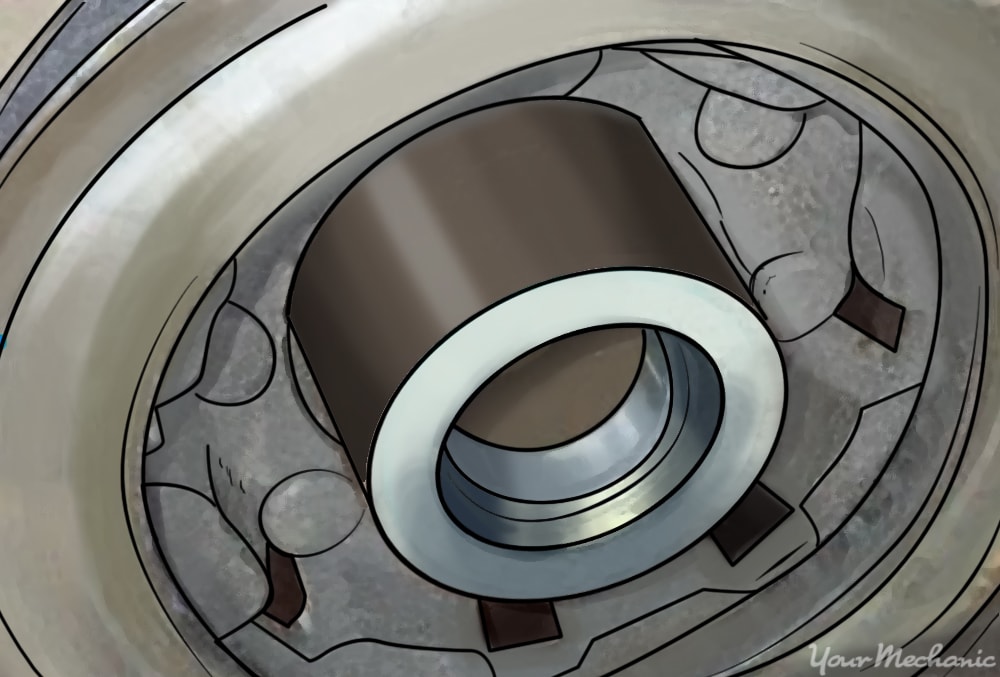
Next, remove the cotter pin locking tab and the nut. That will allow the rotor/hub to slide off the spindle with the bearings and the seal attached. Use a seal remover tool to pop the seal out of the back of the hub/rotor.

brand new wheel seal installed

Step 5: Reinstall the wheel bearings and wheel seal. First, clean all the grit and grime off of the bearings. Use a bearing packer and pack them with fresh new grease. Make sure the inside where the bearings sit is clean, and apply a little bit of new grease along the surface.

Put the rear bearing back in and use a seal installer or a socket big enough to let you hammer the new seal back in straight and flat. Slide the hub/rotor back onto the spindle and reinstall the front bearing along with the washer and nut.

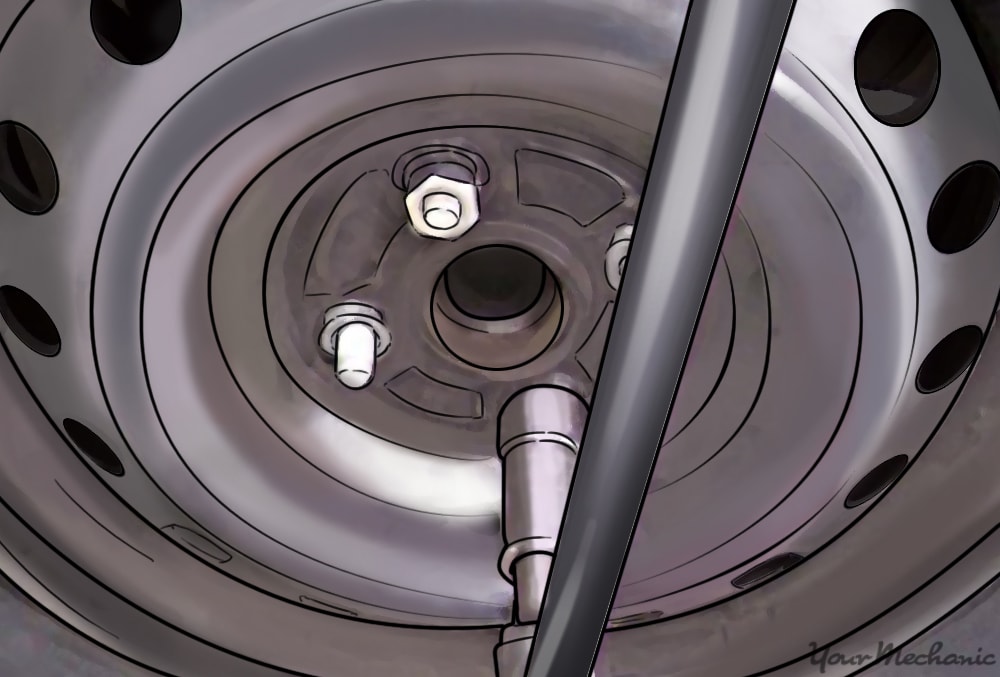
Tighten the nut down hand tight. Spin the hub/rotor until it has some resistance on it. Back the nut off a tiny increment, then install the nut guard and cotter pin.

Put the cap back on using a hammer until it is flush, then start reassembling the brakes. Bolt the brake caliper bracket to the spindle, then place the pads back onto the bracket. Put the caliper back on and torque all the bolts to specification, which can be found in the service manual or online.

installing wheels back onto vehicle

Step 6: Reinstall the wheels. Place the wheels back onto the hubs using the lug nuts. Snug them all down with a ratchet and socket.

Removing jack stands

Step 7: Jack the vehicle back off the jack stands. Place the jack in the correct spot under the vehicle and jack the car up until you can remove the jack stands. Then you can lower the vehicle back onto the ground.

torquing wheels

Step 8: Torque the wheels. Most cars use a torque from 80 ft lbs to 100 ft lbs. SUVs and trucks usually use anywhere from 90 ft lbs to 120 ft lbs. Use a ½ inch torque wrench and torque the lug nuts to the proper specification.

test drive

Step 9: Test drive the vehicle. Test drive the vehicle to make sure that it is running smoothly and there are no clicks or thumps in the front end. If everything feels and sounds good then the job is complete.

Replacing a wheel seal can be done at home with the right set of tools. But if you’re lacking the tools or experience to complete this job on your own, YourMechanic offers professional wheel seal replacement performed at your home or office.


Next Step

Schedule Wheel Seal Replacement

The most popular service booked by readers of this article is Wheel Seal Replacement. YourMechanic’s technicians bring the dealership to you by performing this job at your home or office 7-days a week between 7AM-9PM. We currently cover over 2,000 cities and have 100k+ 5-star reviews... LEARN MORE

SEE PRICING & SCHEDULING

The statements expressed above are only for informational purposes and should be independently verified. Please see our terms of service for more details

Recent Wheel Seal Replacement reviews

Excellent Rating

(11)

Rating Summary
9
1
0
0
1
9
1
0
0
1

Scott

39 years of experience
607 reviews
Scott
39 years of experience
Ford Ranger V6-4.0L - Wheel Seal Replacement (Front) - Denver, Colorado
Scott was on time and finished the Ball Joint Front Replacement. Thanks!
Cadillac DeVille - Windshield Washer Reservoir - Denver, Colorado
Scott had the job completed in a timely manner.

Matthew

12 years of experience
136 reviews
Matthew
12 years of experience
Chevrolet Blazer V6-4.3L - Wheel Seal Replacement (Rear) - Las Vegas, Nevada
Matthew is a hard and and and stays at it tell it's done right. And a breath of fresh air compared to the shop mechanic. And at your mechanic they stand behind the work that very much Guy's.
Chevrolet Blazer - Wheel Seal Replacement (Rear) - Las Vegas, Nevada
Awesome person with great in a pinch and goes till job is complete and accurate and right THANKS MATT HAVE A GREAT DAY C U ON TUESDAY

Napoleon

28 years of experience
147 reviews
Napoleon
28 years of experience
Porsche Cayman H6-2.7L - Oil Change - Chatsworth, California
He's very friendly, and courteous.
Honda Civic - Alternator - Los Angeles, California
Fast and efficient

Johnny

34 years of experience
392 reviews
Johnny
34 years of experience
Chrysler Town & Country V6-3.6L - Wheel Seal Replacement - Citrus Heights, California
So helpful and nice. He explained everything in a very easy to understand manner.

Need Help With Your Car?

Our certified mobile mechanics make house calls in over 2,000 U.S. cities. Fast, free online quotes for your car repair.

GET A QUOTE

Related articles

How to Make Aluminum Wheels Shine
Aluminum Aluminum wheels are an amazing addition to your vehicle to spruce up its appearance. They give your car a sleek, customized look while being relatively low maintenance. Aluminum wheels are desirable in many applications because aluminum is a lightweight...
How to Replace a Power Steering Input Shaft Seal
A faulty power steering input shaft seal can cause hydraulic fluid to leak from the power steering input shaft and cause the system to overheat.
How to Replace a Wheel Speed Sensor
A car wheel speed sensor helps control the anti-lock brake system by determining if a wheel is moving at a different speed than the other wheels.

Related questions

Wheels lock up and have to cool down before driving again.
Hi, If you have had a brake master cylinder or brake booster installed recently the problem may be due to the installer not adjusting the push rod on the brake booster. The push rod may be pushing on the master...
Recommendation and information on seal conditioners and synthetic oils
No, not to my knowledge. The problem with all kinds of sealers and engine oils is that they have all kinds of additives but no one ever tells you what the exact ones are. So you really can't compare. The...
The rear passenger side wheel is pointing inwards it was checked out by a mechanic and they only said its the control arm
The mechanic may be right, but sometimes the terminology gets a little hazy on the Mercedes. That rear suspension has 5 links on each rear wheel, damage to any of them can cause the wheel to point in the wrong...

How can we help?

Our service team is available 7 days a week, Monday - Friday from 6 AM to 5 PM PST, Saturday - Sunday 7 AM - 4 PM PST.

1 (855) 347-2779 · hi@yourmechanic.com