According to the National Highway Traffic Safety Administration (NHTSA), tire failure leads to approximately 11,000 automotive crashes every year in the United States. Of these car accidents that occur in the US each year due to issue with tires, almost half are fatal. Most Americans don't think twice about our tires; we assume as long as they are round, have tread and are holding air, they are doing their job. However, having your tires rotated at recommended intervals can save you a ton of money on buying new tires but also potentially save a life.
Most automotive as well as OEM and aftermarket tire manufacturers agree, tires should be rotated every 5,000 to 6,000 miles (or every other oil change). Proper rotation intervals can reduce the potential of the leading causes of tire-related accidents including tread separations, blowouts, bald tires and under-inflated tires. However, by simply taking the action to rotate and inspect your tires, you're also able to diagnose problems with your suspension and steering and can improve fuel economy as well.
What is a tire rotation?
For those that may not know, a tire rotation is the act of moving the location of the wheels and tires of your vehicle to a different location on the vehicle. Different vehicles are designed with different weight, steering, and drive-axle configurations. This means that all tires don't wear evenly on all four corners of the vehicle. Different types of vehicles have different tire rotation techniques or recommended rotation patterns.
Different types of vehicles have individual patterns that the tires should be rotated. For example, if you have a front-wheel drive vehicle, all four tires will eventually be placed on each wheel hub location within the first 20,000 miles. In this example, if we follow the left front tire's original location and assume all the tires are brand new and the vehicle has 50,000 miles on the odometer, the rotation process would be as follows:
Left front tire would be rotated to the left rear at 55,000 miles.
That same tire now on the left rear would be cross-rotated to the right front at 60,000 miles
Once on the right front, that same tire would be rotated straight back to the right rear at 65,000 miles
Finally, the same tire now on the right rear would be rotated back to it's original location (the left front) at 70,000 miles.
This process is continued until all the tires have worn past their tire wear indicators and need to be replaced. The only exception to tire rotation is when a vehicle has two different size tires or what's referred to as "directional" tires on their cars, trucks, or SUVs. An example of this would be a BMW 128-I which has a smaller tire on the front wheels than on the rear wheels. Plus, the tires are designed to stay on the right side or the left side at all times.
Proper rotation can extend the lifespan of a tire by as much as 30%, especially on front-wheel drive vehicles since the tires will wear out much quickly on the front than on the rear. Tire rotations can be completed by the dealership, service stations, or specialty tire stores like Discount Tires, Big-O or Costco. However, even a novice mechanic can properly rotate their tires, inspect them for wear and check tire inflation as long as they have the right tools and knowledge. In this article, we'll address the proper steps that you need to take in order to rotate your own tires and keep your vehicle running strong by inspecting them for potential issues brewing on your car, truck, and SUV.
Part 1 of 3: Understanding your car tires
If you recently purchased a new car and are looking to complete most of the maintenance on your own, starting with maintaining proper tire wear and inflation is a good start. However, even older cars that have used tires on them need to be maintained and properly rotated as well. Tires that are OEM are often made from a very soft rubber compound and only last about 50,000 miles (if they are properly rotated every 5,000 miles, are always properly inflated and there are no suspension alignment issues. Aftermarket tires tend to be made with harder rubber compounds and can last up to 80,000 miles under perfect circumstances.
Before you start thinking about rotating your tires, it's important for you to understand what type of tires you have, what size they are, the proper air pressure and when the tire is determined to be "worn out" and needing replacement.
Step 1: Determine your tire size: Most tires made today fall under the "P" metric system for tire sizing. They are installed by the factory and designed to enhance or match the suspension design of the vehicle for maximum efficiency.
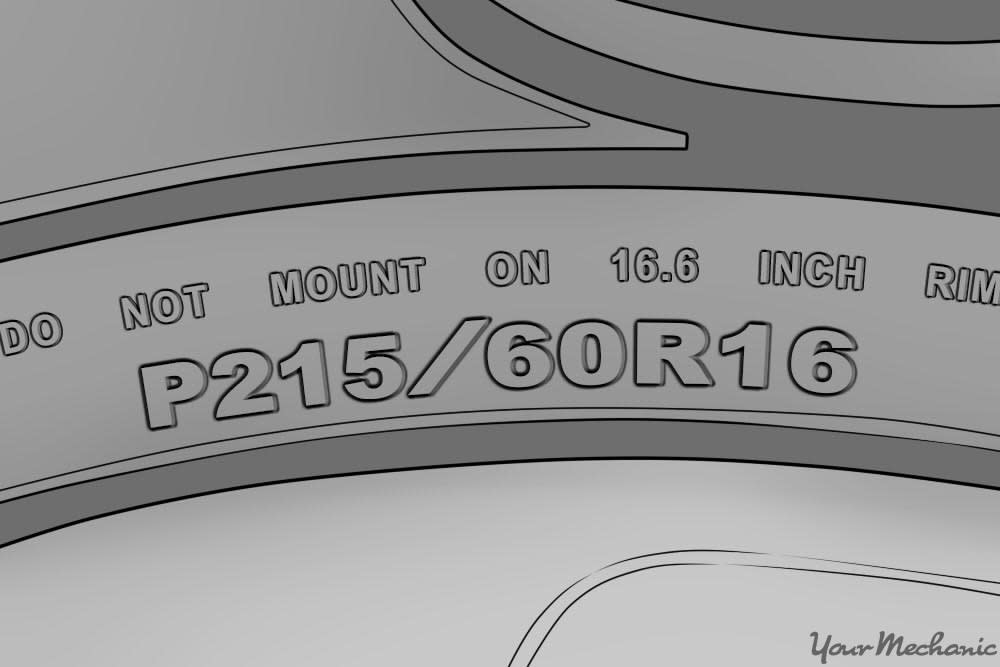
Some tires are made for high performance driving, while others are designed for aggressive road conditions or all-season use. Regardless of the exact purpose, the first thing you need to know about the tires on your vehicle is what the numbers mean:
The first number is the tire width (in millimeters).
The second number is what's referred to as the aspect ratio (which is the height of the tire from the bead to the top of the tire. This aspect ratio is a percentage of the width of the tire).
The final designation will be the letter "R" (which stands for Radial Tire) followed by the wheel diameter size in inches.
The final numbers to write down on paper will be the load index (two numbers) followed by the speed rating (a letter, usually S, T, H, V, or Z).
If you have a sports car or sedan, it's likely that your tires have a speed rating of H, V, or Z. If your car is a commuter, economy car, you'll likely have an S or T rated tire. Trucks are different and may have an LT designation (light truck). However, the tire sizing chart still applies to them unless they are measured in inches, for example, 31 x 10.5 x 15 would be a tire that is 31" tall, 10.5" wide, and is installed on a 15" diameter wheel.
Step 2: Know your recommended tire inflation: This is often a trap and can be very confusing for some general automotive mechanics. Some people will tell you that the tire's inflation is found on the tire (which they would be correct in a round-about way).
The tire's pressure documented on the tire is a max inflation; meaning that the tire should not be filled above that recommended tire pressure when it's cold (as tire pressure will increase when it's hot). This number however is NOT the recommended tire pressure for the vehicle.
To find your vehicle's recommended tire pressure, look on the inside of your driver door and find the date code sticker, which will list the vehicle's VIN number, but also display the recommended tire pressure for your vehicle. One thing that people tend to forget is that tire manufacturers build tires for different vehicles, however, automotive manufacturers pick a tire that matches their individual components, so although the tire manufacturer might recommend a max inflation, the automotive manufacturer has the final say on what's recommended for proper handling, safety and efficiency.
Step 3: Know how to read tire wear:
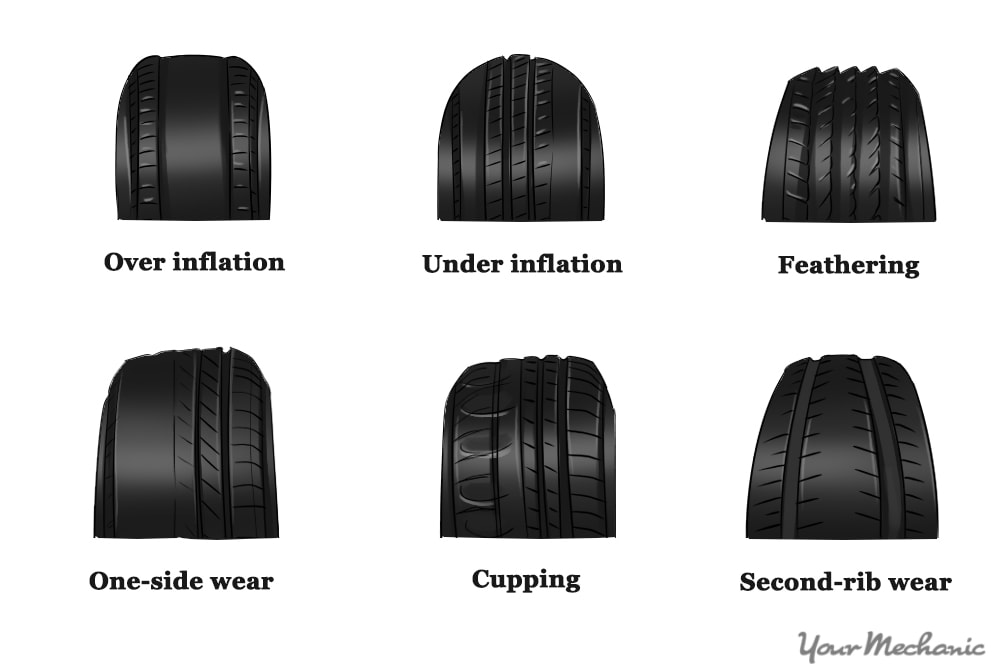
Taking time to rotate your tires is useless unless you know how to "read" the wear on your tires.
Tires that show excessive wear on the outside edges of the tires are typical when the tire pressure is under inflated frequently. When a tire is under inflated, it tends to "ride" on the inside and outside edge more than it should. This is why both sides are worn out.
Over inflation is the direct opposite of under-inflated tires: those that are over inflated (past the vehicle's recommended tire pressure) tend to be worn out more in the center. This is due to the fact that when inflated, the tire will grow and ride on the center more than evenly as it's designed.
Bad suspension alignment is when the front-end suspension components are damaged, or not properly aligned. In this case, it's an example of what is called "toe-in" or the tire leaning more to the inside of the car than on the outside. If the wear is on the outside of the tire, that's "toe-out." In either case, this is a warning sign that you should have your suspension components checked; as it's likely that the CV joint or tie rods are damaged, worn out or may break.
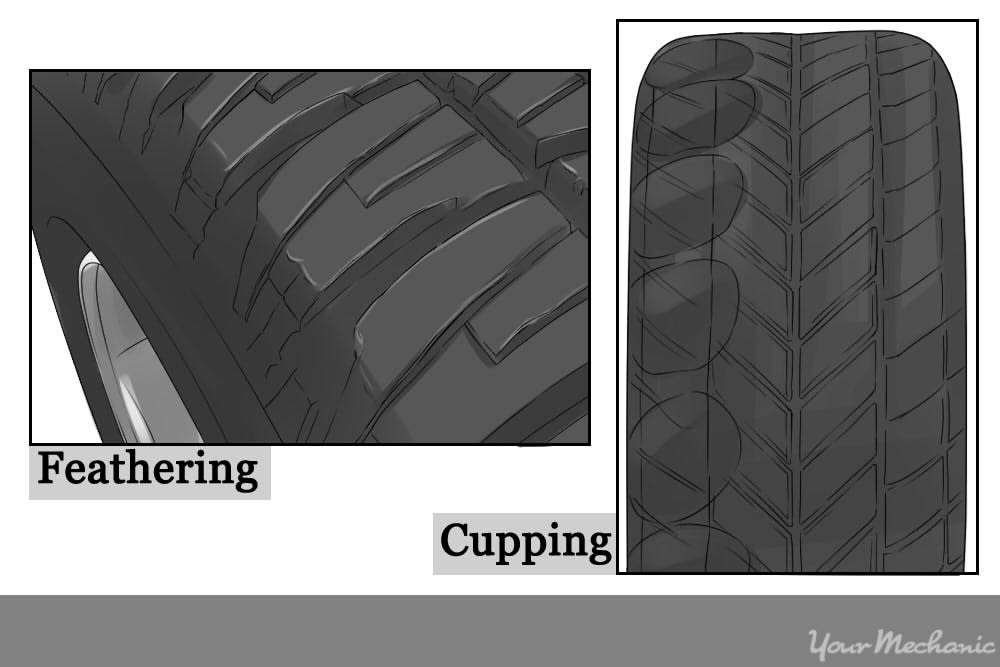
Cupping, or un-even tire wear due to a shock or strut that is worn out, is a signal that other issues with your car exists and should be fixed before too long.
When tires have extensive wear patterns like this, they shouldn't be rotated. You should fix what's causing the problem and purchase new tires.
Part 2 of 3: How to rotate tires
The actual process of rotating tires is rather simple. First, you'll need to know what type of rotational pattern is best for your tires, vehicle and the tire wear.
Materials Needed
- A flat surface
- Car jack
- Flathead screwdriver
- (4) Jack stands
- Chalk
- Lug nut wrench
- Air compressor & tire inflation nozzle
- Air pressure gauge
- Torque wrench
Step 1: Find a flat surface to work on your car: You should not raise your car on any type of inclined surface because this will increase the chances of the car tipping over or a wheel getting away.
Take your car, tools, and jack stands to a flat area with plenty of space to work on your car. Set the parking break and make sure vehicle is in "Park" for automatic transmission vehicles or in a forward gear for manual transmissions. This will ensure your wheels are "locked" so you can easily remove lug nuts.
Step 2: Jack the vehicle up on four-independent jack stands: In order to rotate all four tires at the same time, you'll have to raise your vehicle on four independent jack stands. Check with your vehicle service manual to locate the best location to place jacks for safety and proper support.
- Tip: In a perfect world, you'd want to do this job using a hydraulic lift, where all four tires would be easily accessible and the vehicle can be raised simply. If you have access to a hydraulic lift, please use this method above jack stands.
Step 3: Mark the tires destination with chalk: The professionals do this – why not you? Before you start the rotation, mark the location that the tire is being rotated to with chalk on the top or the inside of the tire. This will reduce confusion when you take your tires to be balanced and return to place them back on the vehicle. Refer to your rotation guide for reference. Mark the tires with these letters for the following location:
- LF for Left Front
- LR for Left Rear
- RF for Right Front
- RR for Right Rear
Step 4: Remove the hub or center cap: Some vehicles have a center or hub cap that covers and protects the lug nuts from being removed.
If your vehicle has a center or hub cap remove this item first before you being to remove lug nuts. The best way to remove a center cap is with a flat blade screwdriver. Locate the cap removal slot and gently pop the cap off the center hub.
Step 5: Loosen the lug nuts: Using either a lug nut wrench, or an impact air/electric wrench, remove the lug nuts on one wheel at a time.
Step 5: Remove wheel from the hub: Once the lug nuts have been removed, take the wheel and tire off the hub and let it sit on the hub until all four tires have been removed.
Step 6: Check tire inflation: Before moving the tires to their new location, check the tire pressure and set the tire pressure to the recommended settings. You'll find this information in the owner manual or the side of the driver door.
Step 7 (OPTIONAL): Take tires to tire shop to be balanced: If you have access to a truck or another vehicle, it's a good idea to have your tires professionally balanced at this time. Typically when tires ride on the rear of the vehicle, they can fall out of balance when the tires/wheels hit pot holes or other objects.
When you rotate these tires to the front, it will cause a vibration above 55 mph and you'll have to have the balance completed to rectify the situation. You can also take your vehicle to a shop to have this step completed after you rotation your own tires.
During this step, you can also examine your tires for wear. Refer to the section above for descriptions of common wear indicators. If your tires are worn out more than normal, it is recommended to have new tires installed and balanced.
Step 8: Take tires to their new destination and place on hub: Once you've had your tires balanced and air pressure checked, it'll be time to rotate the tires to their new location. Hopefully you wrote down the location of where you should rotate the tires in step 3 above. Follow these guidelines to easily rotate your tires.
- Start with the left front tire and take it to its new location.
- Place the tire on the hub where it's supposed to be rotated
- Take the tire on that hub to its new location and so forth
Once you've done this with all four tires, you'll be ready to reinstall the wheels on their new hub.
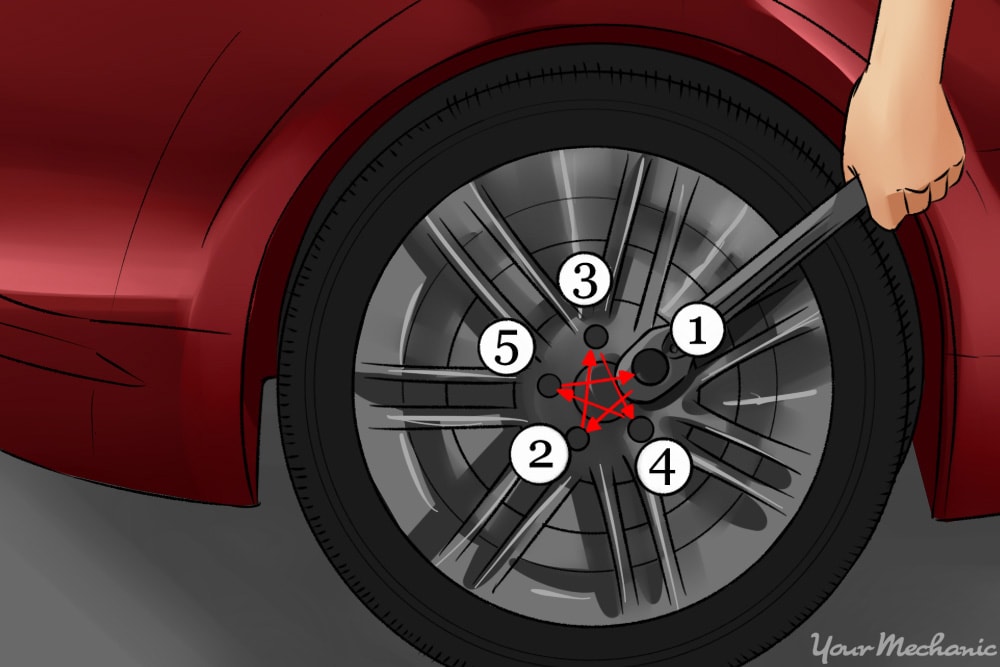
Step 9: Install lug nuts on each wheel: This is where most accidents occur. When you install the lug nuts on each wheel, the goal is to make sure the wheel is installed flush onto the wheel hub correctly; not to get out of the NASCAR pit stall quicker than the neighbor. In all seriousness, most accidents involving wheels are due to improperly installed wheels, cross threaded lug nuts or improper torqued lug nuts.
The image above shows the correct method and pattern on how lug nuts should be installed based on how many lug nuts the vehicle has on the hub. This is known as the "star pattern" and must be used when installing wheels onto any vehicle. To correctly install lug nuts, follow this method:
Hand screw the lug nuts on until you've spun the lug nut at least five revolutions. This will reduce the potential of cross threading the lug nuts.
Using an impact wrench on the lowest setting or with your lug wrench, start tightening the lug nuts in the recommended pattern indicated above. DO NOT OVER TIGHTEN THEM AT THIS POINT. You simply want to guide the lug nut until the wheel is flush and centered on the hub.
Complete this process on all lug nuts until all lug nuts are FIRM and the wheel is centered on the hub.
Step 10: Torque wheel lugs to recommended pressure: Again, this is a vital step that many forget to complete and could result in a fatality. Using a calibrated torque wrench torque your lug nuts using the above star pattern to the recommended torque pressure as indicated in your vehicle service manual. Complete this step on all four wheels before lowering. If you set the parking break and made sure your vehicle was in gear noted in Step 1, this should be easy.
Step 11: Lower vehicle from jack stands.
Part 3 of 3: Road test your vehicle
Once you've rotated your tires, you'll be ready to take it on a test drive. If you took our advice in Step 7 and had your tires balanced professionally, you should have a very smooth ride. However, if you didn't, you should look for the following signs that the tires need to be balanced.
- The vehicle steering wheel vibrates when you accelerate
- The front end shakes when you approach highway speeds
If this happens on your road test, take the vehicle to a professional tire shop and have the front wheels and tires balanced. Rotating your tires can add thousands of miles to your tires' lifespan, prevent uneven tire wear, and keep you safe from tire blowouts. By maintaining your tires, you will save both time and money in the long run and ensure your safety on the road. Take the time to care for your tires by rotating your tires yourself, or having a professional mechanic rotate your tires for you.