When your engine is running, it creates power that is used for more than just accelerating. The engine’s power turns a belt on the front of the engine that can power additional systems such as:
- The air conditioning compressor
- The air pump
- The alternator
- The power steering pump
- The water pump
Some vehicles have more than one belt to operate additional components while others have an alternate means of powering systems. Each vehicle model is unique in what that drive belt operates.
Engine drive belts are made of reinforced rubber. Rubber is used to manufacture belts because:
- Rubber is flexible even in cold weather.
- Rubber is inexpensive for manufacturing.
- Rubber is non-slip.
If the belt was completely made of rubber, it would stretch or break under just a bit of stress. It is reinforced with fibers to retain its shape and to strengthen it, preventing it from stretching. The fibers can be cotton strands or even kevlar strands that add enough strength to stop the belt from losing its shape and stretching.
Because belts are made of rubber, they are subject to wear and weathering. As your engine runs, the belt goes around on the pulleys several hundred times per minute. The rubber can heat up and slowly wear off the belt. It can also dry out and crack from heat or from lack of use and can eventually snap.
If your belt breaks, you can experience drivability problems like a lack of power steering, no power brake assist, your battery won’t charge, or your engine could overheat. You should change the engine drive belt at the first sign of excessive wear, cracking, or fraying. Some small cracking is considered normal wear on the rib side and crack should not go to the bottom of the rib or it is considered excessive and should be replaced.
Part 1 of 4: Select a new serpentine belt
It is absolutely crucial that your new belt is the same size and style as the one on your vehicle currently. If it is not, you will not be able to operate your car until you get the proper belt.
Step 1: Check part listings at an auto parts store. In the belt aisle, there will be a book that indicates the correct belt for nearly all modern vehicles.
- Find the correct belt on the shelf and purchase it. Be aware of optional belts for different accessories on your vehicle.
Step 2: Ask a parts professional. Ask an employee at the parts counter to locate the correct belt for your vehicle. Confirm the model, year, and options if they are requested. The engine size and any options may be needed to get the correct belt.
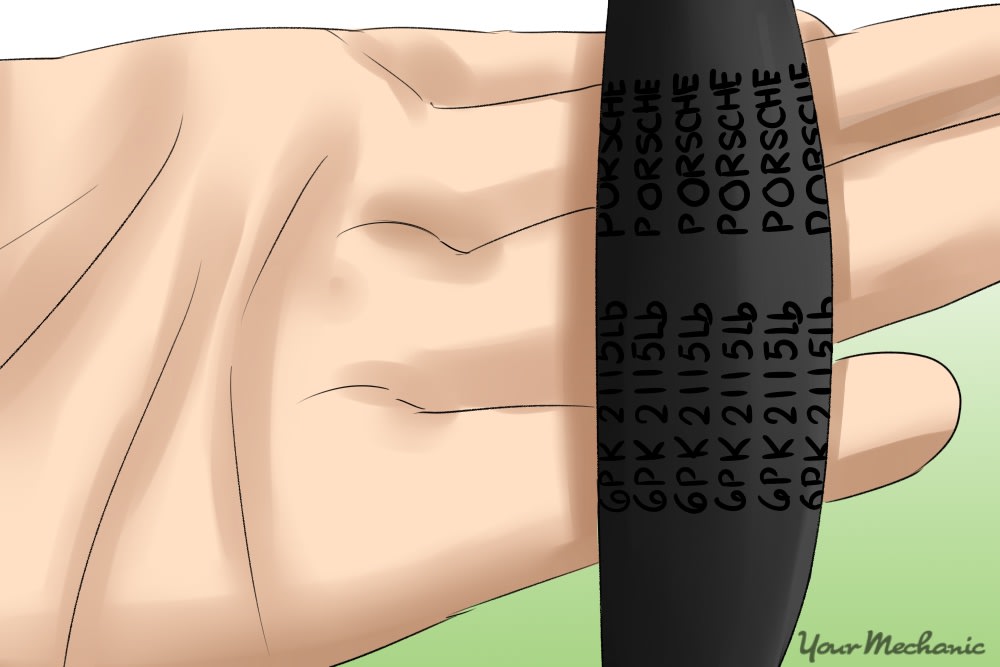
Step 3: Check the belt. If you cannot find a listing for your belt, check on the belt itself. Sometimes there will be legible part numbers or belt identifiers on the belt even after years of use. Match that number up with one at the auto parts store.
Step 4: Physically match the belt up. If none of the other options are successful, remove the belt and bring it into an auto parts store. Match it up physically with a new belt by trial and error.
Ensure it has the exact same number of ribs, is the same width, and the same length. The length of the new belt may be just a small amount shorter than the worn belt due to the old belt may be stretched out.
Ask a parts professional to help if you are uncertain of the process.
Part 2 of 4: Remove the serpentine belt
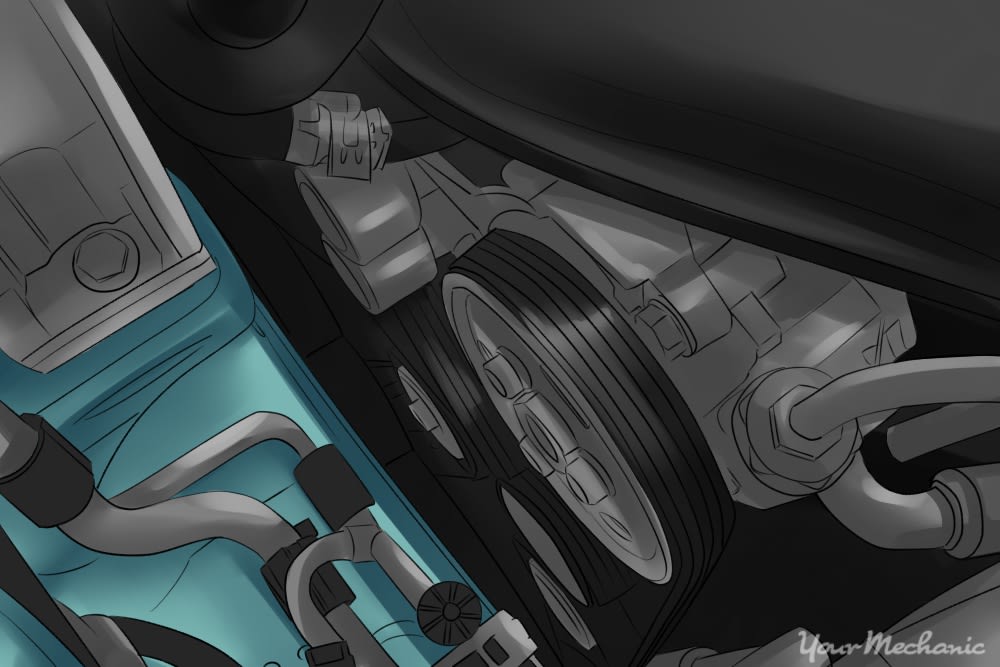
Modern cars almost all use a single belt that operates all the accessory devices on your engine. It is routed in a bit of a complex manner and is held in place with tension. A serpentine belt is a flat, reinforced rubber belt that has several small grooves in it on one side, and a smooth backside. The grooves match up with protrusions in some of the pulleys on your engine while the backside of the belt runs along smooth surfaces on idler pulleys and tensioners. There are a few engines that use a belt with grooves on the inside and outside of the belt.
Materials Needed
- Belt
- Eye protection
- Gloves
- Pen and paper
Ratchet and socket set (⅜”)
Warning: Always wear gloves and eye protection when working under the hood of your car.
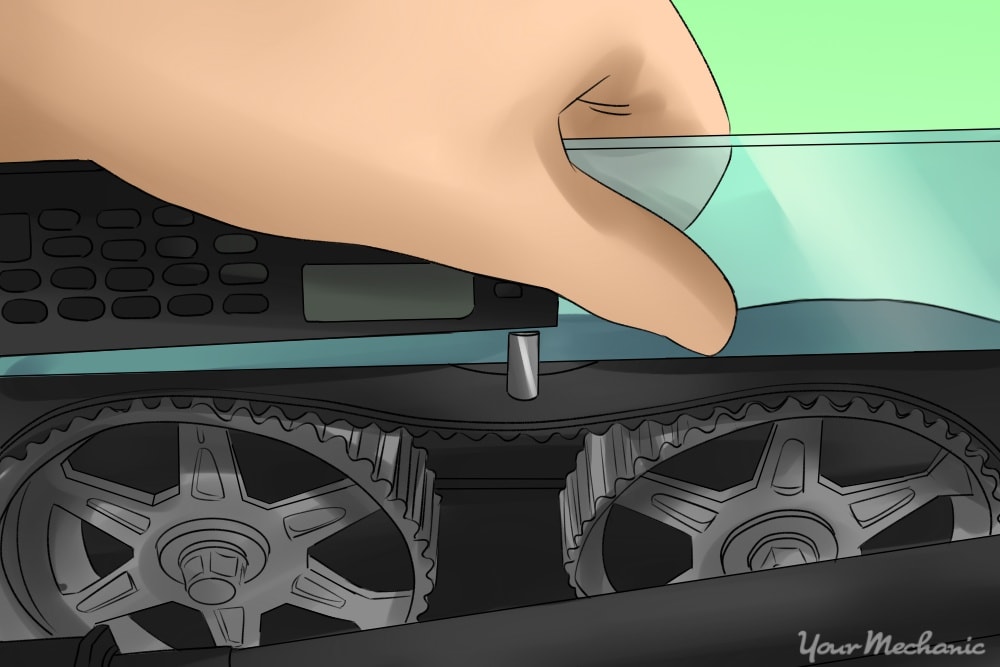
Step 1: Identify the belt routing. Check under the hood for a label that shows the correct routing of your engine belt.
If there is no label for belt routing, draw the pulleys and the belt routing with your pen and paper.
Warning: It is crucial that your new belt is installed in the exact same fashion as the old belt or you can cause serious damage to your engine or other components.
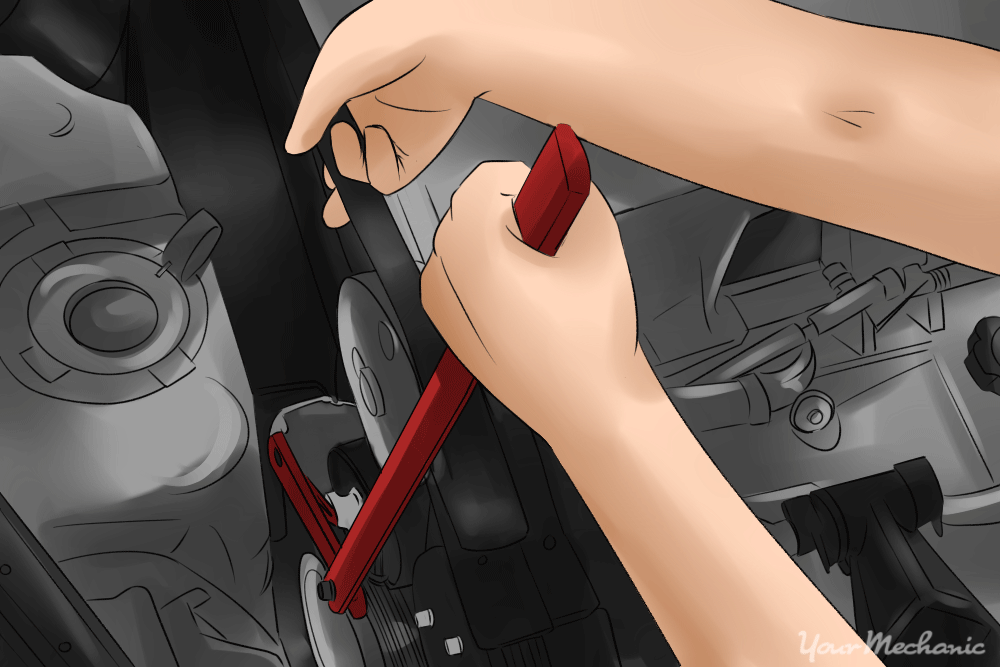
Step 2: Release the belt tension. There are a few different styles of tensioners for serpentine belts. Most new vehicles use a spring-loaded tensioner while others have a screw-style adjustable tensioner.
Step 3: Use ratchet to release tension. If your tensioner is spring-loaded, use your ratchet set to release the tension.
You may need to put a socket on the ratchet to put it on the tensioner pulley bolt. Another style requires just the square ⅜” or 1/2" drive on the ratchet to be inserted into a hole on the tensioner.
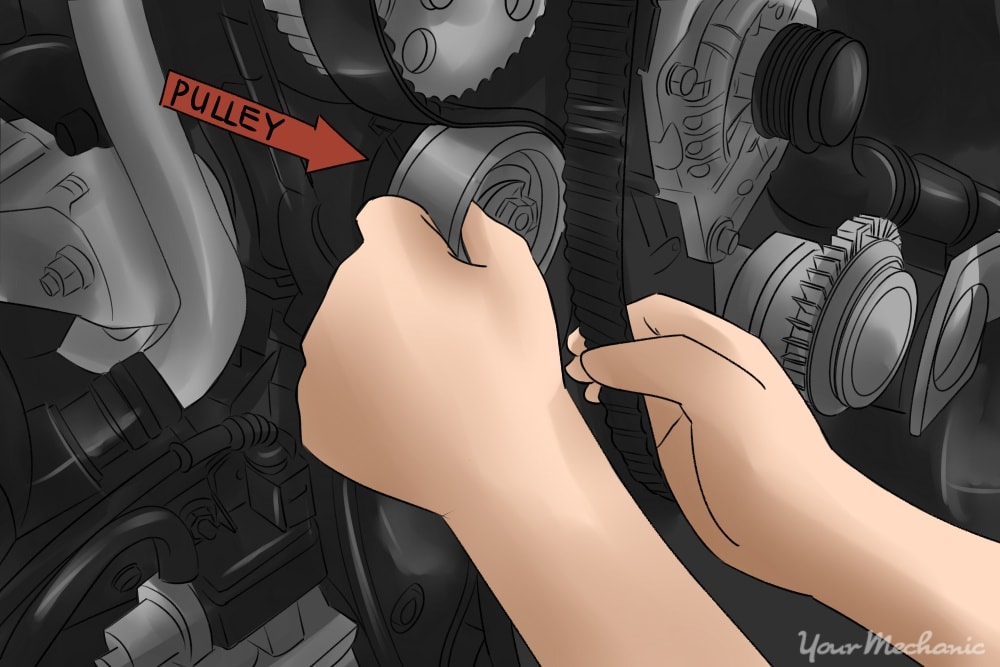
Pry in the direction opposite the belt to release tension. Be careful not to get your fingers caught in the belt while removing the belt.
Step 4: Match the socket. If your tensioner is adjustable with a screw-style adjuster, match up the correct socket to the adjuster bolt and install it on your ratchet.
Step 5: Loosen the tensioner adjustment bolt. Turn the ratchet in a counterclockwise direction until the belt loosens and you can pull it off the pulleys by hand.
Step 6: Take the old belt off. While you are still holding the tensioner with one hand on the ratchet, slide the belt off one or more pulleys with your free hand.
Step 7: Release the tensioner. Slowly and in a controlled manner, ease the tensioner pulley back to a resting position with the ratchet if your tensioner is spring loaded. If you release tensioner too fast or slip off and it slams to stop it may damage the tensioner and would need to be replaced.
Part 3 of 4: Inspect the pulleys
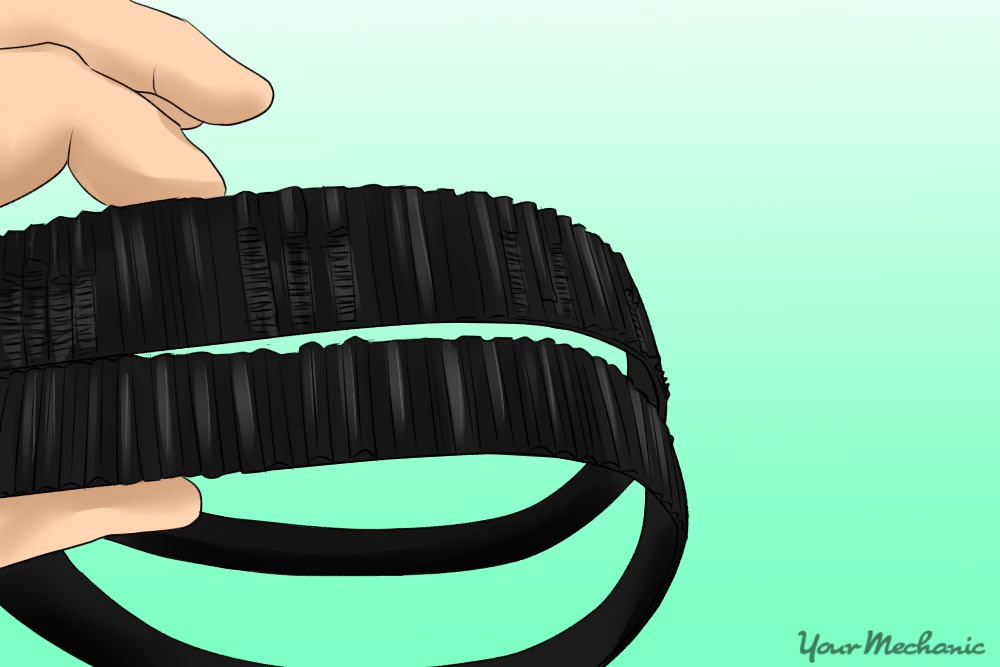
Step 1: Pull the old belt off the rest of the pulleys. Compare its length and width with the new belt you have to install to make sure it is correct.
- The belt width and number of ribs needs to be exact and the length needs to be very close. The old belt may have stretched a bit while in use so it may be slightly longer than the new one by an inch or less.
Step 2: Inspect the condition of the pulleys. Look for missing pieces of the metal pulleys, check for bends, and spin each pulley to make sure they aren’t noisy or seized.
Make sure the pulleys are lined up. Look from one side to see if any pulleys are noticeably set further back or protruding forward.
If they don’t spin smoothly or are out of alignment, you need to address the issue before installing a new belt. A damaged pulley or seized component will quickly throw off or destroy a new belt.
Part 4 of 4: Install the new serpentine belt

Step 1: Install the new belt loosely. Route the new belt over as many pulleys as you can. If possible, install the belt onto every pulley aside from the tensioner.
- Verify that the smooth backside of the belt only contacts the smooth pulleys and the grooved side only contacts the toothed pulleys.
Step 2: Apply pressure to the tensioner. Apply pressure to the tensioner with your ratchet if your tensioner is spring-loaded.
- Pull it as far back as you can manage. It will likely need to be extended a little further than the old belt as the new one is stiffer and hasn’t stretched out.
Step 3: Slide the belt onto the tensioner with your free hand.
- If you weren’t able to completely route the belt before this step, do so with the tensioner pressure released.
Step 4: Slowly release your pressure on the tensioner. Keep your hands clear in case the belt slips off or snaps back in your direction.
- Check all pulleys to make sure the belt has engaged all ribs properly.
Step 5: Tighten the adjustable tensioner. If your tensioner has a screw-style adjuster, tighten it with the ratchet until the belt is taut between all the pulleys.
Step 6: Check the belt deflection. Press on the longest belt run between pulleys to make sure it is tight. You should only be able to manage about a half-inch of deflection.
- If you have more deflection than a half-inch to an inch, your belt tensioner is weak and needs to be replaced. Do so before you run your engine. If you have an adjustable tensioner then re-adjust the belt tighter till the deflection is a half-inch.
Step 7: Start your engine and watch the belt turning. Watch the belt for a minute or two, confirming that there is no squealing noises, grinding noises, or smoking from the belt.
If there are any irregularities, shut the engine off immediately and check your belt routing. If the belt routing is correct, you may have another mechanical issue which you should have looked at by a certified mechanic such as YourMechanic.
Re-check belt tension after running the engine for a couple of minutes to make sure the belt's initial stretch does not require re-adjustment.
If you don't have the time or wish to have a professional perform this repair for you, consider having a certified mobile mechanic, such as one from YourMechanic, help you replace your drive belt.