How to Replace a Combination Switch Assembly

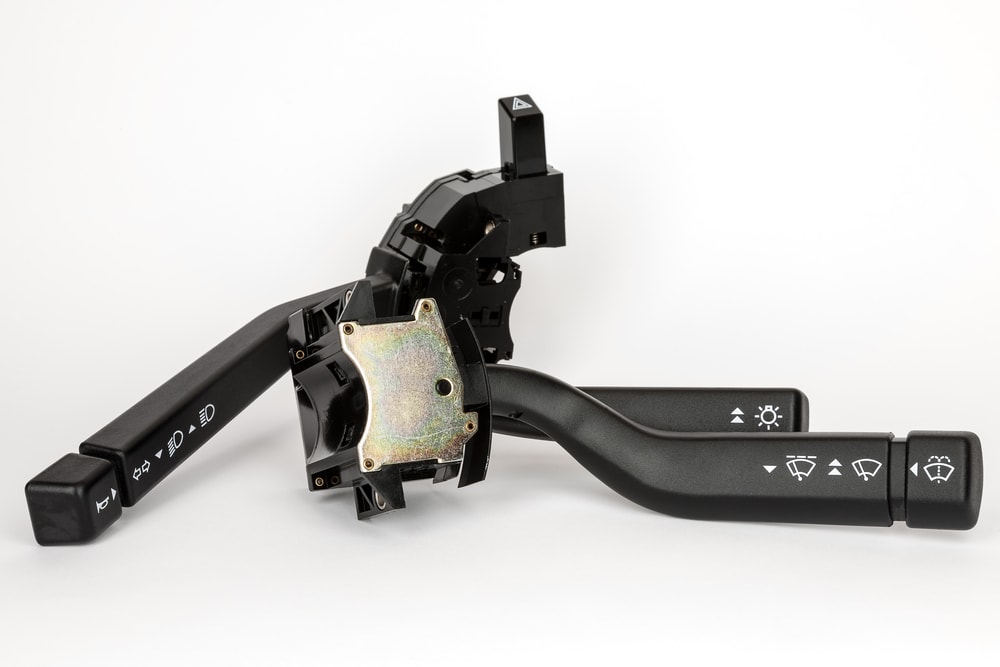
A vehicle's combination switch, also known as a multi-function switch, allows the driver to use a combination of functions at the reach of a single hand. Functions such as turn signals, windshield wipers, windshield washer, high beams, flash to pass, and in some vehicles cruise control.

A bad or failing combination switch will often show symptoms such as turn signals inoperative, hazards inoperative, or intermittently causing turn signals not to work. Making sure your lights work in general is basic safety when driving, inspecting your vehicle when you plan to drive can prevent accidents when driving.

Part 1 of 4: Accessing and removing the combination switch

Materials Needed

Step 1: The combination switch location. The combination switch for your vehicle is located on the right side of your steering wheel column.

Step 2: Remove the column panels. Start by removing the 2 to 4 mounting screws located underneath the steering column, some mounting screws are phillips, standard (slotted) or torx.

Step 3: After removing the mounting screws. Most steering column covers will come right off, others types may need to be separated by applying pressure to the releasing tabs that lock the two pieces together.

Part 2 of 4: Removing the combination switch

Step 1: Locate the combination switch mounting screws. The mounting screws for the combination switch, mount the combination switch to the steering column. There should be 2 to 4 mounting screws for the combination switch, some combination switches are held with clips.

Step 2: Remove the mounting screws holding the combination switch. Remove the mounting screws and set aside. If your combination switch is retained by plastic tabs, release the tabs by compressing the clips to slide combination switch out.

Step 3: Removing the combination switch. Pull the combination switch away from the column.

Step 4: Disconnect the combination switch. To disconnect the connector there will be a release tab at the base of the connector. Push in the tab and pull on the connector to disconnect.

Part 3 of 4: Installing the new combination switch

Step 1: Apply dielectric grease. Grab the connector and apply a thin even layer of dielectric grease to the face of the connector.

Step 2: Connecting the combination switch. Get the new combination switch and connect it.

Step 3: Mounting the combination switch. Line up the switch to the steering column, and set into place.

Step 4: Installing the mounting screws. Start the mounting screws by hand, then tighten using the screwdriver necessary.

Part 4 of 4: Installing steering column covers

Step 1: Installing the column covers. Place the steering column cover onto the column and start the mounting screws.

Step 2: Tighten mounting screws. Once the mounting screws are in place, use the screwdriver necessary to hand tighten.

Step 3: Test the functions. Now test the different functions your combination switch has to verify the repair is complete.

The vehicle’s combination switch is a switch made for the convenience and safety of the driver. A faulty switch could cause an accident that could have been avoided with the vehicle’s signal lights. Being sure your turn signals and other lights are in working order is safe for you and anybody around. If replacing a combination switch is something you would rather leave to a professional, consider one of YourMechanic’s certified technicians perform the replacement to do it for you.


Next Step

Schedule Combination Switch Assembly Replacement

The most popular service booked by readers of this article is Combination Switch Assembly Replacement. YourMechanic’s technicians bring the dealership to you by performing this job at your home or office 7-days a week between 7AM-9PM. We currently cover over 2,000 cities and have 100k+ 5-star reviews... LEARN MORE

SEE PRICING & SCHEDULING

The statements expressed above are only for informational purposes and should be independently verified. Please see our terms of service for more details

Recent Combination Switch Assembly Replacement reviews

Excellent Rating

(21)

Rating Summary
21
0
0
0
0
21
0
0
0
0

Matthew

34 years of experience
1438 reviews
Matthew
34 years of experience
Jeep Wrangler L4-2.5L - Combination Switch Assembly - Williamsburg, Virginia
Matthew was great! Very professional, friendly, and knowledgable. He was able to fix the problem with my Jeep quickly.
Buick Century - Combination Switch Assembly - Norfolk, Virginia
2nd call with Matt. He is on time with great work. I plan to always request Matt for all services.

Ramon

21 years of experience
166 reviews
Ramon
21 years of experience
GMC Sierra 1500 V6-4.3L - Combination Switch Assembly - Tucson, Arizona
Did the job quickly and efficiently, very polite, punctual. Great experience!

Ben

19 years of experience
114 reviews
Ben
19 years of experience
Ford Expedition V8-5.4L - Combination Switch Assembly - Littleton, Colorado
Ben was great to irk with. Very knowledgeable, extremely timely and quite patient with my questions on other issues I raised as to my aging autos performance and helping understand and prioritize future necessary repairs.

Juan

10 years of experience
426 reviews
Juan
10 years of experience
Cadillac DeVille V8-4.9L - Combination Switch Assembly - Chapel Hill, North Carolina
Juan stayed an extra hour to get the job done. He was able to do it without using new parts he bought which saved me a bunch of money. He is great

Need Help With Your Car?

Our certified mobile mechanics make house calls in over 2,000 U.S. cities. Fast, free online quotes for your car repair.

GET A QUOTE

Related articles

How Long Does a Windshield Wiper Refill Last?
Regardless Regardless of where you live, you will probably have to deal with rain and other forces of nature from time to time. This means that you will need to take the time to make sure that all of the...
How to Replace a Door Lock Switch
The door lock switch goes bad if pressing the button does not lock or unlock the door or the usual functionality fails to work.
B2110 OBD-II Trouble Code: Front Wiper Motor Relay Circuit Open
B2110 trouble code means there's an error in the front wiper motor relay circuit, caused by a faulty front wiper relay or electrical components.

Related questions

How do I reactivate the auto-up and auto-down features?
The auto-up and auto-down features allow you to entirely roll up or down a power window with one press of a button. Sometimes the auto-up and auto-down functions stop working, and need to be reactivated. To do this, pull the...
dash lights go out when i turn on headlights
In order to properly diagnose the system, the wire diagram would need to be looked at for your Chrysler. In general, the dashboard lights are powered and set to brightness from the headlight switch (https://www.yourmechanic.com/services/headlight-switch-replacement). Have the switch checked to...
HVAC controls don't work. All fuses are good and the relay works. there is still no power to HVAC unit.
Hi there. Check to see if there is power to the air conditioning controls. If there is power to the controls and there is power to the fuse and relay, then the air conditioning controls need replaced. If there is...

How can we help?

Our service team is available 7 days a week, Monday - Friday from 6 AM to 5 PM PST, Saturday - Sunday 7 AM - 4 PM PST.

1 (855) 347-2779 · hi@yourmechanic.com