Misfiring is a common drivability problem that may take some time to diagnose, depending on the cause. When an engine misfires, one or more cylinders fail to fire properly, either because of ignition or fuel-related issues. An engine misfire is accompanied by a loss of power directly proportional to the severity of the misfire.
While idling, the engine may shake so badly that vibrations can be felt throughout the vehicle. The engine may be running poorly and one or more cylinders may be misfiring. The check engine light may come on or keep flashing.
The most common cause for a misfire is a problem related to the ignition system. Misfiring can be caused by loss of spark; imbalanced air/fuel mixture; or loss of compression.
This article focusses on finding the source of misfires caused by the loss of spark. Loss of spark is caused by anything that prevents coil voltage from jumping the electrode gap at the end of the spark plug. This includes worn, fouled or damaged spark plugs, bad plug wires or a cracked distributor cap.
Sometimes, misfiring may not be caused by a total loss of spark but by incorrect sparking or by high-voltage electrical leaks.
Part 1 of 4: Locate the misfiring cylinder(s)
Materials Needed
Step 1: Scan the car to find the misfiring cylinders. Use a scan tool to find the diagnostic trouble code (DTC) numbers for the problem.
If you do not have access to a scan tool, your local parts store can scan your car for free.
Step 2: Get a printout with all the code numbers. The DTC numbers show specific circumstances where the collected data does not meet acceptable values.
Misfire codes are universal and go from P0300 to p03xx. “P” refers to Powertrain while 030x refers to a detected misfire. “X” refers to the cylinder in which the misfire occurred. For example: P0300 refers to a random misfire, P0304 refers to a misfire occurring in cylinder 4, while P0301 signifies cylinder 1 and so on.
Pay attention to all ignition coil primary circuit codes. There may be other DTCs such as coil codes or fuel pressure codes related to fuel, spark, or compression that can help you diagnose the problem.
Step 3: Identify the cylinders on your engine. Based on the type of engine your vehicle has, you can identify the specific cylinder or cylinders that are not firing.
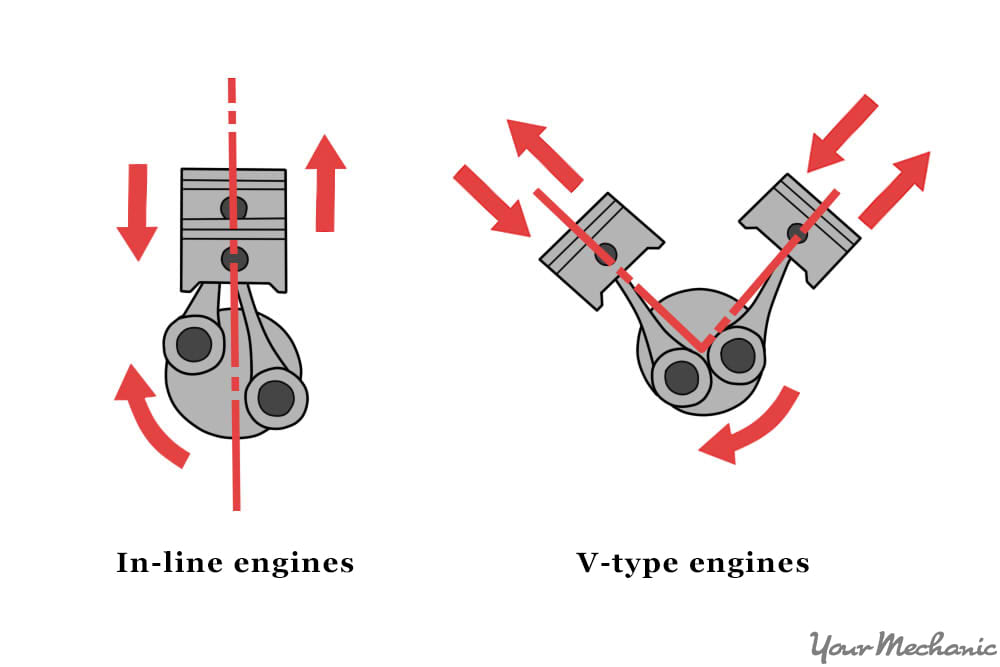
A cylinder is the central part of a reciprocating engine or pump, and is the space in which a piston travels. Multiple cylinders are commonly arranged side by side in an engine block. Different engine types have the cylinders arranged in different positions.
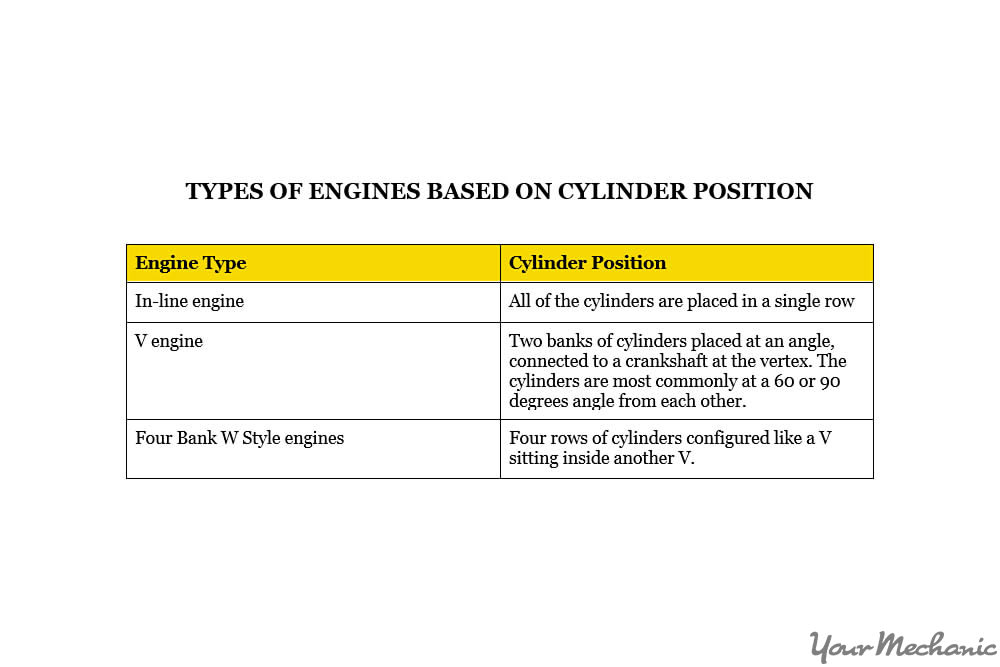
If you have an inline engine, number 1 cylinder would be closest to the belts. If you have a “V” engine, do some research to find a diagram of the engine cylinders. All manufacturers use their own method of numbering cylinders, so check the manufacturer’s website for more information.
Part 2 of 4: Test the coil pack
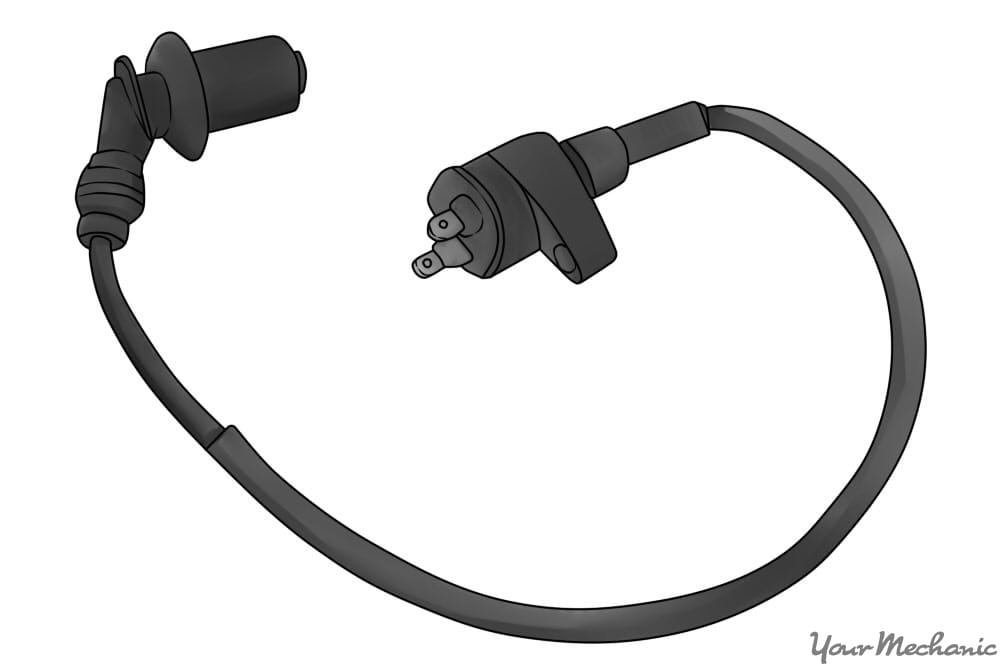
The coil pack produces the high voltage needed for the spark plug to create a spark that starts the process of combustion. Test the coil pack to see if it is causing the misfiring problem.
Materials Needed
- Dielectric grease
- Ohmmeter
- Wrench
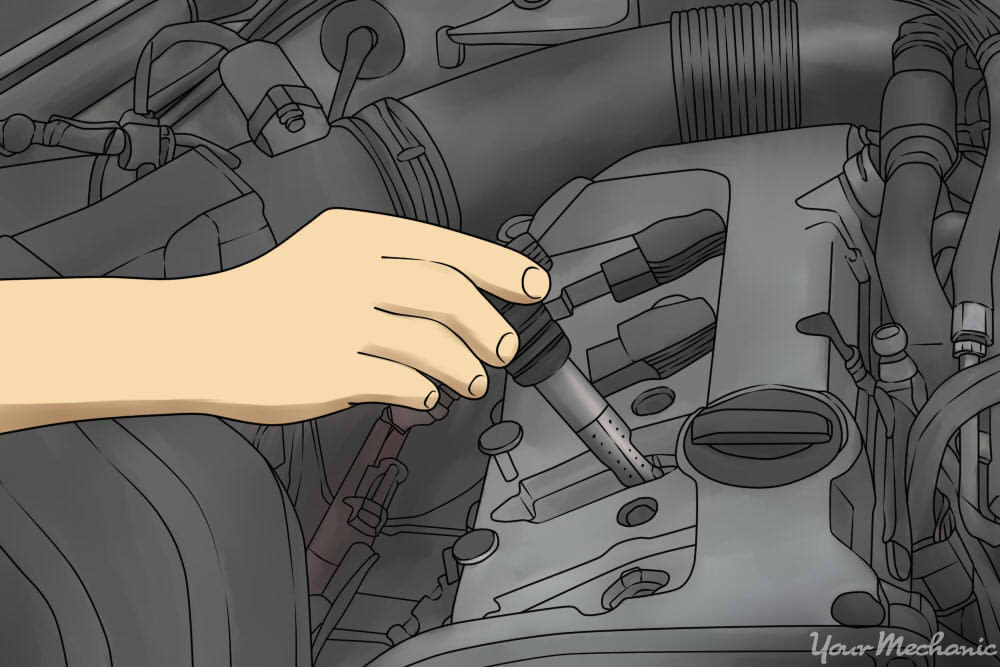
Step 1: Locate the spark plugs. Access the coil pack in order to test it. Turn off the car's engine and open the hood.
Locate the spark plugs and follow the spark plug wires until you locate the coil pack. Remove the spark plug wires and label them to make it easy to install them again.
Tip: Depending on the make and model of your car, the coil pack might be at the side or the back of the engine.
Warning: Always exercise caution when working with wires and spark plugs.

Unbolt the coil packs and remove the connector. Visually inspect the coil pack and the boot. When a high voltage leak occurs, it will burn the surrounding area. The usual indicator of this is discoloration.
- Tip: The boot can be replaced separately, if available. To correctly remove the boot from the spark plug, firmly grasp it, twist and pull it off. If the boot is old, you may have to use some force to twist it off. Do not use a screwdriver to try to pry it off.
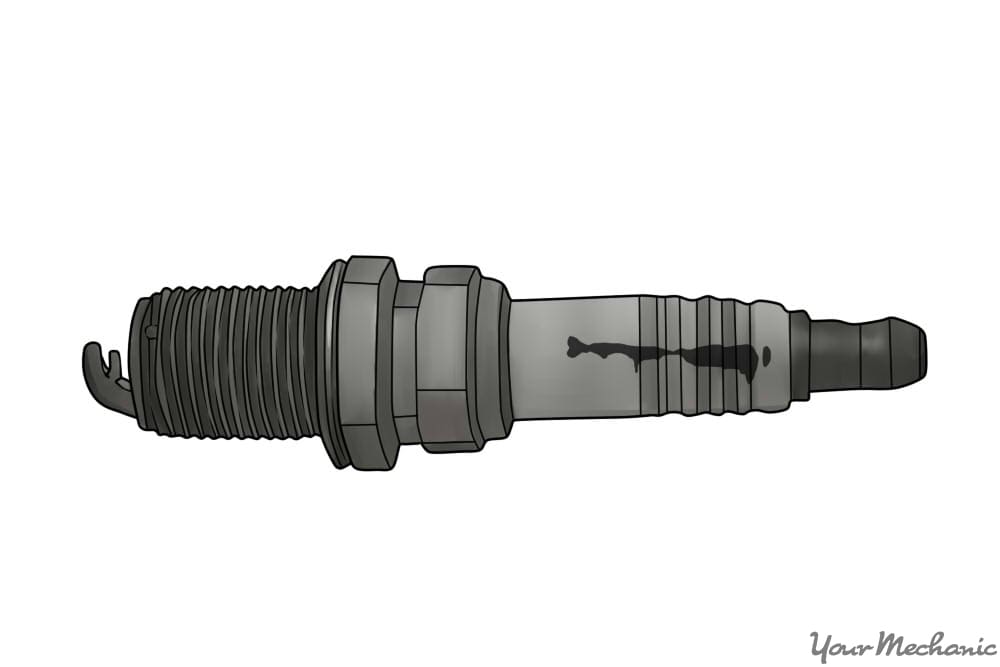
Step 2: Check your spark plugs. Look for carbon tracking in the form of a black line running up and down the porcelain portion of the plug. This is evidence of the spark traveling down the plug to ground and is the most common cause for an intermittent misfire.
Step 3: Replace the plug. If the spark plug is misfiring, you may want to replace it. Ensure that you use dielectric grease when you install the new spark plug.
Dielectric grease or silicone grease is a waterproof, electrically insulating grease made by combining a silicone oil with a thickener. Dielectric grease is applied to electrical connectors, as a means of lubricating and sealing rubber portions of the connector without arcing.
Step 4: Remove the coil pack. Remove the bumper panels and the crash bar to enable easier access. Remove the three torx headed bolts from the coil pack that you are going to remove. Pull out the lower HT lead from the coil pack that you plan to remove.
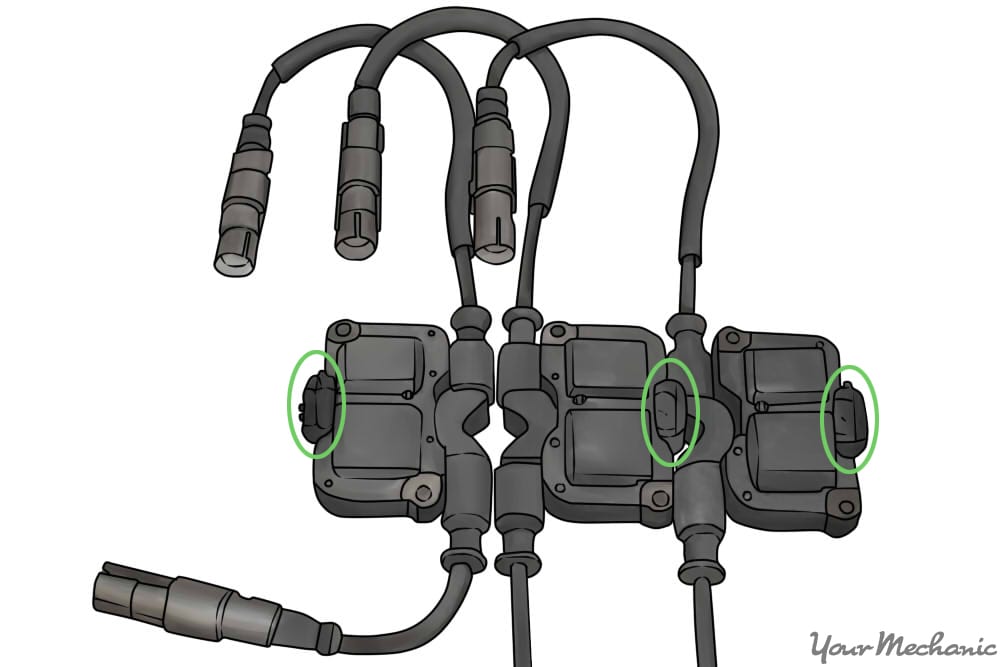
Unplug the electrical connectors of the coil pack and use a wrench to remove the coil pack from the engine.
Step 5: Test the coils. Leave the coils unbolted and just barely resting on the plug. Start the engine.
- Warning: Make sure no part of your body is touching the car.
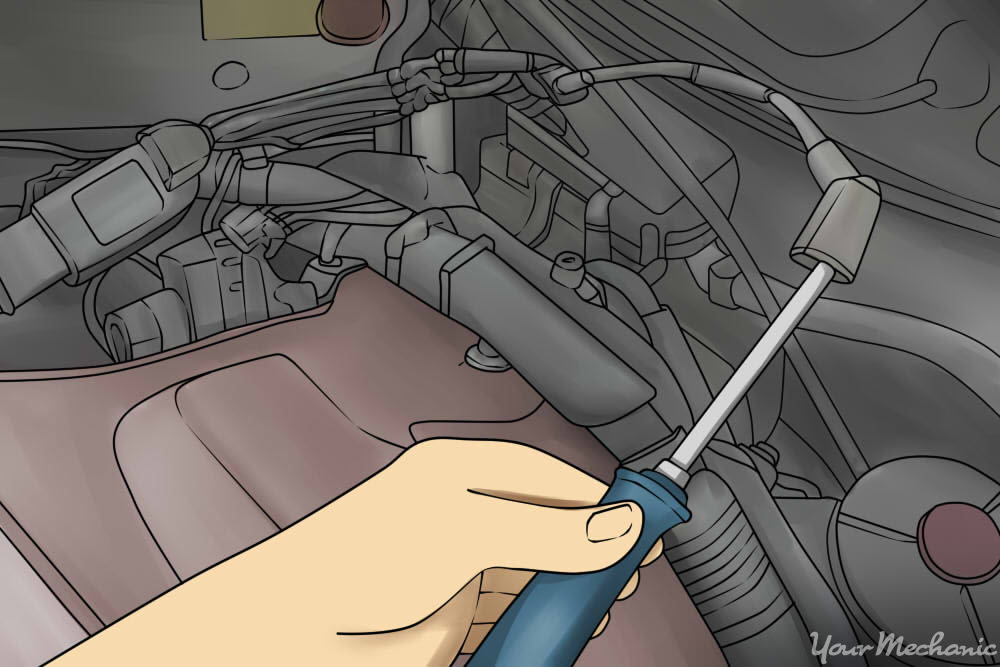
Using an insulated tool, lift the coil up by about ¼ of an inch. Look for electrical arcs and listen for a snapping noise that may indicate a high-voltage electrical leak. Adjust the amount you lift the coil to get a loudest sounding arc, but do not lift it by more than ½ an inch.
If you see a good spark at the coil, but not at the spark plug, then the problem may be caused by either a bad distributor cap, rotor, or carbon point and/or spring, or plug wires.
Look down in the spark plug tube. If you see the spark going to the tube, the boot is bad. If the arc slowing gets weaker, or goes away, the coil pack is bad.
Compare all the coils and determine which one is faulty if any.
- Tip: If half of your coils are underneath the intake manifold, and that is where the misfires is, remove the intake, replace the plugs, take the known good coils from the accessible bank and put them under the intake. Now you can load test the questionable coils.
Part 3 of 4: Test the spark plug wires
The spark plug wires can be tested in the same way as the coils.
Step 1: Remove the spark plug wire. First remove the wires from the plugs and look for obvious signs of a high voltage leak.
Look for cuts or scorch marks on the wire or on the insulation. Check for carbon tracking on the plug. Check the area for corrosion.
- Tip: Use a flashlight to visually inspect the spark plug wires.
Step 2: Test the wire. Rest the wire back on the plug to prepare for load testing. Start the engine.
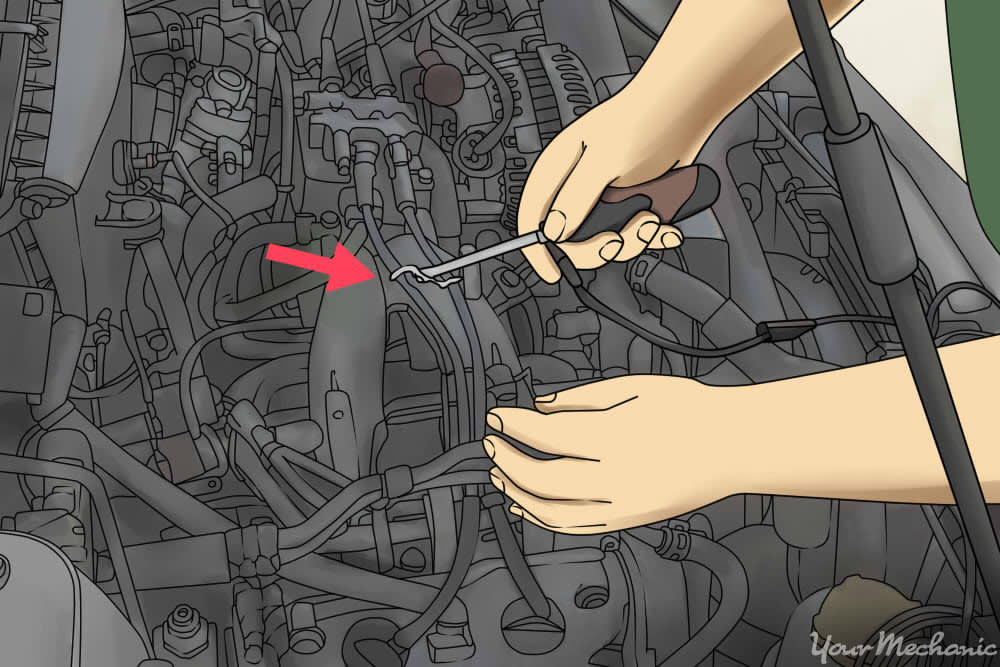
Use an insulated tool to lift the wire off the plug, one at a time. Now the whole wire and the coil that supplies it is loaded. Use a jumper wire to ground an insulated screwdriver. Gently drag the screwdriver down the length of each spark plug wire, around the coil, and the boots.
Look for electrical arcs and listen for a snapping noise that may indicate a high-voltage electrical leak. If you see an electrical arc from the wire to the screwdriver, the wire is defective.
Part 4 of 4: Distributors
A distributor's job is to do as the name implies - distribute electrical current to individual cylinders at a predetermined time. The distributor is connected internally to the camshaft, which operates the opening and closing of cylinder head valves. As the camshaft lobes rotate, the distributor is powered, spinning a centralized rotor that has a magnetic ending which triggers individual electrical lobes as it spins in a clockwise direction.
Each electrical lobe is attached to a corresponding spark plug wire that distributes electrical current to each spark plug. The placement of each spark plug wire on the distributor cap is directly correlated to the engines firing order. For example; a standard V-8 General Motors engine has eight individual cylinders. However, each cylinder fires (or reaches top dead center) at a specific time for optimal engine efficiency. The standard firing order of this type of motor is 1, 8, 4, 3, 6, 5, 7, and 2.
Most of today's modern cars have replaced the distributor and points system with an ECM, or electronic control module that does a similar job to send electrical currents to each spark plug.
What causes spark loss issues with a distributor?
There are three specific components inside the distributor that may cause a lack of spark at the end of the spark plug to appear.
A broken distributor cap Moisture or condensation inside the distributor cap Broken distributor rotor
In order to diagnose the precise cause of the distributor failure, follow the steps outlined below.
Step 1: Locate your distributor cap. If you have a vehicle made before 2005, it is likely that you have a distributor and thus, a distributor cap. Cars, trucks and SUV's built after 2006 are more likely to have an ECM system.
Step 2: Inspect the outside of the distributor cap: Once you have located your distributor cap, the first thing you should do is complete a visual inspection to look for a few specific warning signs which include:
Loose fitting spark plug wires on top of the distributor cap Broken spark plug wires on the distributor cap Cracks along the sides of the distributor cap Verifying that the distributor cap clips are solidly attached to the distributor cap Determining if there is any water surrounding the distributor cap
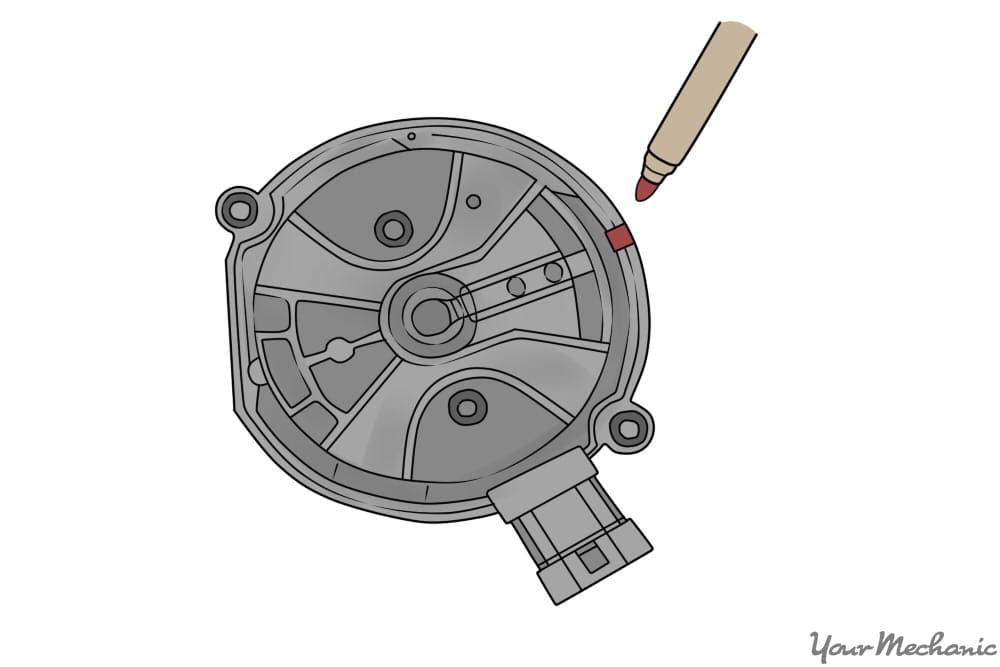
Step 3: Mark the location of the distributor cap: Once you've inspected the outside portion of the distributor cap, the next step will be to remove the distributor cap. However, this is where the inspection and diagnosis can get tricky and may cause more problems if not properly handled. Before you think about taking the distributor cap off, make sure you mark the location of the cap precisely. The best way to complete this step is to grab a silver or red colored marker and draw a line directly on the edge of the distributor cap, and the distributor itself. This will ensure that when you replace the cap, it's not put on backwards.
Step 4: Remove the distributor cap: After you've marked the cap, you'll want to remove it to inspect the inside of the distributor cap. To remove the cap, you'll simply remove the clips or screws currently securing the cap to the distributor
Step 5: Inspect the rotor: The rotor is the long piece in the center of the distributor. Remove the rotor by simply sliding it off the contact post. If you notice that there is black powder located on the bottom of the rotor, this is a good indicator that the electrode is burnt and needs to be replaced. This could be the cause of the spark issue.
Step 6: Inspect the inside of the distributor cap for condensation: If you've checked the distributor rotor and found no problems with this piece, it is possible that condensation or water inside the distributor might be causing the spark problem. If you notice condensation inside the distributor cap, you'll need to purchase a new cap and rotor.
Step 7: Check the distributor for proper alignment: There are some instances where the distributor itself will become loose, which will impact the ignition timing. This does not impact the distributor's ability to produce a spark often, however, there are some instances where it might.
A misfiring engine is usually accompanied by a critical loss of power, which needs to be corrected promptly. It can be difficult to identify the cause of the misfiring, especially if the misfiring occurs only in certain conditions.
If you are not comfortable with performing this diagnosis on your own, get a certified technician from YourMechanic to inspect your engine for you. Our mobile mechanic will come to your home or office to determine the cause of the misfiring engine and provide a detailed inspection report.